Showing posts with label peanut butter cups. Show all posts

Wednesday, October 08, 2008

Chocolate Treats & Menu Planning

CHOCOLATE PEANUT BUTTER CUPS: I promised chocolate peanut butter cups for this weekend's brunch - so I threw a bunch of confectioner's sugar in the Kitchen Aid and then realized I should have measured -- I ended up adding nearly 2 cups (a whole jar!) of peanut butter and then scooped out 105 centers. Yikes. I ran out of chocolate (yes - really! I know! Isn't it shocking!).

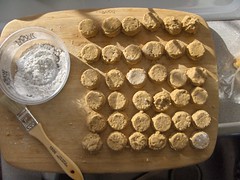
This time, however, I modified my Peanut Butter Cup recipe a bit - instead of crushed graham crackers, I used ground raw flax seeds. It works quite well - it gives a little nutty crunch, blends in with the peanut butter and the chunks of pink Hawaiian salt and makes the candy gluten free and wheat free.

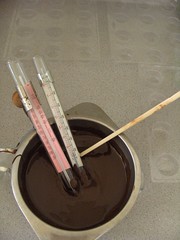
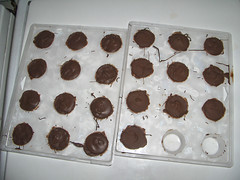
CHOCOLATE DIPPED CANDIED APRICOTS: I pulled out the candied apricot halves from the fridge. They rattled in the container. I let them warm up but they were still quite firm - a bit over candied but I thought they would soften up after being dipped in chocolate. The result were delicious, very chewy and possibly dangerous treats. Tonight I sliced up the chocolate dipped halves into strips and am redipping and melting the chocolate from them -- they are much more manageable as small strips and will definitely go farther for brunch on Saturday.

BRUNCH & RUMBA-POTLUCK: Yes. Food. I have planned some treats including:
  • Chocolate dipped candied apricot spears
  • Chocolate peanut butter cups
  • Rhurbarb crisp
  • Fig tart with semolina-lavender crust
  • Breakfast potatoes
  • Tomatoes "a la Provencale" (because it's easy and I have all the ingredients in my garden!)
  • DIY waffles with "Joy of Vegan Baking" recipe
  • Roederer champagne mimosas (if I can find fresh fruit at a farmer's market for juice)
If that isn't enough, I have also planned to host a rumba jam starting after 4pm. The foods for that will include several fillo based dishes because I am lazy:
  • Onion-olive pie (with fillo instead of bread dough because it will be easier)
  • Spanakopita with Spinach & Dill (sheet this time instead of hand pies)
  • Zucchini & mushroom tart (more fillo!)
  • Sliced fresh tomatoes
  • Pasta salad with fresh tomatoes, arugula & basil pesto
RECIPES:
Onion-olive pie:
I found some darling small yellow onions about the size of my Moscovich Extra Early tomatoes -- those will be sliced up into rings for the onion pie (all 5#) and caramelized in a dutch oven on the stove with olive oil, then tossed with fresh thyme, oregano and black olives and sealed up in fillo and baked until the fillo is crispy.

Spanakopita: basically the same recipe as "Vegan With A Vengeance"

Zucchini & Mushroom tart: I think tofu is going to be involved here, but haven't decided quite on the recipe yet.

POTLUCK: Everything is a potluck at my house. Bring food. Bring drinks. Bring napkins, plates, cups. Pitch in, eat up, enjoy. I have several RSVPs and some promises of delicious contributions. James' conga friends Sam and Richard are coming - Sam always brings two armfuls of pain d'epi from Acme Bakery - it's fresh, delicious and the epi style makes it easy to tear off a single serving piece without a knife. I imagine Richard will bring his popular Chinese Chicken Salad. Chef Eric tantalized me with the idea of some kind of tempeh enchilada, "but you never know what will happen."

I promise photos! Really!

Tuesday, June 10, 2008

Chocolate Peanut Butter Cups

vegan chocolate peanut butter cups

VEGAN DARK CHOCOLATE PEANUT BUTTER CUPS

Before you begin, you'll need
  • mini-cup candy mold, mini-muffin mold (optional for "Quick & Dirty")
  • candy thermometer (optional for "Quick & Dirty")
  • double boiler
  • kitchen scale
  • small pastry brush or (new) paintbrush
  • rubber spatula, measuring cups, bowls
  • parchment paper

SustainLane - Peanut Butter Centers

For the filling:
1/3 cup graham cracker crumbs
3/4 cup powdered sugar
3/4 cup natural crunchy peanut butter (no added sugar)

Optional:
1-2 Tb coarsely ground pink Hawaiian sea salt (big crystals for effect)

  1. Make your centers by sifting the powdered suger through a wire mesh sieve or flour sifter to break up all the lumps.
  2. Blend the filling ingredients in a bowl using a stand or hand mixer, until it resembles cookie dough. Depending on your ingredients, you may want to add more or less peanut butter or powdered sugar. Feel the filling with your fingertips - does it hold together enough (too sticky or too crumbly are not good).
  3. Optional: Add your coarse pink sea salt - this adds a great burst of flavor that goes really well with peanut butter and chocolate.
  4. Make all your centers before you melt your chocolate. Measure out about 1TB for each center - find a spoon or gadget that works. A melon baller makes just about the right size and a shape that fits into the cups perfectly. If you don't have a mold or mini-muffin tin, roll out the centers into balls -- leave them round or press them into patties.
For the chocolate coating:
1 pound chocolate couverture

NOTE: I recommend Sweet Earth Organic Chocolates for vegan, soy-free dark chocolate

Melting chocolate doesn't have to be complicated or intimidating. It's true that if you don't temper chocolate correctly, you'll have light gray-ish streaks and it wouldn't be fit to serve on a plate at a fancy restaurant. Let's face it -- you're going to eat it anyway.

TIP: The important thing is not to add water to chocolate (that ruins it) and don't over cook it.

tempering the chocolate HPIM4191

  1. Set up a bowl of ice water that will hold your double boiler or heatproof bowl. This is where you'll cool down the chocolate to stop it from cooking while you are working with it.
  2. Put a cup of water in your pan and start it to boil.
  3. Put about 12 oz of your chocolate in your double boiler or heat proof bowl over the boiling water. Let it melt and keep an eye on the temperature - you don't want it to get over 118 degrees.
  4. Once the chocolate has melted, take it off the heat and add the remaining 4 oz of chocolate. Stir gently until it melts and then put it over the cold water bath.
  5. Once the chocolate has cooled to 90 degrees or so, dip your centers and lay on waxed paper OR use your brush to cover the sides of your muffin tin.
  6. Don't use too much chocolate or it will just drip down and become uneven. If it drips down into the bottom right away, your chocolate is still too warm. Once the sides of your mold are covered in chocolate, coat the bottoms.
  7. Chill the mold a bit in the freezer or refrigerator - check for areas you may have missed and give another coat of chocolate. Chill again to set if necessary but don't chill to the point where the chocolate is cold and will crack.
  8. Add your centers to the mold, press gently -- you don't want to crack the chocolate.
  9. Once all the centers are placed, brush the tops with chocolate - sometimes you can dribble it off the spoon back. You may need to rewarm the chocolate a bit if it has cooled too much. You might even be able to top each one with a goji berry or two...
  10. Cool the chocolates -- in the refrigerator or freezer. Once they are set, turn them out onto a clean dish towel. These will keep for weeks in the refrigerator or longer in the freezer.
Chilled homemade chocolate peanut butter cups make a great summertime treat!