Tuesday, July 20, 2010

Stuffed Pattypan Squash on Couscous


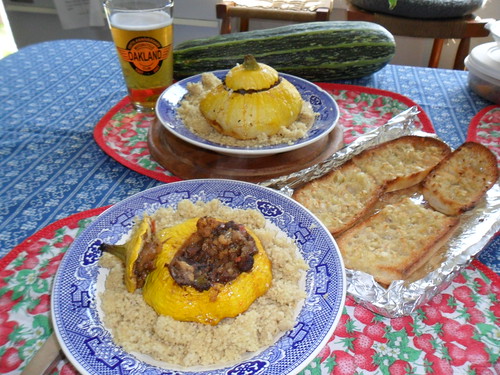
As any gardener knows - if you blink, your squash will get HUGE.  My sunburst (aka pattypan) squash got to be quite ginormous.  So, of course - I immediately decided to stuff them! 

After reading through some recipes, I decided - you can pretty much stuff the squash with whatever you want as long as it won't be overcooked (or undercooked) by the time the squash itself is cooked to your liking.

4 Overgrown Pattypan Squash:  
  • use a melon baller to scoop out the seeds and pithy part, leaving about 3/4" thick squash all the way around.  
  • steam the squash (not necessary to steam caps), til they were just tender then removed them to a baking sheet.

Here's what I stuffed into the squash:
  • sauteed garlic (3-4 cloves)
  • chopped sweet onions & sweet red peppers - about 1.5 cups
  • very small cut up cauliflower florets - about 2-3 cups
  • squash - about 1.5 cups cocozelle cut into 1/4" bits
  • "Savvy Stir-Ins" Shitake Mushroom & Herb seitan bits - about 1/2 package
  • 4 cups vegetable stock, use as needed
  • vegan worcestershire sauce, 2-3 Tb
  • olive oil as needed
  • fresh or dried herbs - I used fresh rosemary & sage
  1. I first softened up the garlic, onions & peppers, then added the cauliflower & squash -  til they started to sweat a bit, then mixed in the Savvy Stir-ins (make sure you bust them up really well).  
  2. Deglaze with veggie stock, turn down the heat and simmer.
  3. Add stock til the savvy stir-ins are soft and the veggies are where you want them - and you should get a nice rich dark sauce.  You can always thicken it up with some instant gravy, arrowroot, flour or other starch.
  4. Fill the squash and roast for 15-20 minutes til bubbly and squash very soft.
  5. Serve squash on bed of couscous - prepared to your liking.  I cooked my couscous with my homemade veggie stock, next time I might mix in some Ras al Hanout or some Bharat into the couscous for a little excitement.  Yum!


    Monday, July 12, 2010

    Crunchy-Crispy Kale & Fennel Salad

    It's a fact that kale is one of the most nutritious foods you can eat - it provides both a high level of nutrition AND a high level of satiation/satisfaction for very few calories. Raw kale provides a powerhouse punch of Vitamin A and Vitamin C, as well as carotenoids and chlorophylls.  Want to make your body happy? Make this delicious salad - you can make up a big batch of it and it will keep in the refrigerator for several days!

    Ingredients:
    • 1 large bunch lacinato or dino kale (remove stem & chiffonade to 1/8", give a few coarse cross-chops)
    • 1/2 large red bell pepper, thinly sliced & cut into 1" pieces
    • 1/2 large red onion, finely sliced and coarsely chopped
    • 1/2 large fennel bulb (or 1 small - to your taste!), thinly sliced & coarsely chopped
    • 1/4-1/2 c Meyer lemon juice
    • fresh rosemary & oregano to taste, finely minced
    • 2-5 cloves garlic, pressed or very finely minced
    • 1/4 c capers, rinsed & coarsely chopped
    • 1/4 c pitted kalamata or nicoise olives, coarsely chopped (optional)
    • extra virgin olive oil to taste
    • fresh ground black pepper to taste
    Instructions:
    Really, all the work here is in chopping up the vegetables.  Once you have the vegetables in the bowl, add a small handful of coarsely chopped capers (rinsed!) and olives.  Drizzle with the lemon and olive oil, toss to coat, add chopped herbs and pepper to taste.  If you are storing it in the fridge, remember to toss it every so often to move veggies down to the small puddle of dressing in the bottom of the bowl.  This salad keeps very well for several days and is very satisfying!

    A quick visit to a nutritional calculator provided a rough estimate that this entire salad is about 600 calories - less if you use less than 4 Tb olive oil!

    This post is currently featured guest post on Dog Island Farm!

    Tuesday, July 06, 2010

    Vegan Camping Guest Posting on Dog Island Farm

    Today, one of my blog entries on vegan backcountry cooking/camping was featured on the Dog Island Farm blog.  I'm going to make up a few more entries to post to their site (and mine) so stay tuned and check out their really cool blog!

    Thursday, June 24, 2010

    Cantaloupe Sorbet & Snacks

    As if cantaloupe isn't good enough on its own - I had the bright idea to chunk up half a cantaloupe and froze it on a cookie sheet while I made dinner.  Then I put the frozen pieces into the ole reliable Breville blender with a bit of agave to lubricate the works and pureed the heck out of it.  I scraped it into a 9" x 9" light aluminum (no nonstick -yuk!) pan and put it back into the freezer.  Stir every 15-20 minutes or so and you'll have sorbet for 4 as soon as you all finish eating dinner. 

    I really had to resist the urge to throw in frozen strawberries, too! 

    This morning I sliced up the remaining cantaloupe to throw in the dehydrator - just three weeks til my 4 week motorcycle road trip, so I better get moving on the food prep and meal planning!

    Wednesday, June 23, 2010

    The Last of the Enchiladas Verdes!

    I love summer but honestly, I am so very much looking forward to fall when I can get more chiles and tomatoes.  I've now just used up the last of my green enchilada sauce on a casserole dish of enchiladas stuffed with summer veggies.

    The beauty of having a stock of homemade red and green enchilada sauce in jars is that I can make up the enchiladas with whatever I have at hand - I have used tofu, seitan, potatoes, any number of veggies, nut cheeses - you name it. I end up making enchiladas with the same stuffing maybe twice - and then move on. Here are instructions for tonight's dinner of:


    Summer Veggie Stuffed Green Enchiladas

    Ingredients:
    1/2 med-large red onion, 1/4" dice
    1-2 summer squash, 1/4" dice (you need about one generous cup of diced squash)
    3-5 orange & white Chantenay carrots, 1/4" dice
    3/4 cup corn kernels (froz or fresh)
    4 cloves of garlic, pressed or finely minced
    1 serrano chile, stemmed & seeded, finely minced
    1/2 cup nutritional yeast
    1 Tb cumin seed
    1/2 tsp whole white pepper
    extra virgin olive oil, as needed
    2 pint jars of green enchilada sauce
    1 c toasted pumpkin seeds
    1 package corn tortillas (12 ct)

    Directions:
    1. Heat up a large cast iron skillet with 2 Tb or so drizzled olive oil.
    2. Sautee the carrots until they start to get browned and soften.  
    3. Add chile, onions & garlic and sautee til soft. Stir to prevent sticking.
    4. Add squash & corn.
    5. In a separate dry pan, toast the cumin seed and white pepper - grind in a spice grinder and add to the cooking veggies.
    6. In the dry pan, spread the pumpkin seeds and toast - medium flame, move them to keep them from burning but not so much as to dissipate heat.  They should pop like popcorn.  Once they are toasted, remove from heat in a cool dish (they will continue to cook and scorch in the hot pan).
    7. Spread 1/2 c of enchilada sauce in the bottom of a 7" x 11" glass baking dish.  Put one tortilla in the pan, spoon some filling onto it.  Make sure it goes all the way out to the edge and roll it up.  Push it to the end of the pan.  The sauce on the outside of the tortilla helps soften it up and helps distribute the sauce a bit between the stuffed tortillas.  
    8. Fill the rest of the tortillas - just squish them in together - if you run out of space and have extra tortillas, usually I'll have 1 or 2 extra - shred the tortilla into bits, ladle more sauce on the enchiladas, and then place the tortilla bits in areas that have space or where tortillas may have split when you rolled them up. 
    9. Pour on the rest on the rest of the enchilada sauce, encouraging it to go down the sides into the ends of the stuffed tortillas with a spatula or spoon.
    10. Bake in preheated 350 oven for 20-30 minutes until tortillas are softened. Sprinkle generously with salted toasted pumpkin seeds and serve.

    Wednesday, June 16, 2010

    Backcountry Vegan - Prep for 4 Week Road Trip

    In just 4 weeks, I hop on my motorcycle to begin a four week road trip that has three legs - going from Oakland to Southern California by motorcycle, then by moving van to NE Ohio and then return to California on motorcycle via Memphis, New Orleans, Austin, West Texas, the Grand Canyon, the Eastern Sierras and Tioga Pass.

    Since this isn't quite the same as a backpacking or camping trip - I'll have plenty of opportunity to seek out local natural grocery stores & farm stands, plus I'll be staying with family and friends at least half of the nights on the road.

    Clearly, bringing everything for 4 weeks would be impractical and unnecessary.  So, then what do I need to bring? Here are the limitations & opportunities I identified:
    • Space Limitations:  while I can carry more stuff in my bicycle panniers, and in the stuff sacks that I will attach to the luggage rack.  I'd rather bring tools & a spare tube than a gallon bag of bulky dried apples.
    • Weight Limitations: are not the same as backpacking but still a consideration.  I can pack liquids in stainless steel bottles that will be safer from crushing & heat than plastic that I took on the trail in April.
    •  Spoilage: same sort of issues as backpacking, but I will be traveling in much greater heat than Kauai in April.  Temperatures across the Midwest & South are pretty insane right now (yes, I will be doing some parts of Texas in the dark/pre-dawn). That means no matter how tempting those farmstand peaches - just buy enough to eat by the end of the next rest stop or that evening because they will not travel.
    Preliminary Preparations:
    • Coffee cone & filters, assam tea, mesh strainer & chai spices - it's always nicer to make your own hot beverages at camp in the moring.
    • Pasta, couscous & quinoa - enough for several meals, easily replenished at the bulk section of a natural grocery store.
    • Oatmeal, dried fruit (blueberries, strawberries, raspberries, raisins, cantaloupe, persimmons) & granulated maple sugar -  yes, it will be much easier to make oatmeal than to wait around for quinoa for breakfast.
    • Dried veggies (squash, onions, peppers, tomatoes, porcini & shitake mushrooms, carrots, turnip, beet) - about 1 gallon bag of the dried veggies & fruit in their own wax paper bags.
    • Road's End Organics gravy packets
    • Fresh garlic
    • Olive oil & Meyer lemon zest
    Meals that I anticipate making for myself will include pretty easy stuff like:
    • pasta & marinara: a small can of sauce along with my dried veggies & pasta makes a pretty good meal!
    • mushroom & veggie gravy on mashed potatoes - maybe with seitan sausage or chunks from the store means I can have seitan for breakfast the next morning, too!
    • veggie soup with udon noodles or pasta & bread
    • roasted or veggies from local farm stand, cooked with my spices & olive oil - great sandwich fixings for lunch the next day
    • "Special of the Day" - you never know what you'll find in local groceries and it is summer - I might end up with the sweetest corn, or giant peaches that I can grill over the fire at the campsite. 
    Recommendations? If you know of any good recipes, restaurants or natural grocery stores along my route - leave me a comment here.  I'm especially interested in veg-friendly restaurant recommendations for the east side of Cleveland, Ohio; Nashville & Memphis, TN; New Orleans, LA; Austin & Lubbock, TX. 

    Wednesday, June 02, 2010

    Surprise Apricot Sorbet!

    Since the cherry plum tree in my backyard is about a week away from 20 gallons of plums being ripe all at once, I reached into my freezer to see what I could use and make space for this season's fresh fruit.  One quart size bag of something somewhat orange or gold had a smeared label - I couldn't tell what it said at all.  Pumpkin? Persimmon? What?  I let it defrost and was delighted to discover - I had 3 cups of delightfully sweet apricot puree in my hands!

    Last summer, I picked a pile of amazing apricot's from my friend L's house - the skins are so delicate that I don't even bother to remove them when I make jam.  I filled my Breville blender with pitted apricots and froze the puree to use later.  The apricots were so sweet that I didn't even add sugar!

    Easiest sorbet ever - I reprocessed the defrosted puree in the blender to aerate it a bit, then poured it into 9" x 9" metal baking pan.  Put into the freezer.  Stir every 20 minutes or so to keep it from sticking to the sides. 

    Spoon it into  bowl when firm enough and eat with great contentment.

    Tuesday, May 25, 2010

    Backcountry Vegan Camp Meal: A Quinoa-nundrum on Grains

    Ah, quinoa - the mother of grains - packed with nutrition & protein and very few calories.  However, I discovered that cooking black quinoa (which I selected for sheer novelty) - took way too long to cook on the trail.  My meals with quinoa included:
    • quinoa with granulated maple sugar, raspberries & blueberries for breakfast
    • quinoa with vegetable broth, onions, zucchini, carrots & peppers
    The basic recipe is 1 c quinoa + 1.5 c water - 12 minutes for white and 15 minutes for black.  It didn't work - after 20 minutes, the quinoa was still quite hard.  Nothing attributable to elevation - sea level for both home and travel cooking attempts.

    For my subseqent attempts to cook quinoa on the trail, I soaked the quinoa til it sprouted - and then put it in a pot with enough water, covered it and simmered - it took the better part of 40 minutes before I moved to someone's campfire. 

    I cooked quinoa 3 times on the trail and each time was the same result.  I think I may try to dehydrate cooked quinoa to see if that works better on the trail.

    Oatmeal is definitely going in my pack next time! 

    Monday, May 24, 2010

    Backcountry Vegan Camp Meal: Tempeh & Green Bean Stew

    A quick trip to Trader Joe's can net some pretty healthy ingredients for a meal - I grabbed both tempeh and a tube of polenta (must have options) but when it came down to Friday night dinner on the tailgate of the truck, a single 2.5 qt pot and these delicious ingredients resulted in a very very tasty meal.

    Ingredients:
    • 1 package tempeh, cubed
    • 1 bulb garlic, peeled and coarsely chopped
    • 1 can diced Fire Roasted Tomatoes with chiles (TJ's brand)
    • 1/2 package of thin green beans, rinsed, trimmed and snapped into 1" to 1.5" pieces
    • dried herbs or several sprigs chopped or snipped oregano, rosemary and whatever herbs you can grab from the garden or where you are camping (rosemary and bay are pretty widely available in Northern California)
    • olive oil
    • red wine (whatever variety you have at the camp site) or water
    Instructions:
    1. Sautee the garlic til it starts to soften.
    2. Add the tempeh and cook until it browns.
    3. Add green beans, sautee til bright green - stir with wooden spoon
    4. Deglaze with a 1/4 c or so of red wine (to taste).
    5. Add chopped fresh herbs or dried herbs, pepper and salt to taste.
    6. Allow to return to simmer and reduce, then add can of tomatoes.
    7. Reduce heat, warm up to simmer and then serve!
    Delicious and filling!

    Friday, May 21, 2010

    Backcountry Vegan Camp Meal - Sweet Potato Pancakes

    Before I went on this trip, I strongly resisted the idea of traditional convenience breakfasts - like oatmeal - and was fantasizing about tasty & colorful brunchy delights.

    I steamed sliced & peeled sweet potato, pressed it through the ricer and dehydrated the sweet potatoes.  The dried cooked sweet potato seemed to pull a lot of moisture from the air, so I re-dehydrated and then powdered the sweet potato in my Breville blender.

    My idea was to use the powdered dried sweet potato to make a thick paste, sautee it on both sides to make it brown - and have little latkes.  I had some granulated maple sugar to sprinkle on top of it - sounds perfectly delicious, right?

    Since I did not test this recipe out before going on the trail, it could stand a little refining.  I used too much water and my patties did not brown as well as I had hoped and were a little squishier - but still quite delicious.

    Next time - using less water or perhaps shredded dried sweet potatoes (instead of steam blanched/dried/powdered) - I will try sprinkling the maple sugar on the patties before flipping them to help along the browning/caramelization process.  I'm also considering shredding/grating raw sweet potatoes, dehydrating and then frying them up rehydrated - they should cook up pretty well so it may well be time to test that recipe before my next trip!