My pre-trip reading list included these books, in no particular order:
Reviews coming soon!
Monday, May 10, 2010


REVIEW: The Girl With the Dragon Tattoo (Millennium #1) by Stieg Larsson (1-star)
It took me nearly 400 page to start to care about what was going on in this book - since I was a languages major, I always read through and confess to having read the last 40 pages or so when I was around page 250.
First, I have to say that this book could stand some real editing down. I agree with folks that it's hard to understand what the monetary values are - it would have been nice to have a little appendix with some of the figures - at the date this is set Kronor = X pounds = X dollars or whatever.
I didn't find the names of the characters all that confusing as some of the other reviewers did - names are just names, people! But why didn't they translate "Ms" - unless "Froken" has some hidden meaning - perhaps they should have explained the cultural context and the reason for not translating that in an appendix.
Yes - it was irritating to continually read gratuitous references of Mac hardware and applications (a URL in the book to a freeware app, REALLY???).
I agree with Anne's review of the movie - why did they change the name? "Men Who Hate Women" is much more appropriate.
The parallel character development - Martin and Lisbeth - was just not that well done. I have to admit when the book described how handsome he is - I was a bit amazed at the frumpy plain looking middle aged guy they picked to play Martin in the movie!
Despite the gore and violence depicted in the book - in the end, it felt like a lukewarm and overly long setup to create a super smart female hacker protagonist who embezzles money from a criminal to live happily ever after spending freely and traveling wherever she wants.
*yawn*
Another Cinderella story. Next, please!
REVIEW: The Girl With the Dragon Tattoo (Millennium #1) by Stieg Larsson
RATING: 1-star
Refurbishing Furniture... Green or Not?

It seems like I am spending a lot of time fixing up my furniture instead of buying new furniture. Due to problems with mold & mildew - I have to sand and fix up the back of my antique mahogany armoire. I'm regularly re-doing the 6' high kitty condo with new hemp rope & indoor outdoor carpet.

Sun damage on the arm in 2005 or so - within the next year, the seat cushion between
the black pillow and the kitty started to shred parallel to the length of the sofa.
Enter - the problem of the sofa. I bought it in 1998 or 1999 at Z Gallerie on Union St in SF. I loved this sofa to bits. It started showing sun damage on the fabric around 5 years of age, and by 8 or 9, the fabric on the seat was starting to fall apart and I kept it covered with a throw for well over a year before I realized that it needed to be recovered.
Of course I already thought of recovering it myself OR making a slipcover. Recovering the sofa would mean taking a class - which wasn't available. Being a single arm sofa would make it easier but there are all sorts of things that I just didn't know about - like how do you get the trim that is tacked around the whole sofa? How do you pleat the arm? What do you use to do all this? I know using my little heavy duty stapler would NOT be the answer - if it couldn't hold fabric and hemp rope onto a kitty condo for the long term, what good are 3/4" staples going to be on a sofa?
Making a slipcover - for a single arm sofa? Come on! How ridiculous would that even look? At a certain point - I realized that if I tried recovering it myself or making a slipcover - it would look like pure shit. Some things are better left to the professionals. However, I thought I would save money by looking for eco-friendly fabrics.
Bamboo is freaking expensive and is not available in upholstery weights when I looked.
After months of trying gave up on trying to find eco-friendly/sustainable/organic type of upholstery fabric, I gave up. From what I have read online, it seems like those fabrics are not not available to consumer and what's available to trade is more than $50/yard. At Britex, I bought a polyester ultrasuede for $19/yard to cover my sofa. Getting someone to do the recovering seems to be ridiculously expensive - it's a one-arm chaise and I was getting prices anywhere from $500 to $800. The damned thing cost $750 new!
I finally settled on a guy from craigslist who is charging $525 to recover my sofa - fabric cost over $100. It would be just as "cheap" to replace. Why does it cost so much to do the right thing? Is recovering the sofa the "right" thing? I have had it for over 10 years, afterall.

The finished result - note how the trim at the lower right/front leg is drooping - I had to tack it up with a stapler.
As it turns out - I was right. The Craigslist guy had tools that I didn't have or even imagine.. The stapler he used had very very long staples that were narrow and thin. While he did the work on the chaise in my own backyard, he made all the trim in the shop. In the end, the guy didn't do such a great job.
Though he still did better than I, the front of the single arm on the chaise didn't look right at all and there were plenty of bumps and such. I totally fell out of love with it in its new color (went from a red brocade which fell apart from sun damage & use after 7 years and which I draped for another 3) to a light grey-green.
I ended up selling it to a friend who admired it very much and almost covered the costs of fabric and recovering it.
I ended up selling it to a friend who admired it very much and almost covered the costs of fabric and recovering it.
Saturday, May 08, 2010
Potato Condo Harvest!
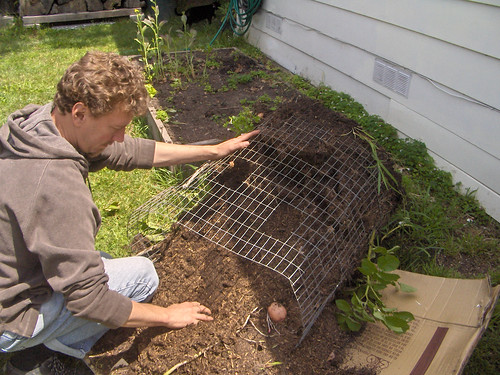
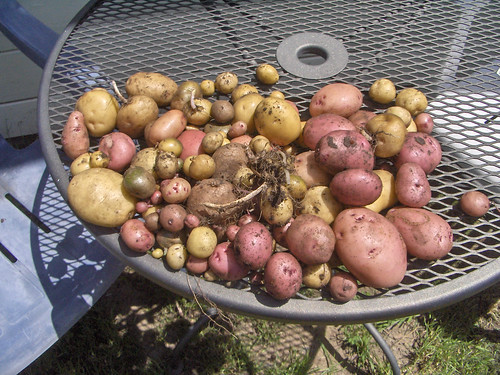
The Great Potato Condo Experiment - after growing potatoes for nearly a year, I wasn't quite sure when I should just knock it over and harvest. I do, afterall, live in a 365 day growing season (for potatoes, apparently) so none of the plants up and died or dried out on me as I expected as the signal that it was time. Over the past couple of months, I would find a few potatoes popping out of the wire mesh here and there - I even cut down the wire mesh by 2' because the soil compacted and slid out so much.
Finally, with James' assistance - it was time to harvest. As he said - $40 worth of dirt for $10 worth of potatoes. I saved the plants and some of the potatoes with sprouts and put it all into 3-gal nursery pots in a different area to continue growing potatoes - here are photos of the condo harvest.


Finally, with James' assistance - it was time to harvest. As he said - $40 worth of dirt for $10 worth of potatoes. I saved the plants and some of the potatoes with sprouts and put it all into 3-gal nursery pots in a different area to continue growing potatoes - here are photos of the condo harvest.

Thursday, May 06, 2010
Backcountry Vegan!
I've just returned from Maui & Kauai - I went backpacking on the Kalalau Trail. After reading through a huge pile of backcountry & backpacking cookbooks - I came to the dismal realization that most of them really don't meet my needs or my style of cooking (or sharing!). I am going to be refining my thoughts on backcountry cooking - focusing on using whole ingredients, prepping with a dehydrator, and cooking quantities based on need (little or very hungry, how many people are sharing?) and available ingredients and other resources. It seems more of a process than a recipe. I don't like the idea of schlepping a ton of plastic bags out to the wilderness, "cooking" in plastic bags or hoarding condiment packets.
In the next couple of weeks, I will put together a list of the food that I prepared in advance, what I bought locally, descriptions of some of the meals and what worked. I'll also be discussing some other ideas I have for vegan, whole foods cooking - that is more like the way you cook at home. None of this "spread peanut butter on a flour tortilla, roll up, eat" as a recipe -- I'll also write up reviews of the backcountry cookbooks that I read and point you to the single book out of more than half a dozen that I think is worth buying. So - stay tuned!
In the next couple of weeks, I will put together a list of the food that I prepared in advance, what I bought locally, descriptions of some of the meals and what worked. I'll also be discussing some other ideas I have for vegan, whole foods cooking - that is more like the way you cook at home. None of this "spread peanut butter on a flour tortilla, roll up, eat" as a recipe -- I'll also write up reviews of the backcountry cookbooks that I read and point you to the single book out of more than half a dozen that I think is worth buying. So - stay tuned!
Tuesday, April 13, 2010
Spring Foraging - Miner's Lettuce!
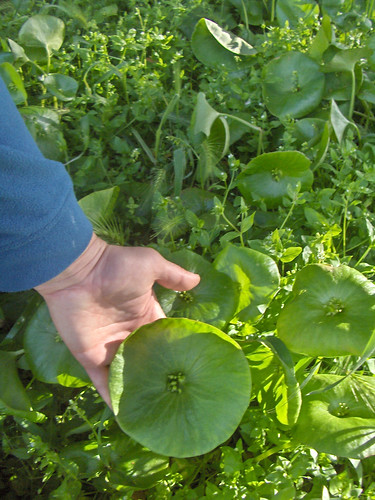
On a 14 mi loop around Briones Reservoir, I saw a few mushrooms (a couple candy caps!) and observed piles and piles of Miner's lettuce. Miner's lettuce is high in vitamin C - and it's pretty tasty. This Miner's lettuce was unusually big - I'm more accustomed to seeing it around the size of a fifty-cent piece.

Saturday, March 20, 2010
Shaker Lemon Pie
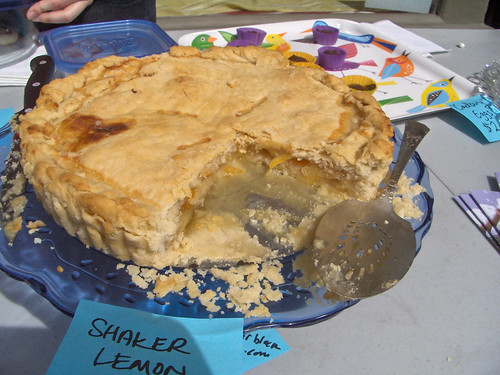
Meyer lemons are going crazy right now - they are everywhere! Instead of the basic zest & juice for freezer, lemon bars & lemonade, I wanted to try something different. I read some recipes for Shaker Lemon Pie - standard recipe for a double crust pie is - macerate 2 thinly sliced lemons (no seeds) in 2 cups of sugar for several hours or overnight, put the drained lemons into the pie crust and beat 2 eggs into the sugary syrup - pour on top and bake.
Since the East Bay Vegan Bake Sale was coming up - I wanted to do something with these gorgeous lemons and put together three versions of the pie.

INGREDIENTS & PROCESS:


Since the East Bay Vegan Bake Sale was coming up - I wanted to do something with these gorgeous lemons and put together three versions of the pie.
INGREDIENTS & PROCESS:
- 2-3 Meyer lemons, depending on size - slice thinly, removing seeds as you go, place into a bowl and cover with
- 2 cups of granulated sugar
- Strain lemons from sugary syrup and lay out in the pie crust
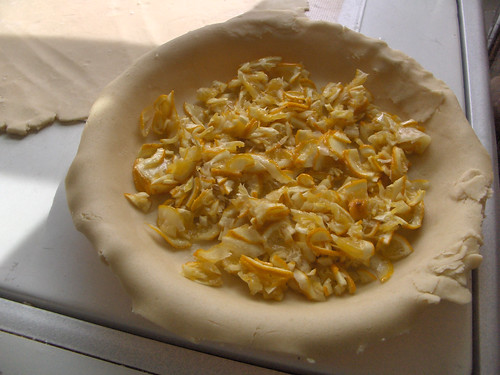
- Add 1/3 c of arrowroot and 2 Tb agar flakes to the sugar - beat very well and pour over the lemons in the pie shell.

- BAKE in preheated oven at 400 for 15 minutes, then reduce to 350 for 35-45 minutes.
- Deliver to your bake sale!

Tuesday, March 16, 2010
Powdered Milk Substitutes
Anyone out there have experience with a vegan powdered almond or coconut milk? I have done a few searches but most of the products seem to contain sodium caseinate (I'm allergic to dairy protein anyway so... no temptation to lapse veganism).
Tuesday, March 09, 2010
Savoy Cabbage Rolls Stuffed with Chanterelles, Spring Alliums & Arborio Rice
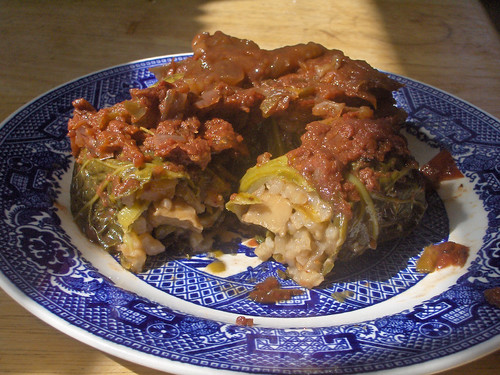
Mariquita's Mystery Box included a gorgeous head of Savoy cabbage - and after contemplating several ideas, including kim chi - I remembered my grandmother's cabbage rolls, read a few recipes and decided to approximate my grandmother's version using her recipe of Pottsville Relish which I have made up every year since college (so I always have some on hand til early summer, at least!).
Her cabbage rolls were stuffed with rice, onions and some ground beef, swimming in a sweet & sour tomatoey sauce. It was always the sauce and the cabbage part that I liked best - the tomato not too thick, not too sweet and still savory. Most of the recipes I read either called for using cooked rice or uncooked rice (and rolling looser rolls).
Since I'm a big fan of risotto, I liked the idea of letting the water from the tomato sauce finish the rice, so this recipe calls for partially cooking the rice. If you happen to have cooked rice on hand - by all means, use it (waste not, want not!). I'm a big fan of reserving extra rice from Thai or Indian take out for use in dinners the following day. :)
This recipe has two parts, the filling and the sauce. I have included alternate instructions for ingredients that you may not have on hand.
STEP 1: Cabbage
In a large pot,place sufficient water and a steamer basket, bring to boil and put your washed head of cabbage inside. If the lid won't fit, improvise with a stainless steel mixing bowl. Let the whole head of cabbage steam on a med-hi simmer while you prepare the filling. I turned my cabbage over once, let the water nearly boil down and left it on the stove with the lid on until the very end.
STEP 2: Filling
Pull out your two largest cast iron skillets - I used #8 and #10. In the smaller pan, drizzle enough olive oil to cover the bottom and heat on medium-high. Add
- 1 cup arborio rice
- 1 cup mushroom stock
- 1 tsp salt
- 2 Tb dried thyme
- Black pepper to taste
- 1/2 tsp smoked paprika
In your other, larger skillet, heat the pan with a drizzle of olive oil, add:
- 1 qt cleaned & coarsely chopped chanterelle mushrooms (about 1.5# - substitute for portobellas or shitake)
Next, add a bit more olive oil to the emptied skillet and reheat it, add:
- 4-6 spring garlic (white & green part), cleaned & chopped (or 3-4 cloves garlic, minced)
- 1 healthy spring red onion (whole thing!), cleaned & chopped (or 3/4 to 1 c. finely chopped red onion)
- 2-3 coarsely shredded or julienned/chopped spring carrots (about 1/2 - 3/4 c carrot)
NOTE: Taste your filling! Does it taste good? Do you just want to sit down with a bowl of it or reserve i as a side dish? Check your spices, adjust if necessary.
STEP 3: Sauce
After you have emptied the larger skillet of garlic, onion & carrot - return the pan to the flame and deglaze with:
- 1 c red wine (whatever you have open!) or mushroom stock
- 1 Tb crushed dried rosemary
- (optional) 1 Tb crushed dried oregano, marjoram or tarragon
- 1 Tsp cayenne pepper flakes
- 1 pint San Marzano Tomato Sauce or other unseasoned tomato sauce (open a quart jar of store bought sauce don't use the whole thing all at once!)
- 1 pint Pottsville Relish (alt - 16 oz can chopped tomatoes & peppers plus 1/4 c vinegar & 1/4 sucanat)
- 1/2 c light vinegar (champagne, white wine or apple cider)
- 1/2 c sucanat (or 50/50 granulated & brown sugar)
- salt & pepper to taste
- herbs to taste - finely chopped fresh parsley or oregano
- (optional) 2 Tb smoked red jalapenos packed in olive oil or chili oil to taste, or toast & grind a piece of chipotle pepper to add some smoky heat
At this point, your cabbage should be cooling off and your filling should be cooling off, too. I let my sauce simmer for about 30-45 minutes, your time may vary based on the amount of water in your tomato sauce (my tomato sauce was very watery!).
STEP 4: Assemble
Prep cabbage by pulling the leaves off. Using scissors, cut off the thickest part of the spine with a V-cut. Make a nice big stack of leaves on your cutting board or plate.
Your filling should be cool enough to handle - take some and form a small ball - maybe 1/4 cup. Place it in a cabbage leaf - fold up the cut ends across each other, then the sides, then firmly roll and place into the pan with the loose side on the bottom.
Repeat until you fill your pan.
Cover the rolls with the sauce from your skillet. If it seems a bit thick - add a bit more sauce from your reserve or from the extra half pint - smooth with the back of a spoon.
Cover the casserole with foil or a lid and bake at 375 for about an hour -- you want it to be nice and bubbly, with sauce thickening up on top, water from the sauce working down into the rolls to finish cooking the rice inside the rolls.
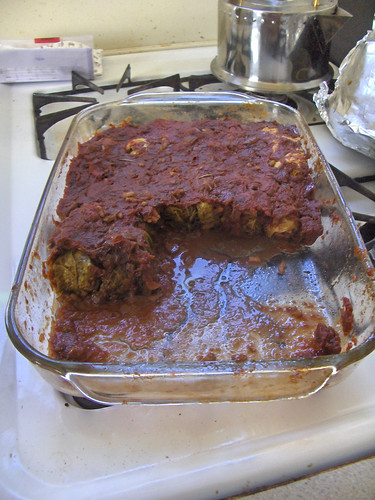
Leftovers Rule!
YIELD: 10 x 16 baking dish of 16-20 rolls, depending on your cabbage and how you roll'em! You could also put some rolls and sauce into glass or metal baking dishes to freeze and heat up later (yum!) - if you have that kind of space in your freezer!
Postscript: many of the ingredients came from my own yard (herbs mostly) or from Mariquita (carrots, spring garlic, red onion, savoy cabbage, San Marzanos for tomato sauce, red jalapenos that I smoked and preserved, sweet peppers & tomatoes in the Pottsville Relish, even the cayenne peppers that I dehydrated and made into flakes!).
Friday, March 05, 2010
Jenn & the Giant Chanterelles

The fallen oak branches protected these beauties on the periphery of the woods. I often find nice little flushes by this tree - very large mushrooms that are firm and integral. The one in my right is a mere 18 oz to the 22 oz in my left. I am standing up straight - it's the location that is crooked!
Subscribe to:
Posts (Atom)