Mushroom season is underway - despite all the rain we have had, the chanterelle season is lagging about six weeks behind last year's season. Last year I was harvesting 40-60 pounds of mushrooms/week by this time of year! This year - I'm lucky to come out with 4-6 pounds. Most of the chanterelles are closer to the edge of any given stand of trees where they get a bit more warmth, quite a few buttons.
Lots of other foragers are finding bonanzas in other areas but - being the creature that they are - they aren't giving up the information on where they are finding stuff! Hoping to head out to Salt Point State Park next week to look for black trumpets, hedgehogs, maybe some late porcini and other good stuff. Mushroom reports & pictures coming soon! I've sprayed my shoes & rain jacket with Scotch Guard just to be ready! Maybe I should go do my hat, too...
Sunday, December 26, 2010
Monday, December 20, 2010
Golden Chanterelle Stroganoff
If you haven't yet signed up for one of Chef Eric Tucker's cooking classes at Millennium, perhaps this will tempt you - Chanterelle Stroganoff. He said it was ok for me to reproduce this recipe, so here you go!
This is one of my favorite recipes - I have experimented with a few variations which I will mention below.
Chanterelle "Stroganoff" by Chef Eric Tucker
INGREDIENTS:
Make your own pasta - it's really not hard, and papardelle are wide strips that you want to cut by hand anyway. Rustic homemade noodles are divine!
This is one of my favorite recipes - I have experimented with a few variations which I will mention below.
Chanterelle "Stroganoff" by Chef Eric Tucker
INGREDIENTS:
- 1 yellow onion, sliced into thin crescents
- 2 cloves garlic, minced or pressed
- 2 Tb olive oil
- 1# cleaned chanterelles, sliced thin
- 1 tsp fresh thyme leaves
- 2 tsp paprika
- 1 Tb tomato paste
- 2 c vegetable or mushroom stock
- 1 Tb nutritional yeast (or more, to taste)
- 1 c cashew cream (make yourself with pre-soaked cashews, drain, blend with cold water, dash of salt and squeeze of lemon til you get a cream)
- juice of 1/2 lemon
- salt & pepper, to taste
- minced fresh dill
- lemon zest
- cooked papardelle (super easy to make yourself!)
- In a large skillet, sautee the onion in the olive oil over medium, stirring often until onion is medium caramelized.
- Add garlic & mushrooms, continue to sautee, stirring often until the mushrooms are dry.
- Add thyme & paprika, sautee 30 seconds, then deglaze with red wine.
- Add tomato paste, stock & nutritional yeast and simmer 5 minutes.
- Add cashew cream, simmer until thick.
- Taste & adjust seasoning.
- Toss the cooked papardelle with some olive oil.
- Place a portion of sauce over noodles, sprinkle with dill & lemon zest.
Make your own pasta - it's really not hard, and papardelle are wide strips that you want to cut by hand anyway. Rustic homemade noodles are divine!
Friday, December 17, 2010
Millennium Winter Mushroom Cooking Class 2011
If you have never attended a cooking class at Millennium - or even at all - I highly recommend getting behind the counter at Millennium with Chef Eric Tucker for his annual Winter Mushroom Cooking class. There's usually a pre-class foraging trip in addition to the pre-class Farmer's Market trip.
Winter Mushroom Cooking Class
Sunday January 9, 2011
10am-4pm (ish)
$155/person
Join Eric Tucker for a hands on cooking class in the Millennium kitchen. Spend the second Sunday of the new year creating multiple mushroom filled courses that you will then have the opportunity to sit down and enjoy family style. You will be working with mushrooms that Eric has foraged locally and you will have the opportunity to join Eric for a guided tour through the Ferry Building Farmers' Market on Saturday, January 8 at 10am.
Space is limited, please call Alison for a reservation 415.345.3900x13
Wednesday, December 15, 2010
Chanterelles & Israeli Couscous
Recipes often result from "what do I have in the house" - in my case, I am fortunate that I have a giant pile of chanterelles, plus kale growing in the yard and a well stocked pantry of dry ingredients. This is a quick and easy dish that you can make up using one pot and one skillet, substituting any mushrooms you like! This recipe can also be done fat-free since chanterelles throw off a lot of water.
INGREDIENTS:
INGREDIENTS:
- 1-1.5 pounds golden chanterelles (or other mushrooms) 1/2" dice or coarsely chopped
- 3 cloves garlic, minced
- 1/2 yellow onion, diced
- 1/2 c chopped parsley
- 1/2 c Tuscan or Dino kale, chiffonade into thin strips
- 1 c dry Israeli couscous
- 2 packets Road's End Organics herb gravy
- Veggie stock or almond milk, as needed
- 1 tsp dried thyme
- 1 tsp dried lemon zest or 1 Tb fresh lemon zest (or more, to taste!)
- Salt, black pepper, paprika - to taste
- Olive oil or sesame oil (optional)
- splash of dry sherry or cheap sake for deglazing
- Prepare the couscous in a separate pot with salted water or veggie stock, adding the lemon zest after liquid is about half reduced.
- Mix gravy packets in a measuring cup with 1 c almond milk, stock or water and put to the side.
- Sautee onion til soft, add garlic. When they are transluscent - and before garlic starts to burn - add chanterelles.
- Reduce heat and let chanterelles release liquid. If it gets a bit low, deglaze with sake, sherry (or stock/water/white wine).
- After chanterelles have gotten softer, add kale and parsley and spices.
- Allow chanterelles to cook down a bit more and as the liquid reduces, mix in the couscous and gravy mix. Thoroughly but gently toss and allow to cook down til thick. Add more stock/almond milk/water if needed.
Sunday, December 12, 2010
Candy Cap Blondies
Last month, after signing up for the culinary interest group for the Mycological Society of San Francisco, I found myself volunteering to help make desserts for the annual holiday dinner. The organizer and her other volunteer both live within a few blocks of me, so meetings were convened and e-mails flew back and forth. In the end, I brought a pile of delicious vegan desserts including: Mexican Chocolate Torte, Persimmon Bread Pudding with a Bourbon Anglaise sauce and Candy Cap Blondies using a recipe created by Eric Tucker for one of his classes at Millennium Restaurant (recipe below).
The dinner came off pretty smoothly - my friend Scott joined me and even loaned a hand (& tools) to help set up the xmas tree and set tables. There was so much food! We could have easily had more people there - and the East Bay location at the Albany Community Center had a fantastic kitchen and huge dining room. The chanterelle-quinoa stuffed portobello mushroom was really delicious, as were the mashed potatoes with *vegan* mushroom gravy and a delicious mushroom soup with loads of delicious mushrooms. My desserts partner made up about 20 different kinds of chocolate truffles, mini eclairs and cream puffs. Needless to say - I was very well fed and brought home much of my dinner for lunch the next day.
I am still eating some leftover desserts this week, as well - I hope you'll pop in for coffee and cake!
Eric's Millennium Candy Cap Blondies
INGREDIENTS:
- 1/4 c cocoa butter
- 1/3 c grapeseed oil
- 2 T ground dry candy cap mushrooms
- 1/4 c rice or almond milk
- 1 t vanilla extract
- 1 c brown sugar
- 1 1/2 c all purpose flour
- 1 1/4 t baking powder
- 1 t Ener-G egg replacer
- 1/4 t salt
- 1/2 t ground cinnamon
- 1/4 t ground nutmeg
- 1/4 t ground allspice
- 1/4 t ground clove
- 1/2 c pecans, lightly toasted and roughly chopped
- 1/2 c chocolate chips
- Place the first 5 ingredients into a double boiler and melt. Remove from heat and let steep for 20 minutes or so, then remove double boiler from hot water and let it cool.
- Sift dry ingredients together - except for pecans and chocolate chips.
- Add wet ingredients - at room temperature, not warmer - to dry ingredients. When mixed, add pecans & chocolate chips.
- Turn into lightly oiled pan lined with parchment paper, bake 22-24 minutes at 350. This will fit in a large loaf pan or a 9 x 9 pan if you like thinner blondies (which will need to be removed sooner than a deeper pan). Keep an eye on this - if you increase the recipe size, it will take longer. If you use a dark metal pan that holds more heat, they will cook faster and you will end up with cookie instead of blondie. You want to see the blondies puff up and get tall, filling the sides of the pan and becoming golden brown on top. A 3x batch fits a 13 x 9 pan and takes well over 40 minutes to achieve doneness!
Friday, December 03, 2010
Persimmons are BACK! - Persimmon Bread Pudding for BREAKFAST!
If you're like me - an avid forager & kitchen witch - you might wake up one morning to discover that 40 of the 212 persimmons you harvested and have spread out on cookie sheets, trays and the little cardboard trays that once held pint and half pint canning jars - are ripe and already have been discovered by the ants. Fortunately, the ants never get farther than under the little crown of four leaves at the stem and are easily evicted under running water.
After filling six dehydrator sheets with sliced persimmon, and putting 11 cups of persimmon pulp into freezer bags - you then discover that the gallon bag of croutons and the decidedly non-vegan chicken parts rescued from the freezer of a friend moving to Portland (to pass along to another friend for chicken stock - hey, the chicken is already dead!) - are taking up so much space that you don't have much room for more persimmon pulp in the freezer.
Then, the next morning - say, today - you wake up and find that only 3-4 persimmons, small ones at that, are really super ripe and it's not worth adding them to the dehydrator when you can kill two birds with one stone by using up some of those fabulous sourdough croutons.
Ladies & Gems - I give you:
Persimmon Bread Pudding
INGREDIENTS:
- 4 cups bread cut into 1"-1.5" chunks (last night's leftover baguette baseball bat is ok!)
- 3 cups almond milk (regular or vanilla)
- 2-3 small Hachiya persimmons so ripe that you have to take care not to pierce the skin with your fingertip
- 1/3-1/2 cup maple syrup
- 1 Tb ground cinnamon
- 1/2 tsp ground clove
- 1 tsp vanilla extract
- 1 cup raisins or currants or dried cranberries (or some other dried fruit - chopped dried apricots, nectarines or apples might be nice!)
- 3/4 coarsely chopped pecans
- Pour almond milk into your blender up to the 2 cup mark.
- Cut hachiyas in half and scoop out pulp with a big tablespoon, straight into the blender.
- Check the level - add more almond milk to bring it up to 3 or 3.5 cups.
- Add maple syrup (reserving 3 TB), cinnamon, clove, vanilla to the blender cup - put the lid on and process til smooth.
- Pour custard onto bread crumbs in a large mixing bowl - let soak 5-10 minutes, depending on how tough your bread is already. You want it to absorb a lot of the liquid and there will still be some liquid floating around.
- Mix in raisins and toasted nuts gently - don't mash up the bread!
- Transfer to a lightly greased gratin dish or baking dish - the depth of the dish affects the cooking time and the final outcome. If you like a soft, custardy bread pudding, use a deeper dish - if you like it to be a little more chewy and crispy, use a more shallow dish.
- Drizzle reserved maple syrup on top.
- Bake in 375 oven for 20 minutes - the bread pudding will bubble and get puffy - it will settle a bit after it cools.
Wednesday, November 10, 2010
Hot Kale Mess
There's nothing that nourishes like greens - a sweet & savory Japanese-inspired sauce makes this dish stand out to my friends (one friend always requests it as "that hot kale mess.") usually, it just means going out the garden to pull a bunch of kale & arugula, and adding it to the other ingredients in the house, I give you:
Pan-Seared Greens with Ginger & Mushrooms
INGREDIENTS:
DIRECTIONS:
Pan-Seared Greens with Ginger & Mushrooms
INGREDIENTS:
- 1 Tb rice wine vinegar or sake (if you want more sweet, instead of sour)
- 1 Tb sucanat
- 3 Tb soy sauce
- 3 Tb olive oil
- 3 cloves garlic, sliced or coarsely chopped
- 1 Tb minced fresh ginger
- 1 vidalia or red onion, cut into thin crescents
- 1 c sliced mushrooms - chanterelles, morels, oyster, shitake - whatever is fresh & local
- 1 small hot chili - sliced or 1 Tb cayenne flakes
- 1 small red bell pepper, seeded & julienned
- 6 cups coarsely chopped winter greens - chard, kale and arugula are my favorites (use scissors to cut out the coarse bits which may be finely chopped and added to the pan with the onions)
- Herbs - 20 basil leaves, or equivalent in other herbs that are fresh & local
- 1/2 c raw cashews
DIRECTIONS:
- In a small bowl or measuring cup, combine the first 3 ingredients. Set aside.
- Heat the oil over high eat in a large cast iron skillet or wok.
- Quickly stir in the cashews and toast in the pan - remove and set aside.
- Stir-fry the garlic, ginger, onion & mushrooms (and any reserved chopped chard stems) for about 1 minute
- Add chile and red bell pepper, cook for 1 minute
- Stir in greens - add a splash of sake if needed to deglaze
- Cook greens until they are bright in color and just tender, about 2 minutes or to taste (do you like crisper or softer greens?)
- Add herbs, cashews and sauce - toss gently to coat and cook for another minute or 2 - the sauce will thicken up a bit (this shouldn't be soupy).
Friday, November 05, 2010
Pumpkin-Chipotle Hummus
I love hummus - despite my own allergy to legumes, I occasionally indulge in various flavors of hummus with roasted red pepper or garlic - but rarely make it at home to avoid making too big a batch that I end up eating it all and make myself sick. I can't help it - garbanzos are delicious - in everything from chana masala to stews and gravys. I even named my first cat "Ci-Ci" because I liked the little beans so much. When Julia from Mariquita recently included a suggestion for pumpkin hummus in a newsletter, and the idea inspired me to do my own version of the recipe.
Like pestos and pad thai and many other good things, this is the type of recipe that is open to interpretation by the chef. Feel free to improvise and make your own variation - I already have plans for a gingery-hot 5-spice version, a chai spice version, and might even do a peanutty version with peanut butter in addition to tahini and roasted red peppers (yum, right?).
INGREDIENTS:
- 2-3 pounds peeled and seeded pumpkin cut in 2-3" chunks
- 3/4 c tahini paste (or more to make it more hummus like)
- 1/4 c mellow red/barley miso
- 1 Tb garlic powder or 2-3 TB minced garlic (to taste)
- 3/4 c fresh lemon juice
- 1 whole dried chipotle pepper or your own smoked red jalapenos in oil
- 1/4 c sesame oil
- 2 Tb dried lemon zest or fresh zest of 1 lemon
- 1 tsp salt or to taste
- 1/2 Tb cumin
- Optional: sweet paprika, freshly ground black pepper, nutritional yeast
- Roast the pumpkin, tossed with a tiny splash of sesame or olive oil to keep it from sticking to your dutch oven. It's done when it's tender.
- Soak the dried chipotle in warm water to soften it - unless you have smoked peppers stored in olive oil in the fridge like me (I know, I'm weird).
- Pulverize the heck out of the pumpkin and the other ingredients - if it doesn't taste hummus-y enough, add more tahini (this also helps if you made it too spicy and are out of pumpkin!).
Friday, October 15, 2010
Jelly Catch-up
I had much good fortune - my friend Eric was visiting for the first time in years and we went up for a wine country tour in Dry Creek. We got to Preston Vineyards just at closing but got in a tasting anyway - I managed to catch the young lady clearing away the self-serve produce from the stand and bought up all the muscat grapes that were for sale at $1 per pound. I have to confess - it has been an old dream of mine to make grape jelly.
As soon as my dear friend departed, I pulled out the grapes, the ground cherries I had been cooking down and some plum juice I had frozen in July and made three batches of jelly. Since the grapes & ground cherries are so sweet, I used as little sugar as I could get away with.
The Muscat Grape Jelly came out better than I can possibly express and only a few people get to try it because I only ended up with about 12 half pints. I ate one with a spoon after chilling it in the fridge - it was way better than grape jell-o.
The Ground Cherry Jelly was truly a unique, delicate and amazing experience. It still is. Again - it was a small batch but I plan to make more next year. The plum jelly came out rich and delicious as always - low sugar means it was a bit more tart but I'd happily sub that for cranberry jelly at any holiday dinner!
- Muscat Grape Jelly
- Ground Cherry Jelly
- Plum Jelly (with frozen plum juice)
Monday, September 20, 2010
Weekend Canning Round-up: Tomato Sauce, Zucchini Relish and Bread & Butter Pickles
Nine weeks out from my knee surgery, I am up and about almost back to normal in time for autumn canning season. Tomatoes, basil, squash, apples, ground cherries, quince, persimmons - I just need to lay my hands on some lemons!
STOCK: I made my best batch of stock yet, using the bag of veggie scraps I store in the freezer, along with the beet green stems from 3 bunches of white beets, stems from a bunch of radishes, and the seeds & skins of the tomato sauce making. I even threw in the seeds & stems from a couple jalapenos used in salsa - giving the 2 gallons of stock a bit of zing but it's so rich and flavorful that I am going to use it to make some udon noodles this week.
My newest favorite trick for making stock: throw in a 1/4 cup of dried porcini mushrooms.
TOMATOES:
Tomatoes have suffered the worst of this chilly growing season -- as a result, nobody has tremendous backyard tomato production. Even local farmers are finding the fruits are coming late and small. I had been banking on picking 200# of tomatoes at Mariquita's "U-Pick" weekends this fall - the 150# I picked last fall didn't get me through the spring. However, Julia said that they might not have a U-Pick event this fall (my fingers are still crossed, okay?).
I bit the bullet and bought two 12# box of Early Girl tomatoes for $29 each. I made up a big batch of marinara. My friend Serafine helped me process the first batch of cooked tomatoes - we used the food mill attachment for the Kitchen Aid. I think she was impressed by how easy it was to make sauce - she had seen cooking shows where they pour hot water on tomatoes to skin them and then cut out the seeds. That's a PITA, IMO.
Two weeks later, I bought two more 12# boxes of tomatoes last Thursday. I spent all day cooking down the sauce - even pulled out 4 quarts of sauce from the first batch out of the freezer. I ended up with a mere 9 quart jars of sauce, plus about 2 quarts that went into dinner each weekend - that's just under $10/jar to make my own sauce. I guess I could go to Berkeley Bowl and buy sauce cheaper - but it doesn't taste at all the same. After spending $120 on tomatoes (which is more than I spent last year for 150# at 50 cents/pound) - I think I am going to hold out and wait for tomato season to perk up so I can do the U-Pick event.
I didn't use all of the tomatoes for sauce - I also used some in a black quinoa tabouli, and made a quart of killer salsa (which goes great with carrot-flax crackers). I still have a few in the fridge because those Early Girls are good eating!
YIELD:
14 qts tomato sauce
1 qt salsa
APPLES:
Last Thursday I also got 20# of Pippin apples ($11 for 10#) from Mariquita - which I made into applesauce & dried apple rings. The apples were mostly fairly large, a bright green and super crisp and delicious. I saved about 8 of them for eating, put about 7# into the dehydrator and turned the rest into applesauce.
YIELD:
12 16 oz jars of applesauce
4 8 oz jars of applesauce
SQUASH:
Despite the problems my tomato plants are having in the garden - my squash are doing great. The cocozelle is still going nuts with three vines that are about a total of 22' in length. The yellow sunburst squash is more compact and still producing several a week. The Rond de Nice - which I transplanted to a mini raised bed - has just showed signs that it is going to take off and be the rockstar of autumn. The fourth zucchini plant that I bought - perished after it was sat upon at my "bon voyage" party on 7/9 - it limped along but transplanting it to another pot just resulted in speeding up the death.
I've been collecting squash all week - the small squash went into zucchini bread & butter pickles, the large squash went into the cuisinart to be shredded for zucchini relish. I also saved the carrot pulp from the juicer to put into the relish - it made it a really pretty color.
YIELD:
12 8oz jars of zucchini relish
3 4 oz jars of zucchini relish
4 16 oz jars of zucchini bread & butter pickles
2 12 oz jars of zucchini bread & butter pickles
2 8 oz jars of zucchini bread & butter pickles
GROUND CHERRIES:
I'm collecting lots of ground cherries - mostly they are ripe but some are not. I am experimenting with ways to ripen the green cherries - and have put them cleaned on a tray in the kitchen in the sun. They might go into a bag soon.
Coming up - a trip to Larissa's house to check on the quince & persimmon trees!
Wednesday, September 15, 2010
Vegan Pizzelle Cookies!
I loved making pizzelle cookies as a kid with my sister & brother - we always had fun mixing up the batter with different extracts like anise, almond, orange or lemon - and dusting the hell out of the cookies with powdered sugar. We always broke off the edges of the overly large cookies and ate all our mistakes.
As a vegan, it's often challenging to modify some recipes - most pizzelle cookie recipes use equal amounts of fat and sugar, and an amount of flour that is equal to both. However - no liquid - so it's the melted butter and egg that provide the moisture, making for a very sticky, thick batter.
The other trick is in getting to know your waffle iron - you know the kind with waffle grids on one side and pizzelle cookie grids on the other. These pieces of equipment can be tricky as the temperature settings are far from precise - mine has "dark" and "light" with a small arrow in the middle and turns almost all the way pas the word on each side! Always start on the "light" side - and increase the heat if your cookies aren't coming out crispy enough (don't forget - they get crispy after they cool and you can put them back in the hot iron to cook a bit longer so they are crispier).
The right amount of batter & pressure are also important - if you use too much batter, your cookie will separate in the middle when you try to open the cooker. If you use too little - it'll be very thin and crispy, and perhaps not full size.
SPECIAL TOOLS:
One last tip - don't overclean your cooker! It needs to be wiped to remove any excess oil, and use the bamboo chopstick to loosen charred bits. Scrubbing the plates in soapy water will just make your cookies stick more next time.
As a vegan, it's often challenging to modify some recipes - most pizzelle cookie recipes use equal amounts of fat and sugar, and an amount of flour that is equal to both. However - no liquid - so it's the melted butter and egg that provide the moisture, making for a very sticky, thick batter.
The other trick is in getting to know your waffle iron - you know the kind with waffle grids on one side and pizzelle cookie grids on the other. These pieces of equipment can be tricky as the temperature settings are far from precise - mine has "dark" and "light" with a small arrow in the middle and turns almost all the way pas the word on each side! Always start on the "light" side - and increase the heat if your cookies aren't coming out crispy enough (don't forget - they get crispy after they cool and you can put them back in the hot iron to cook a bit longer so they are crispier).
The right amount of batter & pressure are also important - if you use too much batter, your cookie will separate in the middle when you try to open the cooker. If you use too little - it'll be very thin and crispy, and perhaps not full size.
SPECIAL TOOLS:
- pizzelle iron
- silicone brush
- wood or bamboo tongs
- a disposable bamboo chopstick
- 1.5 c flour
- .5 c canola oil or melted coconut oil
- 3/4 c sugar
- 1 c smooth, unsweetened applesauce
- 3.5 tsp Ener-G egg replacer
- 1 tsp baking powder
- 2 tsp vanilla extract
- (optional) 1 tsp anise extract or 1 tsp almond extract
- (optional) dried Meyer lemon zest, crushed
- Spectrum vegetable shortening (for the pizzelle iron)
- Mix the sugar & fat til blended.
- Add the applesauce and other liquid ingredients.
- Sift together the dry ingredients and add to the wet ingredients.
- Preheat your pizzelle iron! Once it is hot, make ONE pizzelle - if you find the iron is too hot and make a mess - you'll have less to clean up!
- Using a silicone spatula - put a tiny (like 1/8 to 1/4) dab of shortening on the plates - use the silicone brush to move it around as it melts.
- Measure your batter - use a 1/4 measure or a spoon so you can determine the right quantity and make it consistent.
- Press down lightly - don't overdo it - and let the pizzelle cook. After a minute or two, gently pry up the cooker to check - if the pizzelle is starting to pull away from the cooker, it's ok to use the chopstick to pry it down a bit.
- When the cookie is lightly browned, remove it to a cooking rack with wooden tongs. The pizzelles will be soft when you take them out and crisp up as they cool!
- Lay flat for cookies, or roll them into tubes for cannoli or cones for ice cream before they cool too much.
One last tip - don't overclean your cooker! It needs to be wiped to remove any excess oil, and use the bamboo chopstick to loosen charred bits. Scrubbing the plates in soapy water will just make your cookies stick more next time.
Tuesday, August 17, 2010
Pickled Zucchini Relish
The last batch of bread & butter zucchini pickle chips I made with tiny courgettes came out so well with a dash of hot curry powder, that I could think of no other use for the overgrown squash yellow and "black beauty" squashes from James' garden than to make up a zucchini relish - basically the same sort of sweet & sour brine as bread & butter chips but with coarsely grated zucchini & onions.
Relish Ingredients:
Brine Ingredients:
YIELD:
Relish Ingredients:
- 12 cups of overgrown squash - skins on but cut out seedy/pithy areas if needed
- 4-5 fist size red onions
- 5 Tb sea salt
- Optional: coarsely grated carrots or red or green sweet pepper
Brine Ingredients:
- 3 cups sugar
- 2 1/2 cups cider vinegar
- 1 Tb mustard seed
- 1 Tb turmeric
- 1 tsp hot curry powder
- 1 tsp coriander seeds, ground
- 1 tsp fenugreek seeds, ground
YIELD:
- TBD
Sunday, August 15, 2010
Squash, pears & lemons!
This morning I started to feel a return to the normal rhythms of summer after being laid up following knee surgery - yeah, I sure know how to have fun! My friend James gifted me some giant squash last weekend and I admit - I blinked - some of my cocozelle got really enormous. But having 20# of overgrown squash in the kitchen doesn't present enough of a challeng.
This morning, I borrowed a friend's truck and headed off to pick pears & lemons at someone's house in Kensington. The pears are small and green, falling easily off the tree - none are really ripe yet so I don't know how they will taste. The lemons were offered while I was busy picking pears - and they are round, soft ripe Meyer lemons that smell positively gorgeous.
On the way home, I stopped at the Temescal Farmer's Market and ran into Asiya from ForageOakland - I hustled her to the parking lot to load her bag with pears & lemons - we had a nice chat about her blog (go check it out!) and caught up a bit. James took a few pears and lemons on Sunday, and more are promised to Veronika later this week. Time to go plan some preserving projects & check in on my garden!
Friday, August 13, 2010
The LAST French Press I Will Ever Buy
After more than 6 years of service, I somehow managed to set down my Bonjour french press carafe at an angle in the last 1" before it touched the dish towel covered countertop in such a way that it fractured. After cursing and smashing the last bits of it into the recycling bin, I checked prices for replacements online and hiked up to the strip mall at the corner to see what they had at CVS.
As I passed Starbucks, my brain checked me and I went in to take a look. They had a Bodum Bistro stainless steel double wall 34 oz french press. Intrigued, I continued to CVS to see the options. The press they had there was glass and horribly flimsy plastic for $19.99 - about the cost of the replacement glass online.
It took me about five seconds to see that the $50 stainless steel model would save me money in the long run - even if the handle breaks off - the carafe will work forever and I won't have to put the last cup of coffee in the microwave to warm it up because it's better insulated. Even better, when I got home - I saw that Starbucks has some sort of deal with Bodum as the price listed on the Bodum website is $80!
Yes, it was Starbucks. Yes, it is made in China. But - I'll never have to replace it! I'll just call that green and call it a day.
Tuesday, August 10, 2010
My New Fave - Bamboosa Circle Skirt
After a week on the beach and a relatively sprightly return on the Kalalau Beach Trail in Kauai last spring, I wanted to treat myself to a day on the town in Kapa'a the following day. After I got a haircut, I wanted something more comfortable than the shorts and cotton knit sundress I had been wearing. I happened to walk into a store selling Bamboosa clothing - made from sustainably grown & organic bamboo.
The knee-length skirt has been so comfortable that I went to the website and got two more skirts - and a pair of men's boxers made of the same fabric - for myself. I could be come positively large as a house and not care wearing these skirts.
After placing my order online - I e-mailed customer service a few days later to find out how long it would take to receive my items. Their customer service was quick, responsive and friendly (thanks Jennifer!).
My purchase arrived today - everything is as I hoped: Priya Skirt, Priya Circle Skirt (just a longer version), knit scarf and men's boxers. The men's boxers are VERY comfortable. The entire package was plastic free! Recycled cardboard box sealed with brown-tape-glue and the clothing was wrapped in chlorine free recycled tissue and tied with brown twine. No plastic!
Even better than recycling...
Lately, I have been seeing a ton of televisions offered "free" on Freecycle and the free section of Craigslist. It baffles me that people never think of donating perfectly good working televisions & DVD players to their local children's hospital or nursing home. When I mention this to folks - it's like a lightbulb goes off over their heads. Recently, I splurged and got a new television - but my 19" CRT television still works perfectly well and doesn't have any bad spots (why should it since I have only watched movies on it and am hardly a couch potato). I confess - with my recent convalescence, I just decided I wanted a bigger and more energy efficient TV that doesn't weigh so much. And a DVI to stream Netflix.
Rather than Freecycle my television and old DVD players, I called the Children's Hospital Family home - turns out they do need a TV and DVD players. The Oakland Children's Hospital also need lots of other stuff - things that I never thought of for crafts projects and such.
Here are a few things that tickled my fancy:
I wonder how kids would love the little creatures that Hannah at Bittersweet makes, like the cute little froggy.
Rather than Freecycle my television and old DVD players, I called the Children's Hospital Family home - turns out they do need a TV and DVD players. The Oakland Children's Hospital also need lots of other stuff - things that I never thought of for crafts projects and such.
Here are a few things that tickled my fancy:
- Art and craft supplies
- Beanie Babies
- Crayons & Colored Pencils
- Crossword Puzzle Books: for both kids and parents
- Games: such as Monopoly, Clue, Scrabble, Battleship, Chutes and Ladders, Yahtzee, Life, chess, checkers, Boggle, Trouble, Connect Four and memory games
- Hot Wheels Toys, Small Cars & Trucks
- Journals, Blank Books, NotebooksMad Libs
- Magazines: for all ages, including magazines in Spanish
- Mini Needlepoint Kits
- Playing Cards: including UNO, Old Maid, Crazy Eights
- Safety Scissors
- Scrapbook Supplies
- Stationary Sets
- Stickers
- Knitting Yarn & Knitting Needles: all sizes (Family Resource & Information Center)
- Crochet Hooks: (Family Resource & Information Center)
- Booties: Knit or crochet baby booties (including preemie size)
- Favors: Make tray favors or origami for patient meal trays
- Sew: Sew a quilt or wheelchair backpack. Please use only new, not used fabric.
I wonder how kids would love the little creatures that Hannah at Bittersweet makes, like the cute little froggy.
Tuesday, July 20, 2010
Stuffed Pattypan Squash on Couscous
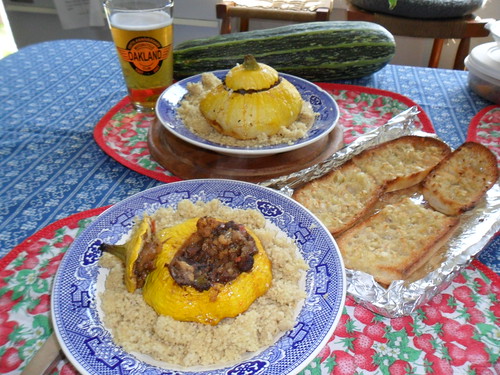
As any gardener knows - if you blink, your squash will get HUGE. My sunburst (aka pattypan) squash got to be quite ginormous. So, of course - I immediately decided to stuff them!
After reading through some recipes, I decided - you can pretty much stuff the squash with whatever you want as long as it won't be overcooked (or undercooked) by the time the squash itself is cooked to your liking.
4 Overgrown Pattypan Squash:
- use a melon baller to scoop out the seeds and pithy part, leaving about 3/4" thick squash all the way around.
- steam the squash (not necessary to steam caps), til they were just tender then removed them to a baking sheet.
Here's what I stuffed into the squash:
- sauteed garlic (3-4 cloves)
- chopped sweet onions & sweet red peppers - about 1.5 cups
- very small cut up cauliflower florets - about 2-3 cups
- squash - about 1.5 cups cocozelle cut into 1/4" bits
- "Savvy Stir-Ins" Shitake Mushroom & Herb seitan bits - about 1/2 package
- 4 cups vegetable stock, use as needed
- vegan worcestershire sauce, 2-3 Tb
- olive oil as needed
- fresh or dried herbs - I used fresh rosemary & sage
- I first softened up the garlic, onions & peppers, then added the cauliflower & squash - til they started to sweat a bit, then mixed in the Savvy Stir-ins (make sure you bust them up really well).
- Deglaze with veggie stock, turn down the heat and simmer.
- Add stock til the savvy stir-ins are soft and the veggies are where you want them - and you should get a nice rich dark sauce. You can always thicken it up with some instant gravy, arrowroot, flour or other starch.
- Fill the squash and roast for 15-20 minutes til bubbly and squash very soft.
- Serve squash on bed of couscous - prepared to your liking. I cooked my couscous with my homemade veggie stock, next time I might mix in some Ras al Hanout or some Bharat into the couscous for a little excitement. Yum!
Monday, July 12, 2010
Crunchy-Crispy Kale & Fennel Salad
It's a fact that kale is one of the most nutritious foods you can eat - it provides both a high level of nutrition AND a high level of satiation/satisfaction for very few calories. Raw kale provides a powerhouse punch of Vitamin A and Vitamin C, as well as carotenoids and chlorophylls. Want to make your body happy? Make this delicious salad - you can make up a big batch of it and it will keep in the refrigerator for several days!
Ingredients:
Really, all the work here is in chopping up the vegetables. Once you have the vegetables in the bowl, add a small handful of coarsely chopped capers (rinsed!) and olives. Drizzle with the lemon and olive oil, toss to coat, add chopped herbs and pepper to taste. If you are storing it in the fridge, remember to toss it every so often to move veggies down to the small puddle of dressing in the bottom of the bowl. This salad keeps very well for several days and is very satisfying!
A quick visit to a nutritional calculator provided a rough estimate that this entire salad is about 600 calories - less if you use less than 4 Tb olive oil!
This post is currently featured guest post on Dog Island Farm!
Ingredients:
- 1 large bunch lacinato or dino kale (remove stem & chiffonade to 1/8", give a few coarse cross-chops)
- 1/2 large red bell pepper, thinly sliced & cut into 1" pieces
- 1/2 large red onion, finely sliced and coarsely chopped
- 1/2 large fennel bulb (or 1 small - to your taste!), thinly sliced & coarsely chopped
- 1/4-1/2 c Meyer lemon juice
- fresh rosemary & oregano to taste, finely minced
- 2-5 cloves garlic, pressed or very finely minced
- 1/4 c capers, rinsed & coarsely chopped
- 1/4 c pitted kalamata or nicoise olives, coarsely chopped (optional)
- extra virgin olive oil to taste
- fresh ground black pepper to taste
Really, all the work here is in chopping up the vegetables. Once you have the vegetables in the bowl, add a small handful of coarsely chopped capers (rinsed!) and olives. Drizzle with the lemon and olive oil, toss to coat, add chopped herbs and pepper to taste. If you are storing it in the fridge, remember to toss it every so often to move veggies down to the small puddle of dressing in the bottom of the bowl. This salad keeps very well for several days and is very satisfying!
A quick visit to a nutritional calculator provided a rough estimate that this entire salad is about 600 calories - less if you use less than 4 Tb olive oil!
This post is currently featured guest post on Dog Island Farm!
Tuesday, July 06, 2010
Vegan Camping Guest Posting on Dog Island Farm
Today, one of my blog entries on vegan backcountry cooking/camping was featured on the Dog Island Farm blog. I'm going to make up a few more entries to post to their site (and mine) so stay tuned and check out their really cool blog!
Thursday, June 24, 2010
Cantaloupe Sorbet & Snacks
As if cantaloupe isn't good enough on its own - I had the bright idea to chunk up half a cantaloupe and froze it on a cookie sheet while I made dinner. Then I put the frozen pieces into the ole reliable Breville blender with a bit of agave to lubricate the works and pureed the heck out of it. I scraped it into a 9" x 9" light aluminum (no nonstick -yuk!) pan and put it back into the freezer. Stir every 15-20 minutes or so and you'll have sorbet for 4 as soon as you all finish eating dinner.
I really had to resist the urge to throw in frozen strawberries, too!
This morning I sliced up the remaining cantaloupe to throw in the dehydrator - just three weeks til my 4 week motorcycle road trip, so I better get moving on the food prep and meal planning!
I really had to resist the urge to throw in frozen strawberries, too!
This morning I sliced up the remaining cantaloupe to throw in the dehydrator - just three weeks til my 4 week motorcycle road trip, so I better get moving on the food prep and meal planning!
Wednesday, June 23, 2010
The Last of the Enchiladas Verdes!
I love summer but honestly, I am so very much looking forward to fall when I can get more chiles and tomatoes. I've now just used up the last of my green enchilada sauce on a casserole dish of enchiladas stuffed with summer veggies.
The beauty of having a stock of homemade red and green enchilada sauce in jars is that I can make up the enchiladas with whatever I have at hand - I have used tofu, seitan, potatoes, any number of veggies, nut cheeses - you name it. I end up making enchiladas with the same stuffing maybe twice - and then move on. Here are instructions for tonight's dinner of:
Summer Veggie Stuffed Green Enchiladas
Ingredients:
1/2 med-large red onion, 1/4" dice
1-2 summer squash, 1/4" dice (you need about one generous cup of diced squash)
3-5 orange & white Chantenay carrots, 1/4" dice
3/4 cup corn kernels (froz or fresh)
4 cloves of garlic, pressed or finely minced
1 serrano chile, stemmed & seeded, finely minced
1/2 cup nutritional yeast
1 Tb cumin seed
1/2 tsp whole white pepper
extra virgin olive oil, as needed
2 pint jars of green enchilada sauce
1 c toasted pumpkin seeds
1 package corn tortillas (12 ct)
Directions:
- Heat up a large cast iron skillet with 2 Tb or so drizzled olive oil.
- Sautee the carrots until they start to get browned and soften.
- Add chile, onions & garlic and sautee til soft. Stir to prevent sticking.
- Add squash & corn.
- In a separate dry pan, toast the cumin seed and white pepper - grind in a spice grinder and add to the cooking veggies.
- In the dry pan, spread the pumpkin seeds and toast - medium flame, move them to keep them from burning but not so much as to dissipate heat. They should pop like popcorn. Once they are toasted, remove from heat in a cool dish (they will continue to cook and scorch in the hot pan).
- Spread 1/2 c of enchilada sauce in the bottom of a 7" x 11" glass baking dish. Put one tortilla in the pan, spoon some filling onto it. Make sure it goes all the way out to the edge and roll it up. Push it to the end of the pan. The sauce on the outside of the tortilla helps soften it up and helps distribute the sauce a bit between the stuffed tortillas.
- Fill the rest of the tortillas - just squish them in together - if you run out of space and have extra tortillas, usually I'll have 1 or 2 extra - shred the tortilla into bits, ladle more sauce on the enchiladas, and then place the tortilla bits in areas that have space or where tortillas may have split when you rolled them up.
- Pour on the rest on the rest of the enchilada sauce, encouraging it to go down the sides into the ends of the stuffed tortillas with a spatula or spoon.
- Bake in preheated 350 oven for 20-30 minutes until tortillas are softened. Sprinkle generously with salted toasted pumpkin seeds and serve.
Wednesday, June 16, 2010
Backcountry Vegan - Prep for 4 Week Road Trip
In just 4 weeks, I hop on my motorcycle to begin a four week road trip that has three legs - going from Oakland to Southern California by motorcycle, then by moving van to NE Ohio and then return to California on motorcycle via Memphis, New Orleans, Austin, West Texas, the Grand Canyon, the Eastern Sierras and Tioga Pass.
Since this isn't quite the same as a backpacking or camping trip - I'll have plenty of opportunity to seek out local natural grocery stores & farm stands, plus I'll be staying with family and friends at least half of the nights on the road.
Clearly, bringing everything for 4 weeks would be impractical and unnecessary. So, then what do I need to bring? Here are the limitations & opportunities I identified:
- Space Limitations: while I can carry more stuff in my bicycle panniers, and in the stuff sacks that I will attach to the luggage rack. I'd rather bring tools & a spare tube than a gallon bag of bulky dried apples.
- Weight Limitations: are not the same as backpacking but still a consideration. I can pack liquids in stainless steel bottles that will be safer from crushing & heat than plastic that I took on the trail in April.
- Spoilage: same sort of issues as backpacking, but I will be traveling in much greater heat than Kauai in April. Temperatures across the Midwest & South are pretty insane right now (yes, I will be doing some parts of Texas in the dark/pre-dawn). That means no matter how tempting those farmstand peaches - just buy enough to eat by the end of the next rest stop or that evening because they will not travel.
- Coffee cone & filters, assam tea, mesh strainer & chai spices - it's always nicer to make your own hot beverages at camp in the moring.
- Pasta, couscous & quinoa - enough for several meals, easily replenished at the bulk section of a natural grocery store.
- Oatmeal, dried fruit (blueberries, strawberries, raspberries, raisins, cantaloupe, persimmons) & granulated maple sugar - yes, it will be much easier to make oatmeal than to wait around for quinoa for breakfast.
- Dried veggies (squash, onions, peppers, tomatoes, porcini & shitake mushrooms, carrots, turnip, beet) - about 1 gallon bag of the dried veggies & fruit in their own wax paper bags.
- Road's End Organics gravy packets
- Fresh garlic
- Olive oil & Meyer lemon zest
- pasta & marinara: a small can of sauce along with my dried veggies & pasta makes a pretty good meal!
- mushroom & veggie gravy on mashed potatoes - maybe with seitan sausage or chunks from the store means I can have seitan for breakfast the next morning, too!
- veggie soup with udon noodles or pasta & bread
- roasted or veggies from local farm stand, cooked with my spices & olive oil - great sandwich fixings for lunch the next day
- "Special of the Day" - you never know what you'll find in local groceries and it is summer - I might end up with the sweetest corn, or giant peaches that I can grill over the fire at the campsite.
Wednesday, June 02, 2010
Surprise Apricot Sorbet!
Since the cherry plum tree in my backyard is about a week away from 20 gallons of plums being ripe all at once, I reached into my freezer to see what I could use and make space for this season's fresh fruit. One quart size bag of something somewhat orange or gold had a smeared label - I couldn't tell what it said at all. Pumpkin? Persimmon? What? I let it defrost and was delighted to discover - I had 3 cups of delightfully sweet apricot puree in my hands!
Last summer, I picked a pile of amazing apricot's from my friend L's house - the skins are so delicate that I don't even bother to remove them when I make jam. I filled my Breville blender with pitted apricots and froze the puree to use later. The apricots were so sweet that I didn't even add sugar!
Easiest sorbet ever - I reprocessed the defrosted puree in the blender to aerate it a bit, then poured it into 9" x 9" metal baking pan. Put into the freezer. Stir every 20 minutes or so to keep it from sticking to the sides.
Spoon it into bowl when firm enough and eat with great contentment.
Last summer, I picked a pile of amazing apricot's from my friend L's house - the skins are so delicate that I don't even bother to remove them when I make jam. I filled my Breville blender
Easiest sorbet ever - I reprocessed the defrosted puree in the blender to aerate it a bit, then poured it into 9" x 9" metal baking pan. Put into the freezer. Stir every 20 minutes or so to keep it from sticking to the sides.
Spoon it into bowl when firm enough and eat with great contentment.
Tuesday, May 25, 2010
Backcountry Vegan Camp Meal: A Quinoa-nundrum on Grains
Ah, quinoa - the mother of grains - packed with nutrition & protein and very few calories. However, I discovered that cooking black quinoa (which I selected for sheer novelty) - took way too long to cook on the trail. My meals with quinoa included:
For my subseqent attempts to cook quinoa on the trail, I soaked the quinoa til it sprouted - and then put it in a pot with enough water, covered it and simmered - it took the better part of 40 minutes before I moved to someone's campfire.
I cooked quinoa 3 times on the trail and each time was the same result. I think I may try to dehydrate cooked quinoa to see if that works better on the trail.
Oatmeal is definitely going in my pack next time!
- quinoa with granulated maple sugar, raspberries & blueberries for breakfast
- quinoa with vegetable broth, onions, zucchini, carrots & peppers
For my subseqent attempts to cook quinoa on the trail, I soaked the quinoa til it sprouted - and then put it in a pot with enough water, covered it and simmered - it took the better part of 40 minutes before I moved to someone's campfire.
I cooked quinoa 3 times on the trail and each time was the same result. I think I may try to dehydrate cooked quinoa to see if that works better on the trail.
Oatmeal is definitely going in my pack next time!
Monday, May 24, 2010
Backcountry Vegan Camp Meal: Tempeh & Green Bean Stew
A quick trip to Trader Joe's can net some pretty healthy ingredients for a meal - I grabbed both tempeh and a tube of polenta (must have options) but when it came down to Friday night dinner on the tailgate of the truck, a single 2.5 qt pot and these delicious ingredients resulted in a very very tasty meal.
Ingredients:
Ingredients:
- 1 package tempeh, cubed
- 1 bulb garlic, peeled and coarsely chopped
- 1 can diced Fire Roasted Tomatoes with chiles (TJ's brand)
- 1/2 package of thin green beans, rinsed, trimmed and snapped into 1" to 1.5" pieces
- dried herbs or several sprigs chopped or snipped oregano, rosemary and whatever herbs you can grab from the garden or where you are camping (rosemary and bay are pretty widely available in Northern California)
- olive oil
- red wine (whatever variety you have at the camp site) or water
- Sautee the garlic til it starts to soften.
- Add the tempeh and cook until it browns.
- Add green beans, sautee til bright green - stir with wooden spoon
- Deglaze with a 1/4 c or so of red wine (to taste).
- Add chopped fresh herbs or dried herbs, pepper and salt to taste.
- Allow to return to simmer and reduce, then add can of tomatoes.
- Reduce heat, warm up to simmer and then serve!
Friday, May 21, 2010
Backcountry Vegan Camp Meal - Sweet Potato Pancakes
Before I went on this trip, I strongly resisted the idea of traditional convenience breakfasts - like oatmeal - and was fantasizing about tasty & colorful brunchy delights.
I steamed sliced & peeled sweet potato, pressed it through the ricer and dehydrated the sweet potatoes. The dried cooked sweet potato seemed to pull a lot of moisture from the air, so I re-dehydrated and then powdered the sweet potato in my Breville blender.
My idea was to use the powdered dried sweet potato to make a thick paste, sautee it on both sides to make it brown - and have little latkes. I had some granulated maple sugar to sprinkle on top of it - sounds perfectly delicious, right?
Since I did not test this recipe out before going on the trail, it could stand a little refining. I used too much water and my patties did not brown as well as I had hoped and were a little squishier - but still quite delicious.
Next time - using less water or perhaps shredded dried sweet potatoes (instead of steam blanched/dried/powdered) - I will try sprinkling the maple sugar on the patties before flipping them to help along the browning/caramelization process. I'm also considering shredding/grating raw sweet potatoes, dehydrating and then frying them up rehydrated - they should cook up pretty well so it may well be time to test that recipe before my next trip!
Thursday, May 20, 2010
Backcountry Vegan Camp Meal - Vegetable Udon Noodle Soup
There can honestly be no backcountry camping meal that is easier to make - one pot is all you need, and a little restraint else you risk exceeding the capacity of your pot!
Less recipe and more about process - especially carrying a variety of ingredients that can be used in multiple dishes.
Ingredients:
Dried seaweed is the key to the savory flavor this soup carries - and dried wakame or hijiki weighs less than nothing!
Don't forget - unless you brought a small mesh strainer or use a bandana to strain the soaked wakame, it's already salty so do NOT add more salt to your soup until you have tasted it. In addition to providing sodium, most dried seaweeds also provide Omega-3 fatty acids, magnesium and calcium -- all good nutrients to replace after exerting yourself on the trail!
Less recipe and more about process - especially carrying a variety of ingredients that can be used in multiple dishes.
Ingredients:
- vegetable boullion
- dehydrated vegetables
- dried wakame and/or hijiki
- udon noodles
- optional: kuro goma (spiced toasted black sesame seeds that add a little flavor and crunch to any soup)
- optional: chili flakes
- Soak about 1/2 to 3/4 c dried veggies such as carrots, zucchini, peppers, onions and shitake mushrooms (I like to carry these whole and break them up before I dehydrate them) in your wide mouth Nalgene bottle - I like to do this as I am leaving my breakfast or lunch stop so they are soaked for my next meal!
- Simmer 2 c water in a pot to dissolve your bouillion. Bring pot to a boil.
- Add udon noodles - you may need to break them in half or manage them manually til the noodles soften enough to fit in your pan.
- Bring water to a boil, add veggies & soaking water.
- Bring water to a simmer, check veggies & udon noodles for tenderness. Remove from fire.
- Add wakame, stir til softened.
- Enjoy with gusto & share with your campmates!
Dried seaweed is the key to the savory flavor this soup carries - and dried wakame or hijiki weighs less than nothing!
Don't forget - unless you brought a small mesh strainer or use a bandana to strain the soaked wakame, it's already salty so do NOT add more salt to your soup until you have tasted it. In addition to providing sodium, most dried seaweeds also provide Omega-3 fatty acids, magnesium and calcium -- all good nutrients to replace after exerting yourself on the trail!
Wednesday, May 19, 2010
Backcountry Vegan Camp Meal - Mushroom & Veggie Gravy & Mashed Potatoes
Mashed potatoes with rich mushroom gravy is one of my favorite comfort meals at home - taking it on the trail is really a no brainer. While instant potato flakes don't taste nearly as good as freshly steamed and riced Yukon gold potatoes - they weigh next to nothing, are very quick to prepare and very satisfying when covered with a rich sauce made by soaking some dried mushrooms (which also weigh next to nothing!) and the nutritional value is improved with the addition of other dried veggies in your pack.
This is less a recipe, per se, than process as ingredients will vary with your preference & preparation!
Ingredients:
This is less a recipe, per se, than process as ingredients will vary with your preference & preparation!
Ingredients:
- potato flakes (I buy these in bulk at Rainbow Grocery)
- dehydrated zucchini, porcini, cherry tomatoes, carrots & onions
- dried herbs to taste - thyme, rosemary, etc
- brown gravy or mushroom gravy - store bought packet is ok, or you can bring corn or potato starch
- fresh garlic made it into your pack? fresh herbs along the trail?
- Put about 1/2 cup of dried vegetables into a widemouth plastic quart bottle with 2 cups of water at least an hour before you get to your final destination for your meal.
- Once you arrive at your destination, boil water and prepare the mashed potatoes, set aside. Make sure that you don't make TOO many mashers if you are eating solo, you can just pour the gravy right into the same pan they were mixed.
- If you have any fresh veggies - sautee those first and leave in the pan.
- Strain the water from the pre-soaked veggies into the pan to heat up along with any dried herbs.
- Bring to a simmer, whisk in the prepared gravy packet or starch with a fork to get the lumps out.
- Add veggies and cook low til gravy thickens up. Pour veggie gravy over top of mashed potatoes and eat with great relish and satisfaction, knowing that your other meals will be just as delicious and easy.
Tuesday, May 18, 2010
Backcountry Vegan: 5 Truths About Eating on the Trail
- No matter how good the intentions, complicated recipes or advanced prep mean carrying around ingredients that the traveler may not feel like using because of time, light, energy, fuel or space restrictions. Good planning results in not just good nutrition but also satisfaction and a light or nonexistent store of provisions upon the return home.
- Regardless of how enticing a recipe for chocolate cherry almond bark sounds - chocolate always melts if traveling anywhere warm. Is it worth it? Life is too short to eat broken chocolate - bring calorie rich treats that are appropriate to the environmental conditions of the trip.
- Making homemade trail mix and granola always sounds like a good idea - but buying it is so convenient and such a good excuse to investigate local organic groceries along the way to the start of the trail or on the rod.
- Despite best intentions - who doesn't end up picking up packaged snacks & treats to take along? It just happens - whether it's Lara bars
, Nutter Butters
, Primal seitan strips
, or Sharkies
- there are certain convenience foods that are easier bought than made.
- Camping often means meeting people & sharing meals or using locally available or foraged ingredients -- provisions should allow for flexibility and scalability (up/down).
Monday, May 17, 2010
Evergreen Rd Morels!
Last week, a last minute invitation was extended to head to the Sierras and go find some morels. I hopped in my friend's Zipcar, along with another of her friends and we went up to the Stanislaus National Forest to see what the MSSF folks left behind after their 2010 morel foray.
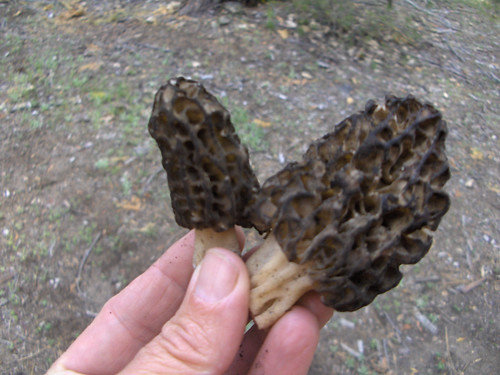
From the moment we got to our camp - we hit the jackpot. Keith spotted something growing next to the fire pit and plucked up a somewhat darking black morel and ran off to show it to Kathryn before I caught a proper glimpse. Looking down - I noticed a second morel growing right there! Two morels right at the fire ring? Incredible!
A walk around our camp to the other fire rings proved futile as the other fire rings were all in to frequent or recent use, but on the way back to our somewhat remote site - I found several morels growing right on the side of the driveway in the campground! Walking around in the woods on the residential property of Peachgrowers Grove, I found several gorgeous puffballs as well.
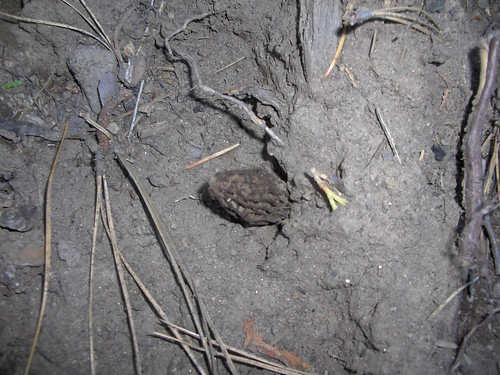
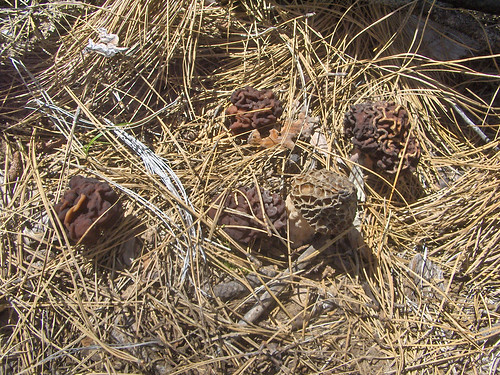
As soon as we put up our gear, we headed off to stomp the woods before sunset - between the three of us, we found at least a couple pounds of morels. Mostly small morels - remember - they are the same color as the dirt:
I found a pretty healthy tree frog - and Keith uncovered a gorgeous salamander:
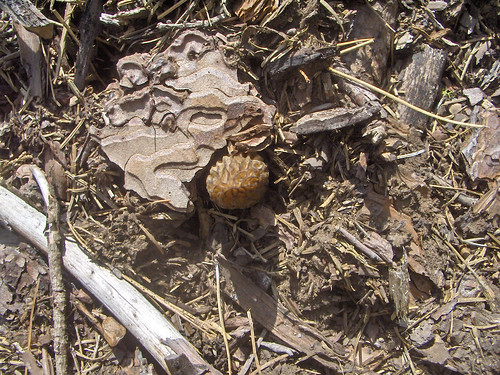
The next morning, we were up and stomping around the woods again - every time we thought we'd notice a pattern, we'd find mushrooms in another kind of spot. Sometimes they were on the west face of a slope or pile of woodchips that had some fire damage and disturbed earth, sometimes they were just growing in the pine needles next to some trees - and lots of times they were growing right on the side of the paved road! Here are some photos of morels in their natural spots and of our haul - we all got an average of 3lbs each:


From the moment we got to our camp - we hit the jackpot. Keith spotted something growing next to the fire pit and plucked up a somewhat darking black morel and ran off to show it to Kathryn before I caught a proper glimpse. Looking down - I noticed a second morel growing right there! Two morels right at the fire ring? Incredible!
A walk around our camp to the other fire rings proved futile as the other fire rings were all in to frequent or recent use, but on the way back to our somewhat remote site - I found several morels growing right on the side of the driveway in the campground! Walking around in the woods on the residential property of Peachgrowers Grove, I found several gorgeous puffballs as well.
As soon as we put up our gear, we headed off to stomp the woods before sunset - between the three of us, we found at least a couple pounds of morels. Mostly small morels - remember - they are the same color as the dirt:
I found a pretty healthy tree frog - and Keith uncovered a gorgeous salamander:


The result of 3 the tramping in the woods of 3 people!
Where should you go look for morels? They like pine trees and disturbed soil; any place that you find burn areas - whether a wild fire or a customary spot for burning brush & plant debris for fire management. Some current reports are that the morels are happening but moving north and to higher elevations pretty quickly. I have heard one report of a friend near Bear Valley who has pulled over 120 lbs already!
Last August's burn in Yuba County interests me - I want to check on the elevations of those burned areas for a target in early June. Failing that - Mt Shasta & Lassen may be good candidates for the second week of June. Are you with me?
Sunday, May 16, 2010
Backcountry Vegan - Tools & Gear
You do not need to have a commercial kitchen - but it does help to at the least have a good knife and a good dehydrator.
Prep tools:
Cookset for the Trail
I'm curious to experiment with alcohol burning stoves made with pepsi cans - they weigh a lot less than carrying MSR fuel and it's pretty easy to make one in case it gets confiscated in travel, and it burns a lot hotter/cheaper fuel.
Of all the gear I brought on the trail - the most dearly missed was a larger wooden spoon or spatula, even some bamboo tongs would have been nice. I didn't use the knife very much - possibly could have skipped that acquisition.
Prep tools:
- Kansui Dojo Chef's knife - I swear by this knife! It's quite affordable and it holds an excellent edge for a long time - it's a great all purpose vegetable/fruit knife. Go get one!
- Breville 800BLXL Blender
- this blender has been one of my favorite acquisitions. I see all kinds of love lavished on the Vitamix - but so far, this blender has met all my needs.
- Cuisinart 9 cup Food Processor
- bought used on E-bay, it has character but may need to be replaced in a few years.
- Williams-Sonoma Professional Multi-chopper - my friend Matt first introduced me to this gadget - then he got me one for my birthday last year. It has been very helpful at cutting up large quantities of fruit or veg in uniform pieces - great for tagines and for dehydrating.
- Excalibur 9 Tray Food Dehydrator
- after building a monster of a solar dehydrator - I finally threw in the towel and got the Excalibur. I haven't looked back - it works like a dream and doesn't consume much power. The solar dehydrator is good for storing persimmons to ripen and for drying off chanterelles after I clean them.
Cookset for the Trail
- REI Campware Mess Kit - two pans (one can be a lid), cup and bowl
- spice wheel filled with salt, black pepper, chili flakes, herbs aux provence, dill, curry, etc.
- To-Go Ware utensil set
- Nalgene widemouth bottle
- stainless steel bottle
- Camelbak
- Katadyn water filtration sport bottle
- half of a sponge with green scrubby on one side
- Drip Coffee filter holder - collapsible silicone gadget from REI & filters
- Dr Bronner's Peppermint liquid soap (4 oz refillable bottle for cleaning dishes & myself)
- MSR Pocket Rocket
stove
I'm curious to experiment with alcohol burning stoves made with pepsi cans - they weigh a lot less than carrying MSR fuel and it's pretty easy to make one in case it gets confiscated in travel, and it burns a lot hotter/cheaper fuel.
Of all the gear I brought on the trail - the most dearly missed was a larger wooden spoon or spatula, even some bamboo tongs would have been nice. I didn't use the knife very much - possibly could have skipped that acquisition.
Saturday, May 15, 2010
Backcountry Vegan - Menu Planning, Food Prep & Packing
Prep vs Packet:
For my first backpacking trip to Kauai, I had a hiking partner - and the two of us decided that for efficiency's sake, we wanted to use some prepared camp meals. I ordered a dozen or so vegan meals in biodegradable/burnable packets from Mary Jane's Outpost - but we got rained out so the meal packets returned home with me. Last summer, I decided to use up the meals on my 2 week long trip to Portland & back. Unlike the usual car camping trips, I wanted to bring stuff that would be relatively easy to put together.
Mary Jane's Outpost has some good options - and lots of vegan stuff. The packets I brought along included: brownies, griddle cakes, ginger sesame pasta, corn ad, corn salsa, falafel, and lebanese peanut bulghar. The main problem with some of her offerings is that they contain dairy and beans - two foods to which I am allergic. The brownies were the one item that most impressed me but the rehydrated pasta didn't have the right mouth-feel. For the most part, none of these items were all that difficult for me to put together on my own. Falafel mixes can be had anywhere (and I can't eat a lot of that anyway due to the garbanzo flour). Couscous and mushrooms? Just why bother with all the packets?
For this trip, I decided to focus on using fresh, seasonal ingredients that I could dehydrate and which would be satisfying when rehydrated. The most helpful cookbook was the one that talked the most about the processes involved in dehydrating food and how to use it. My food supplies and meals had to conform to these principals:
Most backcountry cookbooks don't take into consideration scalability and the incorporation of locally sourced or volunteered ingredients. In any kind of camping situation - well, let's face it - humans are social animals. We like to congregate in the dark over fire and share food together.
No matter where you go, someone's going to suggest sharing food or even a camping potluck. It's not just a matter of throwing all your extra food in a pot and hoping it comes out right (even if folks say it does, doesn't make it true).
And you might find some amazing local contribution like key limes or Mexican oregano or a mango. Flexibility and creativity are essential to fun and delicious backcountry cooking.
I had some ideas for favorite camping meals and new stuff that might be fun to try - and the book I liked most gave me a few ideas for experimentation. I would probably have tested a few things out before going on the trail, but there were no disasters and I ended up making some pretty awesome food, and was able to share with folks several times with ingredients that weren't terribly expensive but which provided excellent results.
Supply List:
In no particular order - here is a list of the food that I prepared and brought with me - in the backpack - as the bases for meals on the trail.
Fruits & vegetables: hey, I'm a vegetarian! this makes up the bulk of my diet at home, so why not on the trail? I don't eat out of packages at home - so why eat packaged food on the trail?
Prepared foods: can't get away entirely without without using some prepared foods!
One of the things that I didn't like about all the backcountry cookbooks I read was that they called for a lot of plastic bags. A lot. Like - pre-measuring out and mixing a ton of things and keeping them separated in a lot of little bags. Or bringing lots of little plastic condiment packets - or worse - small bottles with tons of liquid condiments.
Instead, I wanted to just put like ingredients into larger bags - using mostly wax paper bags (compostable or burnable), which I rolled up, secured with rubber bands and put into 3 larger ziploc bags. I like to use a variety of seasonings and despite any potential weight issue, I don't think I would travel without at least one spice wheel in my pack.
Pre-Trail Shopping
Depending on how you travel, you may need to pick up a few items! Since I was flying to Kauai, I had to build a list of a few items that I couldn't bring in my carry-on:
For my first backpacking trip to Kauai, I had a hiking partner - and the two of us decided that for efficiency's sake, we wanted to use some prepared camp meals. I ordered a dozen or so vegan meals in biodegradable/burnable packets from Mary Jane's Outpost - but we got rained out so the meal packets returned home with me. Last summer, I decided to use up the meals on my 2 week long trip to Portland & back. Unlike the usual car camping trips, I wanted to bring stuff that would be relatively easy to put together.
Mary Jane's Outpost has some good options - and lots of vegan stuff. The packets I brought along included: brownies, griddle cakes, ginger sesame pasta, corn ad, corn salsa, falafel, and lebanese peanut bulghar. The main problem with some of her offerings is that they contain dairy and beans - two foods to which I am allergic. The brownies were the one item that most impressed me but the rehydrated pasta didn't have the right mouth-feel. For the most part, none of these items were all that difficult for me to put together on my own. Falafel mixes can be had anywhere (and I can't eat a lot of that anyway due to the garbanzo flour). Couscous and mushrooms? Just why bother with all the packets?
For this trip, I decided to focus on using fresh, seasonal ingredients that I could dehydrate and which would be satisfying when rehydrated. The most helpful cookbook was the one that talked the most about the processes involved in dehydrating food and how to use it. My food supplies and meals had to conform to these principals:
- Whole foods - similar to how I cook at home. I wanted to avoid pre-packaged processed foods with long lists of ingredients entirely. I don't eat like that at home - and don't want to eat like that on the trail.
- Prep & pack foods that dehydrate well and weigh little, avoid bringing too many liquid condiments (dressings, vinegar, etc).
- Avoid over-relying on processed starches like pasta, couscous and bread. Couscous and pasta are filling and a great source of carbs - but vegetables are key to other nutrients and allow the body to build protein needed by active people! Quinoa was to be my main carb/protein base food, along with whole wheat udon noodles and rice noodles.
- Avoid foods that take too long to cook and thus require more fuel, like rice.
- Flavor foods generously with dried herbs & spices.
- Include foods that replace salts/magnesium lost to sweat while hiking and exercising outdoors - dried seaweeds are great for this purpose.
- Foods should be packaged so they can be used in multiple recipes - dried zucchini, carrots, mushrooms & onions all work pretty well in many different recipes. My magic number was 3 - I would just come up with ideas for different dishes and food combinations for each food, but did not establish this as a hard and fast requirement.
Most backcountry cookbooks don't take into consideration scalability and the incorporation of locally sourced or volunteered ingredients. In any kind of camping situation - well, let's face it - humans are social animals. We like to congregate in the dark over fire and share food together.
No matter where you go, someone's going to suggest sharing food or even a camping potluck. It's not just a matter of throwing all your extra food in a pot and hoping it comes out right (even if folks say it does, doesn't make it true).
And you might find some amazing local contribution like key limes or Mexican oregano or a mango. Flexibility and creativity are essential to fun and delicious backcountry cooking.
I had some ideas for favorite camping meals and new stuff that might be fun to try - and the book I liked most gave me a few ideas for experimentation. I would probably have tested a few things out before going on the trail, but there were no disasters and I ended up making some pretty awesome food, and was able to share with folks several times with ingredients that weren't terribly expensive but which provided excellent results.
Supply List:
In no particular order - here is a list of the food that I prepared and brought with me - in the backpack - as the bases for meals on the trail.
Fruits & vegetables: hey, I'm a vegetarian! this makes up the bulk of my diet at home, so why not on the trail? I don't eat out of packages at home - so why eat packaged food on the trail?
- Persimmons - 1lb home dehydrated slices
- Apples - 1/2 lb home dehydrated/cored slices
- Strawberries - thinly sliced & home dehydrated (2 pints fresh)
- Apples - sliced & home dehydrated (what I had left from last fall - about 4 cups dried but lotso air!)
- Blueberries - home dehydrated whole (1/2 pint fresh)
- Raspberries - home dehydrated whole (1/2 pint fresh)
- Mushrooms - dried porcini & shitake mushrooms from Mountain Rose Herbs - dried mushrooms are indispensable!
- Onion - 1 red, 1/4" dice
- Onion - 1 yellow, 1/4" dice - both kinds of onions turned out very well rehydrated and in all dishes.
- Carrots - 4 large, 1/4" dice - the carrots got so very tiny! I may just try slices or bigger chunks. They worked out great.
- Zucchini - 4-5 courgettes, 1/4" dice -they looked like shrinky dinks and got way smaller than I expected! These could be added soup, gravy, sauteed with other vegetables. They rehydrated really nicely and were very delicious.
- Sweet potatoes - 3 bigger than a handful each. These were sliced, steamed and mashed in the ricer before being dehydrated. Sweet potatoes reabsorb moisture from the air pretty quickly, so I had to run them through the dehydrator a second time and then powdered the mashed dried sweet potato in my Breville blender
- blending into regular flaked potatoes for mashed potatoes
- rehydrated thickly and sauteed as sweet potato pancakes/latkes
- mixed in with peanut butter and veggies for a soup
- Red bell pepper - 2 large, 1/4" dice & dehydrated (also super shrinky dink!) Bell peppers rehydrate nicely and add great flavor to anything.
Prepared foods: can't get away entirely without without using some prepared foods!
- Potato flakes - about two cups store-bought instant organic potato flakes. Let's face it - mashed potatoes are very satisfying - as mashed potatoes, soup or as soup thickener. Who needs an excuse here?
- Vegan vegetable bouillion cubes - 2 packages of 8 cubes
- Seaweed: 1 package of wakame - provides sodium, magnesium & calcium
- Roasted black sesame seeds
- Udon noodles
- Rice stick noodles
- Quinoa, black (2 cups dried)
- Maple sugar, granulated (1/2 cup)
- Tofu - home dehydrated 8 oz 1/2" cubed tofu. It did not rehydrate - not even after soaking for a billion years and being simmered in soup. It was hard and inedible. Time for more dried tofu experimentation.
- Lara bars
& Bumble bars
- 6-8 bars for eating on the plane or in transit or as emergency backup.
- Mixed raw cashews & almonds.
One of the things that I didn't like about all the backcountry cookbooks I read was that they called for a lot of plastic bags. A lot. Like - pre-measuring out and mixing a ton of things and keeping them separated in a lot of little bags. Or bringing lots of little plastic condiment packets - or worse - small bottles with tons of liquid condiments.
Instead, I wanted to just put like ingredients into larger bags - using mostly wax paper bags (compostable or burnable), which I rolled up, secured with rubber bands and put into 3 larger ziploc bags. I like to use a variety of seasonings and despite any potential weight issue, I don't think I would travel without at least one spice wheel in my pack.
Pre-Trail Shopping
Depending on how you travel, you may need to pick up a few items! Since I was flying to Kauai, I had to build a list of a few items that I couldn't bring in my carry-on:
- olive oil
- a small knife (which I didn't really need that much)
- coffee (I figured I should just buy local coffee since I would be in Hawaii)
- stove fuel
- 1 pint each of Frangelico & rum - transferred to 16 oz water bottles. Hey, I was on vacation and a girl's got to be able to doctor her morning decaf coffee once in a while!
Monday, May 10, 2010
Backcountry Vegan - Backcountry & Camping Cookbook Reading List
My pre-trip reading list included these books, in no particular order:
Reviews coming soon!
Reviews coming soon!
REVIEW: The Girl With the Dragon Tattoo (Millennium #1) by Stieg Larsson (1-star)
It took me nearly 400 page to start to care about what was going on in this book - since I was a languages major, I always read through and confess to having read the last 40 pages or so when I was around page 250.
First, I have to say that this book could stand some real editing down. I agree with folks that it's hard to understand what the monetary values are - it would have been nice to have a little appendix with some of the figures - at the date this is set Kronor = X pounds = X dollars or whatever.
I didn't find the names of the characters all that confusing as some of the other reviewers did - names are just names, people! But why didn't they translate "Ms" - unless "Froken" has some hidden meaning - perhaps they should have explained the cultural context and the reason for not translating that in an appendix.
Yes - it was irritating to continually read gratuitous references of Mac hardware and applications (a URL in the book to a freeware app, REALLY???).
I agree with Anne's review of the movie - why did they change the name? "Men Who Hate Women" is much more appropriate.
The parallel character development - Martin and Lisbeth - was just not that well done. I have to admit when the book described how handsome he is - I was a bit amazed at the frumpy plain looking middle aged guy they picked to play Martin in the movie!
Despite the gore and violence depicted in the book - in the end, it felt like a lukewarm and overly long setup to create a super smart female hacker protagonist who embezzles money from a criminal to live happily ever after spending freely and traveling wherever she wants.
*yawn*
Another Cinderella story. Next, please!
REVIEW: The Girl With the Dragon Tattoo (Millennium #1) by Stieg Larsson
RATING: 1-star
Refurbishing Furniture... Green or Not?
It seems like I am spending a lot of time fixing up my furniture instead of buying new furniture. Due to problems with mold & mildew - I have to sand and fix up the back of my antique mahogany armoire. I'm regularly re-doing the 6' high kitty condo with new hemp rope & indoor outdoor carpet.

Sun damage on the arm in 2005 or so - within the next year, the seat cushion between
the black pillow and the kitty started to shred parallel to the length of the sofa.
Enter - the problem of the sofa. I bought it in 1998 or 1999 at Z Gallerie on Union St in SF. I loved this sofa to bits. It started showing sun damage on the fabric around 5 years of age, and by 8 or 9, the fabric on the seat was starting to fall apart and I kept it covered with a throw for well over a year before I realized that it needed to be recovered.
Of course I already thought of recovering it myself OR making a slipcover. Recovering the sofa would mean taking a class - which wasn't available. Being a single arm sofa would make it easier but there are all sorts of things that I just didn't know about - like how do you get the trim that is tacked around the whole sofa? How do you pleat the arm? What do you use to do all this? I know using my little heavy duty stapler would NOT be the answer - if it couldn't hold fabric and hemp rope onto a kitty condo for the long term, what good are 3/4" staples going to be on a sofa?
Making a slipcover - for a single arm sofa? Come on! How ridiculous would that even look? At a certain point - I realized that if I tried recovering it myself or making a slipcover - it would look like pure shit. Some things are better left to the professionals. However, I thought I would save money by looking for eco-friendly fabrics.
Bamboo is freaking expensive and is not available in upholstery weights when I looked.
After months of trying gave up on trying to find eco-friendly/sustainable/organic type of upholstery fabric, I gave up. From what I have read online, it seems like those fabrics are not not available to consumer and what's available to trade is more than $50/yard. At Britex, I bought a polyester ultrasuede for $19/yard to cover my sofa. Getting someone to do the recovering seems to be ridiculously expensive - it's a one-arm chaise and I was getting prices anywhere from $500 to $800. The damned thing cost $750 new!
I finally settled on a guy from craigslist who is charging $525 to recover my sofa - fabric cost over $100. It would be just as "cheap" to replace. Why does it cost so much to do the right thing? Is recovering the sofa the "right" thing? I have had it for over 10 years, afterall.

The finished result - note how the trim at the lower right/front leg is drooping - I had to tack it up with a stapler.
As it turns out - I was right. The Craigslist guy had tools that I didn't have or even imagine.. The stapler he used had very very long staples that were narrow and thin. While he did the work on the chaise in my own backyard, he made all the trim in the shop. In the end, the guy didn't do such a great job.
Though he still did better than I, the front of the single arm on the chaise didn't look right at all and there were plenty of bumps and such. I totally fell out of love with it in its new color (went from a red brocade which fell apart from sun damage & use after 7 years and which I draped for another 3) to a light grey-green.
I ended up selling it to a friend who admired it very much and almost covered the costs of fabric and recovering it.
I ended up selling it to a friend who admired it very much and almost covered the costs of fabric and recovering it.
Subscribe to:
Posts (Atom)