MAKING ENCHILADA SAUCE was probably one of the best things I did this year. I have been eating up the enchilada sauce at a much quicker rate than the marinara sauce, truth be told. This weekend, I am off in the Sierras at the cabin of friends of a friend - and the two of us are relaxing, skiing and cooking up a storm (well, at least I am). I helped my friend Eric at his cooking class at Millennium last weekend - and being that I hate to see anything go to waste, I ended up bringing home a pint of fantastic hominy, a pint of shredded parboiled brussels sprouts and a pint of pepper puree (not too spicy). I didn't quite know what I'd do with it til I realized I was feeling too lazy to make pappardelle for chanterelle stroganoff after a post-skiing first time session making chipotle caramels (which came out awesome, btw).
One of my favorite dishes is chilaquiles - which is basically diced tomatoes, with onions, garlic & green bell peppers, maybe a minced jalapeno - all simmered, made into a casserole with fried up strips of stale tortillas, covered with crema fresca and cheese. I've heard chilaquiles referred to as an "artery clogger" or "heart attack on a plate." In San Francisco, they are usually made with scrambled eggs... making a heart attack more eminent.
Being that I was feeling completely lazy after the skiing/caramels activities - I decided first to make enchiladas, and then decided to layer it - like lasagna. The result was essentially a roasted peppers based chilaquiles casserole - without the dietary cholesterol associated with the traditional recipe:
Step 1:
2 cups large white hominy
1/2 cup chile paste (dried chiles soaked in hot water & pureed)
1 cup water
Simmer hominy, chile paste & water til substantially reduced.
Step 2:
3 Tb olive oil
1/2 minced onion
2 cups shredded parboiled brussels sprouts (or some other green veggie - kale or mustard greens would work)
Sautee onions & brussels sprouts til onions are soft. Once hominy/chile mixture has cooked down, add to the pan. Add:
1/4 cup nutritional yeast
3 Tb cumin
salt & pepper to taste
16 oz silken tofu (mash into pan or puree in blender first)
2-3 Tb tomato paste (optional)
1/3 c finely chopped cilantro (optional)
Cook this down til it reduces substantially.
Meanwhile - warm up your tortillas - you want to dry out a package of about 12 tortillas just a bit. Drizzle the bottom of the casserole dish with olive oil and then cover the bottom one layer of corn tortillas. You'll put down the filling and cover with the rest of the tortillas before putting the enchilada sauce on top.
Warm up 1 pint of Red Enchilada sauce - add about 1 Tb of powdered toasted chipotle pepper. Once the filling has reduced - spread it into the casserole pan, cover with a layer of tortillas, then spread all the enchilada sauce on top.
Bake for 30-40 minutes. Remove - spread the enchilada sauce smooth across the top with the back of a spoon or spatula, pour on 1 cup of cashew cream (or unsweetened Mimic Cream), sprinkle with toasted pumpkin seeds & crushed tortilla chips, Let sit for a few minutes to cool (it makes serving easier!) - use a nice sharp metal spatula to heft out a chunk of delicious casserole to your plate and enjoy!
Saturday, December 26, 2009
Chipotle Soft Caramels
One thing that I have most missed in my vegan diet is caramel - I have always loved caramel and caramel & chocolate is truly an awesome treat. After looking over many many recipes for vegan caramels - many from a Daring Bakers challenge - I realized - it's a lot of guess work. Despite the fact that the top of my candy thermometer (no, not granddad's candy thermometer, mom!) busted off after arriving at the cabin this weekend - it still worked well enough for me to use in my first experiment with vegan caramels.
A major discrepancy was in the amount of invert syrup/agave to sugar, and the temperatures required. The bottom line is this - for soft caramels, you really want somewhere between soft and firm ball - you don't want more because you'll end up with something that will pull out fillings and crowns.
Here's my recipe - your mileage may vary, you should definitely experiment!
2 cups sucanat
1 cup Golden Syrup
1/4 cup maple syrup
Mix together well, and while it is working up to 275 degrees, mix together:
1 cup coconut milk (from a can - shake well!)
1 cup cashew cream (I used Mimic Creme this time)
1 chipotle pepper, toasted and ground in the spice mill
1 vanilla bean (slit the pod, scrape into pan, add pod)
Let the cream mixture warm up - ok if it simmers a bit, just add more coconut or cashew cream.
Keep a brush and water handy - when you stir the sugars, keep in mind, this reduces the temperature so don't stir too often. Use the brush dipped in water to wash down the sides of the pan after you stir. Once it gets to 275, pull it off the burner and add 2 Tb of coconut butter.
Next, add in the cream mixture while stirring - take out the pod piece - and then let it heat up to about 245.
Pour it into a pan lined with parchment paper - moisten with coconut butter if you want to feel safe - and let cool. If it's 40 degrees outside, by all means, set it out on the porch like I did (just pray the racoons and bears aren't around looking for dessert).
This came out super killer yum. Once I dip it in chocolate, I'll try to remember to take some pictures. I promise.
Thursday, December 24, 2009
Lemon Chutney - 2009 (redux)!
LEMON CHUTNEY: You won't believe this but... the last two batches of lemon chutney spontaneously combusted. *poof* gone. Just like that. Tasted really good, though. So, I am making two more batches of lemon chutney.
Directions for 32-36 large lemons:
SWEET & FRUITY LEMON CHUTNEY
8 - 4 oz jars sweet lemon chutney
3 - 8 oz jars sweet lemon chutney
LEMON & SWEET RED PEPPER CHUTNEY
9 - 4 oz jars lemon & sweet red pepper chutney
4 - 8 oz jars lemon & sweet red pepper chutney
Directions for 32-36 large lemons:
- Lemons, pt 1:
- Microplane or zest lemons (finely mince zest if necessary)
- Supreme and section, reserving the seeds and discarding all pith and membrane.
- Combine zest with lemon pulp into glass or earthenware container (my grandmother's Hull beanpot works great for this, you might use a tagine or Pyrex covered dish) with 8 T of sea salt. Let sit overnight or several hours The lemon pulp will release plenty of juice!
- The next day, strain the salty lemon pulp and zest, reserving the liquid. Divide evenly by weight using a kitchen scale (this was 4# of pulp and zest in my case, with 2 c of juice), and put into two separate pots.
- Divide reserved juice evenly by volume into the two pots. Squeeze enough lemons to bring you up to 2 cups of lemon juice, if necessary (don't forget to zest the lemons, first and chuck that in as well.
Sweet(er)
- 2 lb lemon zest & pulp
- 1 c fresh lemon juice
- 1 c cider vinegar
- 3 T finely minced fresh ginger
- 2 oz minced garlic
- 1 c raisins
- 8 oz chopped sweet red pepper
- .5 large white or yellow onion, chopped
- 1/2 - 3/4 c chopped dried apricots
- 2 c unrefined sugar (without molasses)
- 2 c sucanat or brown sugar
- Grind in spice grinder & add to pot 1 tsp each: hulled green cardamom, coriander, whole clove, whole allspice, fenugreek seed, yellow mustard seed
Lemon & Sweet Red Pepper
- 2 lb lemon zest & pulp
- 1 c fresh lemon juice
- 1 c cider vinegar
- 3 T finely minced fresh ginger
- 2.5 oz minced garlic
- 1 c raisins
- 16 oz chopped sweet red pepper
- 1.5 large white or yellow onion, chopped
- 1 lb sucanat (about 3 c)
- 2 t cayenne pepper flakes
- Grind in spice grinder & add to pot 1 tsp each: hulled green cardamom, white pepper, coriander, fenugreek, black mustard
- Put seeds into cheesecloth if there were a significant amount - otherwise, don't worry - it's a chutney and you don't need a ton of pectin to set it like a jam or jelly.
- Cook everything for 60 minutes or so until it reaches the right consistency.
- Remove cheesecloth with lemon seeds. Let sit overnight. Taste, adjust seasonings or ingredients (additional lemon juice, more ginger or chili, for example).
- Heat up, taste again, when satisfied, put into clean, hot mason jars and hot water bath can.
SWEET & FRUITY LEMON CHUTNEY
8 - 4 oz jars sweet lemon chutney
3 - 8 oz jars sweet lemon chutney
LEMON & SWEET RED PEPPER CHUTNEY
9 - 4 oz jars lemon & sweet red pepper chutney
4 - 8 oz jars lemon & sweet red pepper chutney
Saturday, December 19, 2009
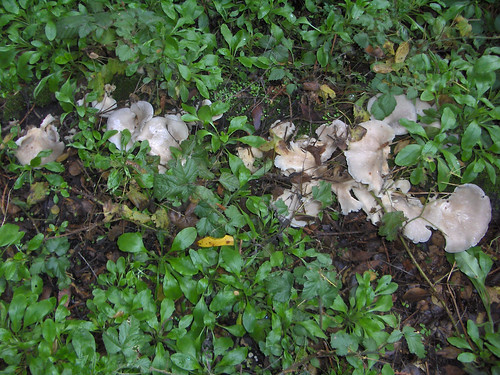
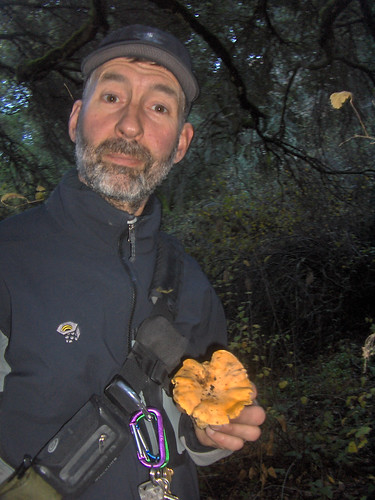
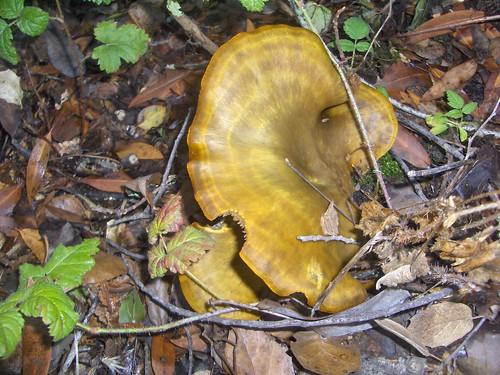
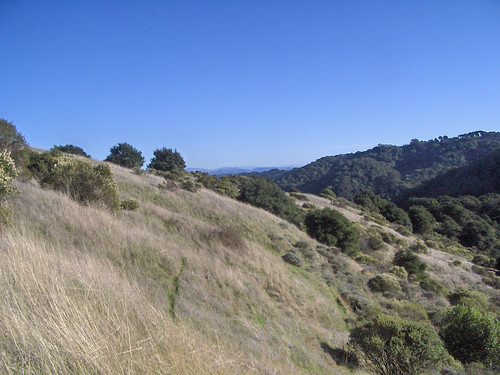
Mushrooming - December 19
Another December mushrooming trip with Scott!

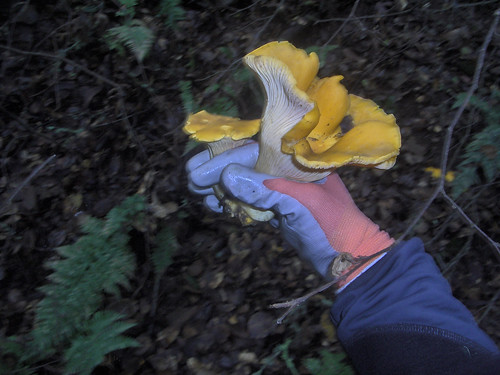
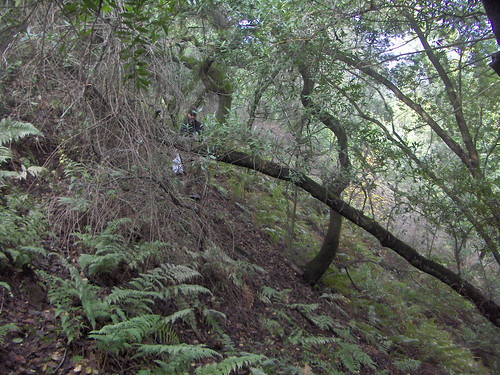
Using my new gloves for the first time - I feel so prepared! No more blackberry thorns in my fingers! No more mud under my nails!
Traversing a very steep hillside!
Thursday, December 10, 2009
Lemon Chutney - 2009!
LEMON CHUTNEY: Despite using a microplane, I was still up til 2:30 zesting and supreming lemons. Refinements on last recipes, below.
Directions for 32-36 large lemons:
SWEET & FRUITY CHUTNEY
LEMON & SWEET RED PEPPER CHUTNEY
Directions for 32-36 large lemons:
- Lemons, pt 1:
- Microplane or zest lemons (finely mince zest if necessary)
- Supreme and section, reserving the seeds and discarding all pith and membrane.
- Combine zest with lemon pulp into glass or earthenware container (my grandmother's Hull beanpot works great for this, you might use a tagine or Pyrex covered dish) with 8 T of sea salt. Let sit overnight. The lemon pulp will release plenty of juice!
- Lemons, pt 2: Zest, halve and juice enough lemons to get 2 cups of lemon juice
- The next day, strain the salty lemon pulp and zest, reserving the liquid. Divide evenly by weight using a kitchen scale (this was 3# 13 oz of pulp and zest in my case, with 2 c of juice), and put into two separate pots. Divide reserved juice evenly by volume into the two pots, as well as any reserved extra zest.
- Mise-en-place for two batches of chutney as follows:
Sweet(er)
1.75 lb lemon zest & pulp, prepared as above
1 c fresh lemon juice
1 c cider vinegar
3 T finely minced fresh ginger
1 c raisins
1/2 - 3/4 c chopped dried apricots
1/2 c currants
2 c unrefined sugar (without molasses)
1 c organic brown sugar
1 t cayenne pepper flakes
1 Tb salt
Grind in spice grinder & add to pot 1 tsp each: hulled green cardamom, coriander, whole clove, whole allspice, fenugreek seed, yellow mustard seed
Lemon & Sweet Red Pepper
1.75 lb lemon zest & pulp, prepared as above
1 c fresh lemon juice
1 c cider vinegar
3 T finely minced fresh ginger
2 oz minced garlic
1 c raisins
4 oz chopped sweet red pepper
1 large white or yellow onion, chopped (about 8 oz)
1 lb succanat (about 3 c)
2 t cayenne pepper flakes
1 Tb salt
Grind in spice grinder & add to pot 1 tsp each: hulled green cardamom, white pepper, coriander, fenugreek, black mustard
- Put seeds into cheesecloth if there were a significant amount - otherwise, don't worry - it's a chutney and you don't need a ton of pectin to set it like a jam or jelly.
- Cook everything for 60 minutes or so until it reaches the right consistency.
- Remove cheesecloth with lemon seeds. Let sit overnight. Taste, adjust seasonings or ingredients (additional lemon juice, more ginger or chili, for example).
- Heat up, taste again, when satisfied, put into clean, hot mason jars and hot water bath can.
SWEET & FRUITY CHUTNEY
LEMON & SWEET RED PEPPER CHUTNEY
Wednesday, December 09, 2009
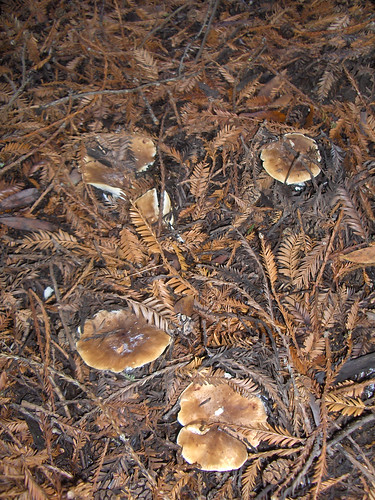
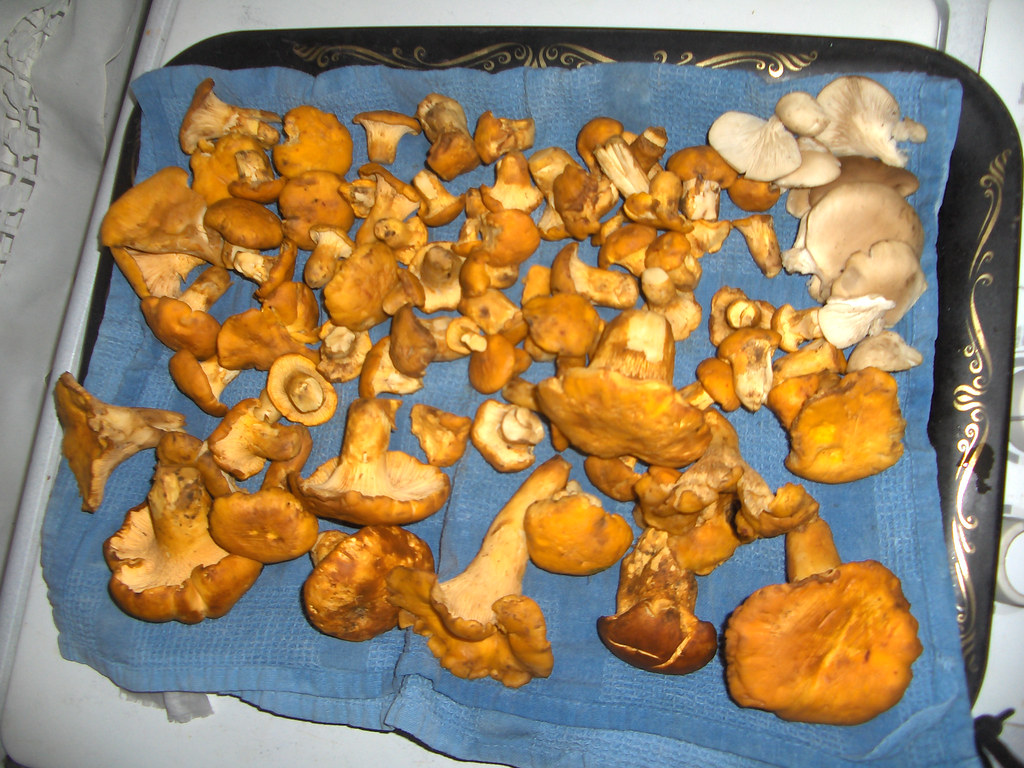
Elbow-Deep in Mushrooms
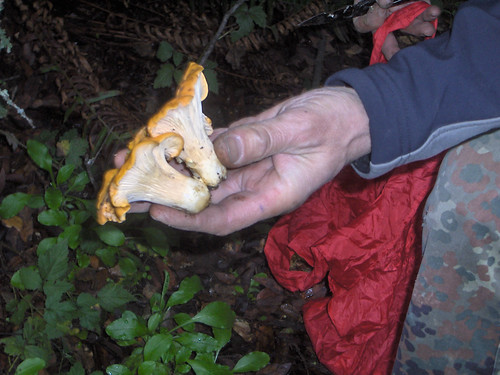
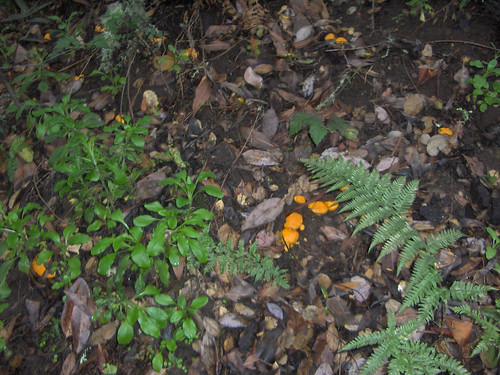
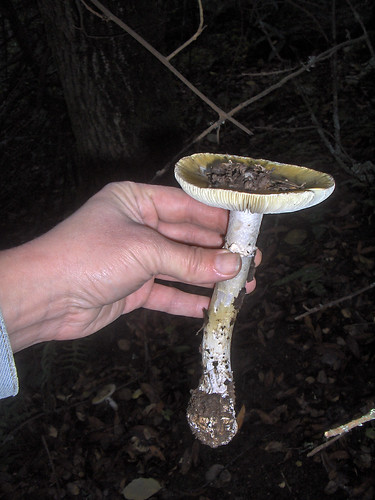
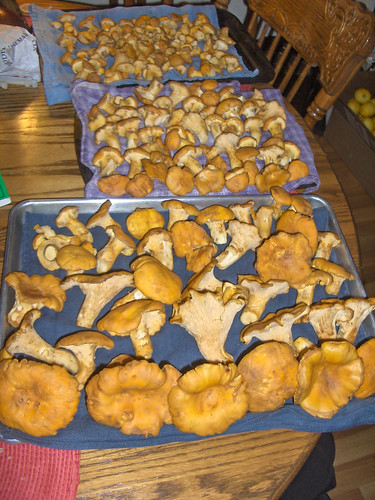
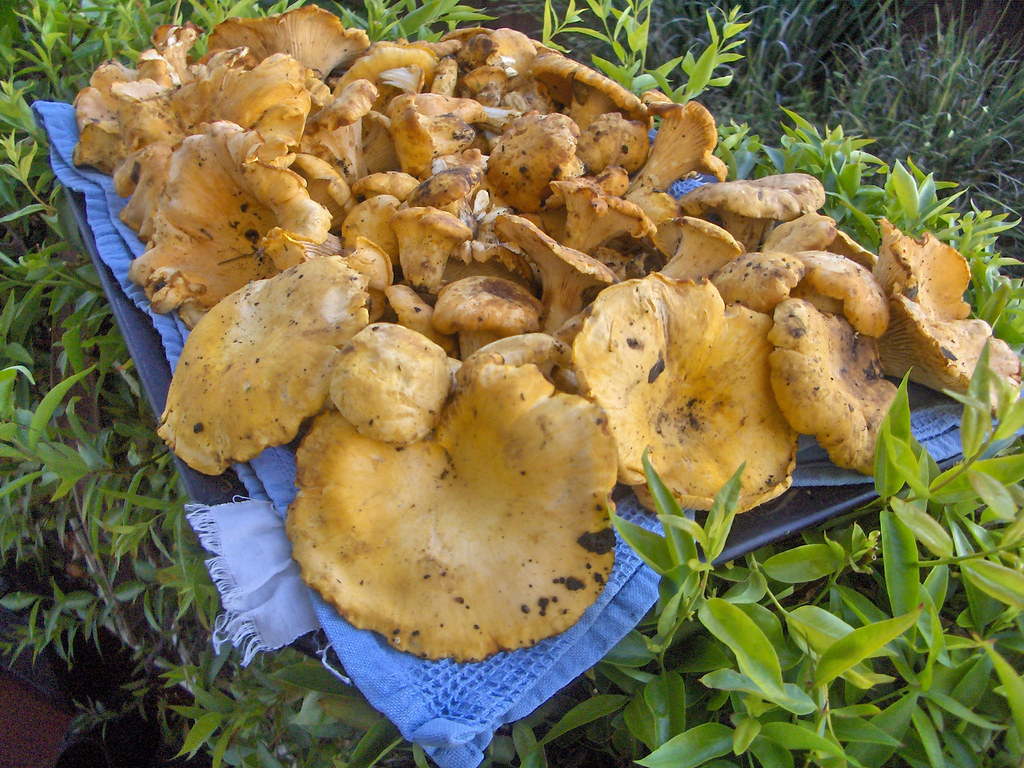
ONE DAY of hard rain seemed to be a blessing. Scotty and I explored an area of steep uphill above a creek in a nice canyon and found saucer sized oysters and piles of chanterelles. The forest claimed my pocket knife - but we came home with 2.75# of oyster mushrooms, and 7.25# of chanterelles. Some of our recent "favorite" spots seem to have suffered some trampling and cutting down of branches by local authorities. We also suspect in one area that it is a bit cooler due to the direction the hillside faces - cutting down on the blooms of the chanterelles.
Meanwhile, I'm still cleaning chanterelles and haven't started on cutting lemons for chutney - woe is me!!
Meanwhile, I'm still cleaning chanterelles and haven't started on cutting lemons for chutney - woe is me!!
December Projects
MUSHROOMS! More rain this week - but also a bit of chill. Heading out shortly to collect more chanterelles - put up a mere 2# in the freezer (done by dry sautee of thinly sliced mushrooms, reserving the juice they release to freeze, too).
LEMONS are still in my kitchen, slowly getting juiced, frozen and even turned into lemonade & lemon drops. I'm going to make up a couple batches of lemon chutney, but probably will create variations on my last two versions for sweet & savory lemon chutney -- of course I still have Hachiyas, but also still have some sweet red peppers and plenty of homemade cayenne pepper flakes. I also plan to make up a batch of marmalade and some candied lemon peel.
DESSERT! On Monday, I made a pair of apple pies - apple rum raisin with allspice (and somehow I'm out of allspice?) and apple strawberry with ginger. I also still have key lime juice and plan to experiment with variations on a key lime pie recipe that I found in a thread on the Post Punk Kitchen forum that doesn't use tofu or packaged pudding, and am going to sub almond milk and coconut milk to make a key lime pie to bring along to my birthday tomorrow.
BIRTHDAY party is tomorrow at Encuentro, kicking off a weekend of good food and soaking in hot water. At last weekend's 40th annual Fungus Fair, Scott & I splurged on a white truffle and a couple winter black truffles at from the lovely wife of Todd, the King of Mushrooms. I'm bringing the marble rolling pin, semolina flour and a hand crank pasta machine to make some pasta to go with those mushrooms on this weekend's get away, along with leftover birthday pie, chanterelles, homemade marinara sauce and a candy thermometer so I can make vegan caramels (why not?).
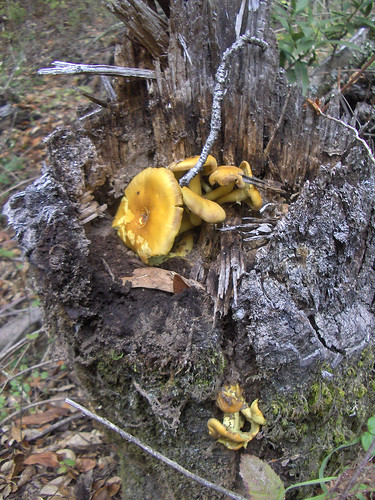
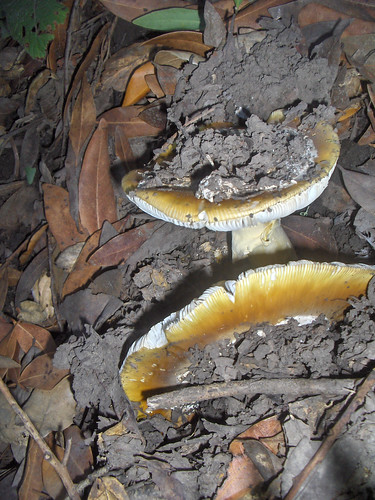
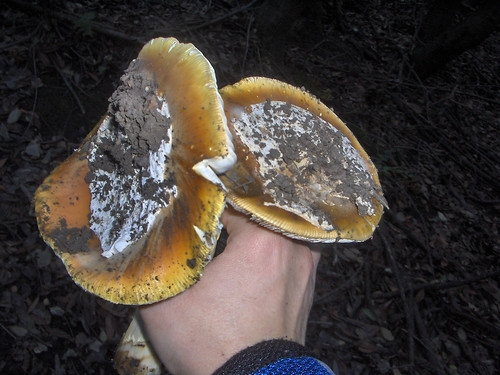
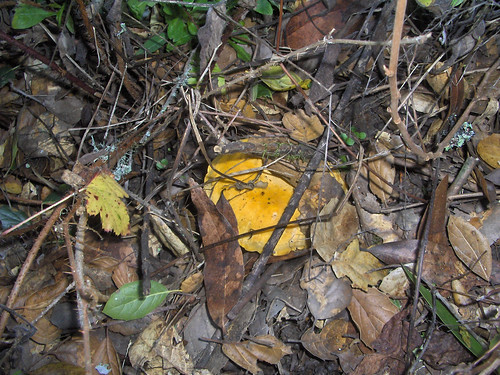
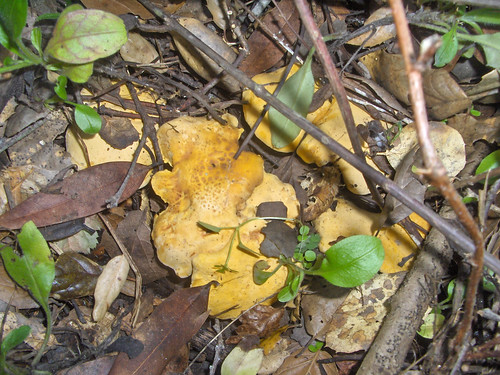
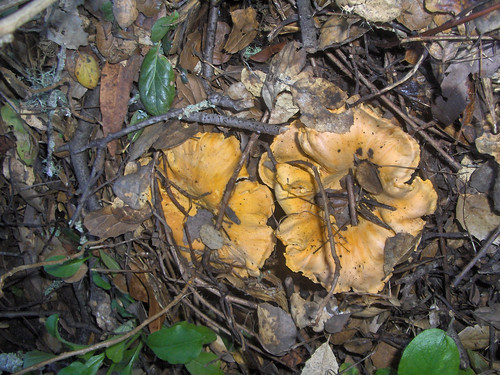
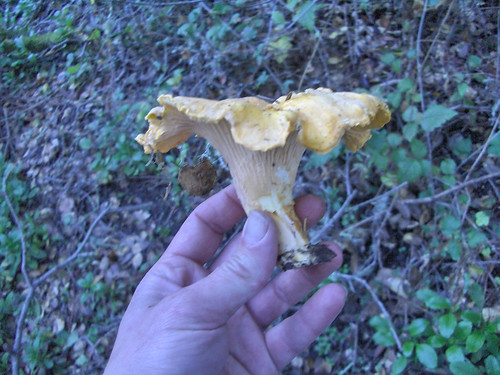
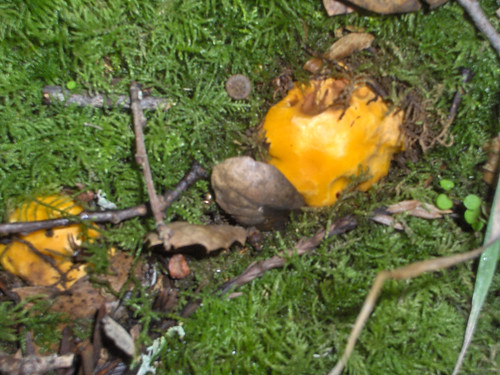
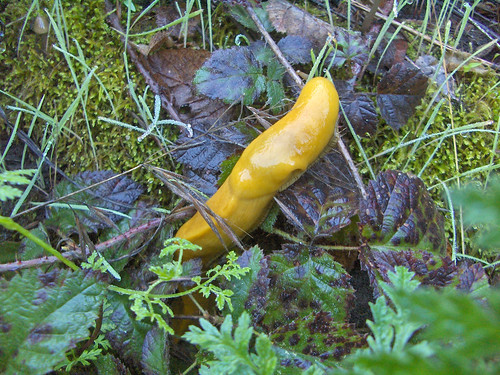
Mushrooming - December 9
Growing in a stump!
This one is very round!

Some nice fawn colored oyster mushrooms
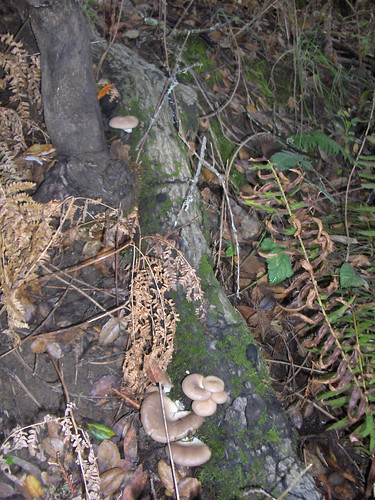
And some pearl grey oysters growing on a rotting log:
Corcorra-ish but not...
More oysters:

Scotty finds some chanterelles
More chanterelles!
More oysters
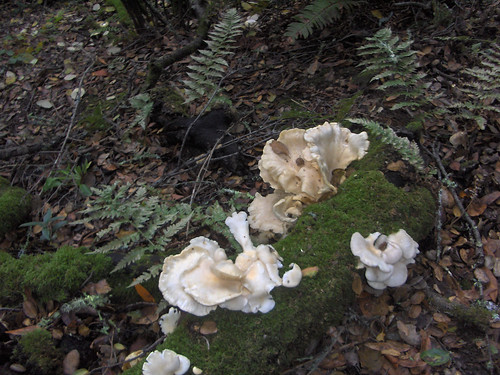
Corcorra!

Our chanterelle harvest for Decemember 9, 2009:
This one is very round!
Some nice fawn colored oyster mushrooms
And some pearl grey oysters growing on a rotting log:
Corcorra-ish but not...
More oysters:
Scotty finds some chanterelles
More chanterelles!
More oysters
Corcorra!
Our chanterelle harvest for Decemember 9, 2009:
Saturday, December 05, 2009

Encuentro Oakland - Opening Night Review
There was nothing "soft" about last night's opening of Encuentro (http://www.encuentrooakland.com) - as soon as they opened the doors, the Jack London Square neighborhood restaurant was packed and stayed packed all night long, steaming up the elegant glass front of the restaurant.
Eric Tucker, founding chef of the highly regarded (even famous!) Millennium Restaurant in San Francisco, along with partners Lacey Sher and Linda Braz picked a quiet corner on the ground floor of a building of lofts at 2nd and Jackson adjacent to the Amtrak Station in an area which transitions from wholesale grocers to residential lofts within just a few blocks off Broadway.
The krispy kale chips were positively addicting - olive oil and sea salt roasted kale chips served in a mound on the plate with our first glasses of wine - a Philo Ridge chardonnay and Wellington Vineyard zine/cab/grenache blend.
My friend found the chardonnay to complement the Uncle Eddie’s Wild Hen Devilled Eggs very well, while the red wine I ordered was perfect with the Truffled Mushroom Pecan Pate (vegan) which was served with grain mustard, fig onion marmalade, caper berries. The pate was so rich and delicious - I have honestly never tasted anything like it and will do my best to find out how to make it!
My friend and I both ordered the same sandwich - Peppered Portobello mushrooms with caramelized fennel/onions - he had the
smoked goat cheddar and I had the smoked pecan cheese (vegan) with caper aioli.
This was probably one of the best sandwiches I have ever had - and now I now what Eric means when I asked him about cooking baby fennel - his response was "You cook the $hit out of it" - the fennel and onions were so tenderly caramelized that the flavors of both came through in each bite without being mushy or dissolved into one big roasted mess.
The velvety texture of the mushroom was countered by the thick lightly toasted rustic bread - toasted just enough to provide a crunch without falling to crumbs when I bit down. The smoked pecan cheese was unlike anything that I have had yet - and I can't wait to go back and order the vegan cheese plate trio of Smoked Pecan / Brazilnut / Herbed Cashew and Pumpkin Seed cheeses.
The Nuevo Mundo Cab/Carmenere went really well with the sandwich, by the way. The printed wine menu in the restaurant includes some of the most apt & mouth watering 2-4 word descriptions of the wines - "tobacco/dirty blackberry" and "chocolate/tobacco/new wood/blueberry" and such.
I can't wait to go back - the Encuentro team has put together an outstanding menu and the space is gorgeous. Though the restaurant is not large and the ceilings are a bit high - at no point did I feel like I would lose my hearing and I was able to converse easily with my friend and with the two folks seated near us. I hope they get to use the broad sidewalk for outdoor seating in warm weather (please Oakland! we need more seats at this amazing restaurant!).
Thursday, December 03, 2009
Mushrooms & Lemons
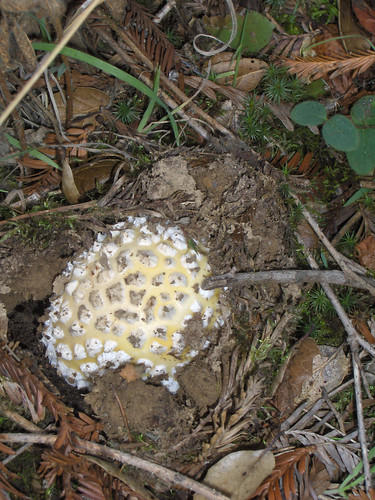
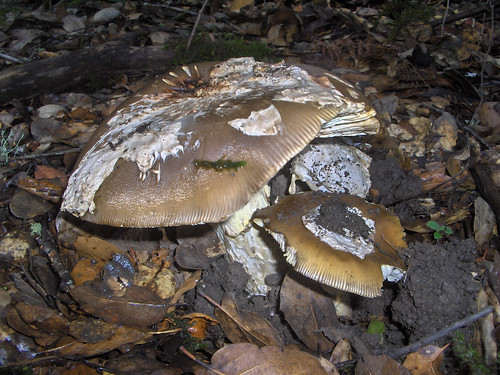
MUSHROOMS: Yesterday I went out for another quick golden chanterelle harvest, returning home with two large, very mature, coccora (aka amanita lanei or amanita calyptoderma) and about 3# of golden chanterelles. Since I held onto the coccora to show to my friend Eric in person for positive ID - they went mushy and I couldn't eat these "poor man's matszutake"
Don't forget - the Fungus Fair is this weekend - the 40th Annual Fungus Fair will be happening at Lawrence Hall of Science this year due to some work at the Oakland Museum.
LEMONS: After months of neglect, I went to my neighbors' backyard to harvest lemons from their very large, productive lemon tree. There were softball size lemons - some of the juiciest lemons I know in the area - and tons of smaller green lemons. As I picked, lemons were just jumping off the tree at me! Fortunately, I only had to walk a block home with 95# of lemons in a backpack and two grocery bags. I still have tons of limoncello from last year - but I guess it's time to make lemon marmelade, and soon, since I am going to be going out of town next weekend for my birthday and lemons won't keep indefinitely!
Look forward to some lemony goodness soon!
Wednesday, December 02, 2009
Tuesday, December 01, 2009
Persimmon Rose Preserves
Today, I decided to put away the rest of my persimmon pulp in the freezer, in 2 cup batches, for future use in salad dressing. The last 6 cups, unpureed pulp, became an other batch of preserves - with a hint of rose - it came out absolutely fantastic:
Ingredients:
6 - 8 oz jars
6 - 4 oz jars
Ingredients:
- 6 c persimmon pulp
- 2.5 c sugar
- 1/4 rose water
- pectin per instructions
6 - 8 oz jars
6 - 4 oz jars
Monday, November 30, 2009
Mushrooming - November 30
More chanterelles - the weather is warm and mushroom hunting on motorcycle in easy to access spots is a great way to trip link... :)
You can hide! But we'll find you, little chanterelle!
Our harvest!
Saturday, November 28, 2009
Vegan Persimmon Salad Dressing
On a whim - I grabbed a container of persimmon pulp and put it in the blender as I was whipping up a salad dressing. It was REALLY good - so, I did it again with similarly awesome results. While this isn't exactly a recipe - here is a list of the ingredients I put in, correcting to my taste.
I threw in 1-2 (hard to tell) smoked red jalapenos packed in olive oil (about 2 cups survived my attempt at smoking on the fire pit). Came out super smoky and yummy!
- 2 c persimmon pulp
- vinegars of your choice (I like orange champagne, rice wine and apple cider vinegar in salad dressings)
- nutritional yeast
- 1/4 olive oil (use even less olive oil than you normally would, if at all)
- 2-3 purple shallots (not the long skinny green onion kind)
- 1-2 cloves garlic
- 2-4 Tb coarse prepared mustard
- fresh or dry herbs
- pepper
- salt or a dash of soy
I threw in 1-2 (hard to tell) smoked red jalapenos packed in olive oil (about 2 cups survived my attempt at smoking on the fire pit). Came out super smoky and yummy!
Thursday, November 26, 2009
Collard Greens & Golden Chanterelles
Collards don't need to be prepared with fat and meat - they are a fantastic and versatile vegetable that can tolerate long cooking periods without falling apart. After reading through some traditional recipes, here's my current favorite way to prepare my collards.
Ingredients:
Instructions:
Ingredients:
- 1 large bunch of collards
- 5-8 cloves of garlic
- 1 white or yellow onion
- 1 cup dried chanterelles (or other dried mushrooms like shiitake, but for black trumpets or porcini, use 1/2 cup due to stronger flavor)
- 2 red Pimiento de Padron peppers (or other mildly spicy red pepper)
- 1-2 small sweet red peppers (or Anaheim)
- 2 Tb tomato paste
- 1/2 c apple cider vinegar
- water, to cover
- salt, to taste
Instructions:
- Prepare the collards by cutting out the thick ribs. Reserve the ribs for broth or to chop into fine dice to cook as a separate dish. Roll up the leaves lengthwise and cut off 1/4" - 1/2" strips.
- Place all collards into pot and cover with water, turn on high heat.
- Add vinegar.
- Fine dice half onion, thin slice remaining half and add to pot.
- Crush dried mushrooms in your hands to break up large pieces before adding to the pot, along with finely minced peppers and tomato paste.
- Bring to a boil, add water as necessary and then reduce to simmer until broth is thickened. You can serve with a slotted spoon (reserving the broth for other uses) or cook down until there is nearly no broth left (more goodies on the greens).
Fourteen Cups of Flour Later...
I just made a 7x of the Basic Persimmon Cookie recipe, and have a few notes:
- when you hit the "blend" button to puree the persimmons, make sure the lid is secured tightly as the persimmons tend to be thick and will "jump" when the blades move
- when you are cleaning up the 1 cup of persimmon from the wall, counter & floor, don't forget to unplug the blender (or make sure the lid is on tightly) when you move it to clean around it or you will end up with another 4 cups of persimmon sprayed up into your closed cabinet and all over your dishes
- get out the Very Large Food Service stainless steel mixing bowl before it gets dark & cold outside
- blending in the baking soda & powder with the puree is a very good idea - it's more evenly distributed in the overall mix for large batches
- potholders
Monday, November 23, 2009
Persimmon Jam
PERSIMMONS are a bit tricky. They are not exactly chop or mash-able. So, I put them in the blender and whiz them - but that introduces a few air bubbles into the puree. It spreads really nicely on dehydrator sheets for fruit leather, though. Since persimmon pulp is taking over my fridge, I decided to try making some jam out of the pulp - put it in the blender and ended up with a thick, persimmon-butter like jam. It's so good - my taster says that he can't believe that there are no other spices added because the persimmon flavor is so rich and yet so subtle and complex.
INGREDIENTS:
Heat up the puree in the pot before adding the sugar. It helps if you thoroughly mix the pectin with the sugar, first. However, since the persimmon is so thick - I found that the sugar and pectin didn't dissolve very well. Next time, I will try reserving some of the puree mix the pectin and sugar in the blender before adding it to the rest of the pulp already hot in the pot.
YIELD:
INGREDIENTS:
- 12 cups of pureed persimmon pulp
- 3 cups of sugar
- pectin as directed by Pomona's Pectin
Heat up the puree in the pot before adding the sugar. It helps if you thoroughly mix the pectin with the sugar, first. However, since the persimmon is so thick - I found that the sugar and pectin didn't dissolve very well. Next time, I will try reserving some of the puree mix the pectin and sugar in the blender before adding it to the rest of the pulp already hot in the pot.
YIELD:
- 11 - 8 oz jars persimmon jam
- 5 - 4 oz jars persimmon jam
Sunday, November 22, 2009
Applesauce!
I love applesauce. I hate quartering, coring and peeling apples. I've been doing it since I was 10 years old - and always found that the hand pain was just no fun at all. This year, I decided to try something easier - I halved the apples and used a melon baller to scoop the cores, cooked up the apples and then put them through the food mill attachment for my Kitchen Aid.
I was amazed and pleased to discover that this worked a lot more easily - with no clogs! - than the tomatoes! And, in fact, there was way less waste than if I had cleaned the apples by hand! I ended up with about 2 cups of skins & centers from the apples instead of a whole bowlful of seeds & cores.
Next time - I'm just going to quarter them and leave the seeds/cores and run the cooked apples through the food mill. Even less work! Even less waste!
YIELD:
8 - 16 oz jars of applesauce
Saturday, November 21, 2009
Mushrooming - November 21
After some showers on Friday, I was excited to head out to some newly discovered moist spots for more chanterelles with my trusty mushroom hunting protegee, Scott. We skipped "the usual" spot and went to the spot we discovered a couple weeks ago and explored more adjacent areas. We even went in for a walk on some trails closed to mountain bikes because we were on foot - and Scott had never been on these trails because he was always in this area on a mountain bike. Scott noticed that "there are a ot of cobwebs across this trail!"
Of course, that's a GOOD sign - and I kept scanning the ground. After the second or third time he said that, I stopped him and said "Well, we could go back or - we could pick those mushrooms." Wouldn't you know it - after picking several pounds of chanterelles, we nearly stepped on some growing ON the trail. We crawled into the underbrush and picked more mushrooms, returning home victorious with 5# of beautiful golden chanterelles.
Giant banana slug
Corcorra!
Little white funguses that look like mung bean sprouts everywhere:

Pretty - large - shrooms growing under bay trees:

Yup! It's a chanterelle!
Growing right on the trail!

More beautiful fungi -
Of course, that's a GOOD sign - and I kept scanning the ground. After the second or third time he said that, I stopped him and said "Well, we could go back or - we could pick those mushrooms." Wouldn't you know it - after picking several pounds of chanterelles, we nearly stepped on some growing ON the trail. We crawled into the underbrush and picked more mushrooms, returning home victorious with 5# of beautiful golden chanterelles.
Giant banana slug
Corcorra!
Pretty - large - shrooms growing under bay trees:
Growing right on the trail!
Friday, November 20, 2009
Strawberry Jam, Redux
The strawberry jam I made in June was tasty but - it wasn't the deep ruby red color that I wanted. I wasn't sure quite what happened there, til I came across this fantastic Bay Area Bites article on Strawberry Jam using directions based on a Helen Witty "Good Stuff Cookbook" recipe.
The basic premise is simple - macerate with sugar, capture the juices, simmer the juices to syrup, add berries, put in jars - voila! No pectin!
4 - 8 oz jars strawberry jam
2 - 4 oz jars strawberry jam
The basic premise is simple - macerate with sugar, capture the juices, simmer the juices to syrup, add berries, put in jars - voila! No pectin!
- Weigh your strawbs, add the sugar and some lemon and let it macerate in a non-reactive container - overnight in the fridge of several hours on the counter at room temperature, stirring occasionally to get the sugar mixed in and dissolved.
- Heat in a pot and bring to a simmer for a couple minutes.
- Return berries & juice to non-reactive container for a few more hours or overnight.
- Sterilize your jars - I like to wash mine in hot water and keep the in the oven at 150 on a cookie sheet.
- Strain the berries from the juice.
- Simmer the heck out of the juice until it starts turning into a syrup
- Add the berries. Mash if necessary (I sliced mine before macerating).
- Simmer again until the berries are translucent and the jam thickens.
- All usual tests for setting apply.
- Put into hot sterilized jars, seal and lick all your spatulas, spoons and fingers before washing them. OK, that last bit wsn't in the instructions but it happens.
- 3 lbs berries
- 3 cups sugar
- 1 lemon, juiced
4 - 8 oz jars strawberry jam
2 - 4 oz jars strawberry jam
Tuesday, November 17, 2009
Sweet Red Pepper & Persimmon Chutney
Chutney is one of my favorite things - on bread, on potatoes, on a nice vegan wheat gluten "field roast" - and it's a great way to use up a lot of persimmon! Using the same winning spice combination as the Fig-Early Girl Tomato chutney recipe from 2 months ago, I whipped up a big pot (but not too big - lest I get myself into trouble as I did with the gigantic proportions of last year's persimmon chutney recipes!). This time - I built the recipe to the pot, minding the proportions of my favorite chutneys, and happened to have on hand a pile of sweet red peppers from Mariquita's Mystery Box - so the combination fell into place.
Sweet Red Pepper & Persimmon Chutney
YIELD:
Sweet Red Pepper & Persimmon Chutney
- 6.5# persimmon pulp - scooped from skins & coarsely chopped (you don't want it to be fibrous/stringy after it cooks)
- 3# finely chopped white or yellow onions
- 2# - 2.5# finely chopped sweet red peppers (stems, membrane & seeds removed)
- 2.5 oz garlic, fine chop
- 2.5 oz ginger - chop, put into blender with 1/2 c vinegar and add water as needed - blend til smooth and then press through metal strainer with a rubber spatula - reblend with a bit more water if you think you can get more pulp out (goal: no ginger "hairs" in chutney this year!)
- 2 c. apple cider vinegar
- 2 c. packed brown sugar
- 2 Tb chili flakes
- 2 Tb salt
- 1 tsp each: white pepper, coriander, fenugreek, black mustard - ground in spice grinder & added to pot
YIELD:
- 4 - 12 oz jars sweet red pepper & persimmon chutney
- 16 - 8 oz jars sweet red pepper & persimmon chutney
- 9 - 4 oz jars sweet red pepper & persimmon chutney
Persimmon Cookies - Update!
As it turns out, the basic recipe is probably the best one. The additional persimmon did not make the cookies taste more persimmon-y - though the texture was pretty good out of the oven. The real test has been the way the cookies stand up to the passage of time. The original recipe came out a lot more cakey and has kept from hardening very well in the past week. The modified recipe - well - warming them in the toaster oven makes them less hockey-puck like, but they are still dryer inside. So, how does this work - you put in more moist ingredients and the cookie dries out faster? More research needed - sticking with the original basic persimmon/pumpkin cookie recipe as posted.
Friday, November 13, 2009
Golden Chanterelle Risotto
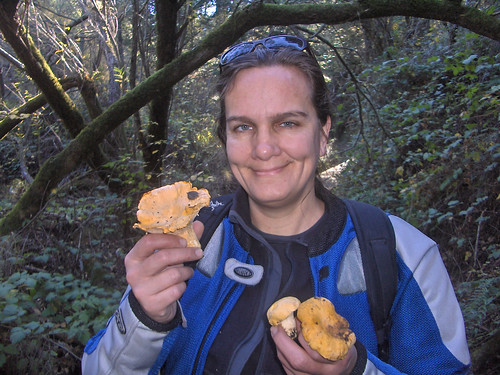
Risotto is one of my favorite dishes - I don't make it nearly often enough and when I do, I always make plenty to eat for several days after. Since picking a wonderful bounty of chanterelles last weekend with my friend Scott -- instead of dry sauteeing and freezing them as I often do -- I've been making up delicious chanterelle dishes every night so that my friend can develop a taste for them and will want to go hunting more with me all winter.
Golden Chanterelle Risotto
Golden Chanterelle Risotto
- 3 c Arborio rice
- 1 lb Golden Chanterelles (chop the stems into discs, thinly slice the tops)
- 1 Delicata squash, roasted & chopped into 1/2" chunks
- 1-2 shallots chopped (the small red onion variety, not spring or Welsh onion variety)
- 2-3 cloves garlic, thinly sliced
- 2-3 yellow carrots, diced
- 1 bunch of radish greens, chiffonaded (or sub a cup or so of other savory greens arugula, white mustard or kale)
- 1/2 c dry cooking sherry
- 1 T dried thyme
- 3-4 T fresh parsley, chopped
- 1/2 tsp paprika
- 1 c. of the tiniest cherry tomatoes you can glean from your garden
- salt, to taste
- black/white pepper, to taste
- olive oil, as needed
- saffron (optional)
- 8 c veggie stock
- STOCK: Pour veggie stock into a stockpot at the back of the stove and start to warm up on low. You want to keep this at a simmer while you're actually adding it to the risotto. I threw in the stems from dried thyme for extra flavor - stems from other herbs might work nicely, too.
- SQUASH: Start to roast your delicata before you start the risotto - they cook up pretty quickly and the squash does not need to go into the risotto in the first part of cooking (unless you want it to cook down and blend in more).
- SOFFRITO: Sautee carrots, garlic & shallots in several Tb of olive oil on med-high until softened - but don't burn! Add chanterelles & cook until the chanterelles start to release all their liquid and then add the dry cooking sherry, radish greens, parsley and dried herbs. Once the greens are a bit soft, scoop all the veggies out with a slotted spoon (I like to use a mesh disc with bamboo handle for stir fries that I picked up in an awesome Asian housewares store on Clement St).
- TOSTATURA: Add a few more tablespoons of olive oil to the reserved juices in the pan and stir in the risotto. Cook on medium til the rice is transluscent - you'll hear a clicky-clicky sound that is different from when it is first put into the pan.
- COTTURA: Add your first ladle of broth and stir in the reserved veggies & delicata squash. Stir the risotto gently to keep it from sticking, and once it has absorbed the broth a bit, add more. The trick is to always keep the rice just slightly covered with broth and don't cook it on too high a heat or it will stick. This is the stage when the rice releases the starch and starts to look creamy.
- ALL'ONDA: don't forget to taste your rice! You want it to be "al dente" - not totally mushy but cooked with a little "bite" in it. Just before it gets to the "al dente" stage is when you want to toss in those tiny cherry tomatoes -- the bigger they are, the earlier they should go in - but you don't want them to cook - just to warm up so that they burst with warm tomato goodness when you take a bite of risotto.
- The last stage is MANTECATO - when butter & cheese are added, but that is up to the cook - not necessary in my vegan kitchen when the risotto is so delicious without! I just add salt, pepper and in this case - some saffron. Stir in the additional spices and serve.
- LEFTOVERS - you want leftovers, trust me. Remember to "heat gently" - you don't want to overcook the rice. Short spurts in the microwave work, or leave it out to warm to room temperature and then heat in a pan adding a little hot water/broth in small amounts just like you did to cook it. Warming it in the oven (with cheese on top if you insist) also works pretty well.
Wednesday, November 11, 2009
Persimmon Cookies
After reviewing 2 dozen recipes for persimmon cookies online, it seemed that they were all so very similar, despite claims of individual authorship or creation. One website has three different persimmon cookie recipes - which all have the same ratio of the same ingredients! For further analysis, I pulled about 18 of them into an excel spreadsheet and organized the ingredients so that I could see the patterns. You can download my spreadsheet as a 2 page PDF (printable as horizontal-legal).
With few exceptions, the basic persimmon (or even pumpkin) cookie looks like this:
Basic Persimmon Cookie
RESULT: I made a 4x batch of this recipe and my conclusions and taster responses are as follows:
Vegan Persimmon Cookies, Take 2
Cream sugar & fat. Puree persimmon in blender, add baking soda/powder/salt/spices & blend again. Add persimmon to sugar/fat & cream again. Whip flaxseeds & water in blender or food processor til frothy. Add to wet mixture & combine thoroughly. Add flour & mix till combined, scraping the sides and bottom. Add raisins. Spoon onto silicone baking sheet liner with teaspoon, rounding batter with fingers or spatula. Bake at 375 for 15-20 minutes. Optional: top cookie with 1/4 tsp size of persimmon paste.
RESULT: if you overbake, the cookies are a bit dry. The persimmon flavor comes through a bit better; the cookies are more cake-y than crisp/chewy. I am going to do another batch with 1/3 c shortening instead of 1/4 c to see if that improves texture a bit. I am also going to do a version with granulated maple sugar instead of Succanat. I'll just update this blog entry instead of starting over.
With few exceptions, the basic persimmon (or even pumpkin) cookie looks like this:
Basic Persimmon Cookie
- 2 c flour
- 1 t baking soda
- 1 t baking powder
- 1 c sugar
- 1/2 c fat (shortening/butter)
- 1 c fruit, pureed
- 1 egg (or replacer of your choice)
- 1 c raisins
- 1 c nuts (optional)
- salt (from a pinch to 1 tsp)
- cinnamon (1/2 to 1 tsp)
- ground cloves (1/4 to 1/2 tsp)
- other spices - ground nutmeg, vanilla, cardamom
RESULT: I made a 4x batch of this recipe and my conclusions and taster responses are as follows:
- Scott: tastes like Thanksgiving/Xmas, can't tell if it's persimmon or pumpkin
- Scott's vegan co-worker: approved.
- Front neighbors: offered that if they were millionaires, they'd give me the start-up cash to go into business creating my own line of foods.
- Me: too sweet and not persimmon-y enough.
Vegan Persimmon Cookies, Take 2
- 2 c AP flour
- 1/2 c Sucanat
- 1/4 c shortening
- 1.5 c persimmon pulp
- 1 t baking soda
- 1 t baking powder
- 1/4 t salt
- 1 T flax meal + 3 T water
- 1 c raisins
- 1 t cinnamon
- 1/2 t ground cloves
Cream sugar & fat. Puree persimmon in blender, add baking soda/powder/salt/spices & blend again. Add persimmon to sugar/fat & cream again. Whip flaxseeds & water in blender or food processor til frothy. Add to wet mixture & combine thoroughly. Add flour & mix till combined, scraping the sides and bottom. Add raisins. Spoon onto silicone baking sheet liner with teaspoon, rounding batter with fingers or spatula. Bake at 375 for 15-20 minutes. Optional: top cookie with 1/4 tsp size of persimmon paste.
RESULT: if you overbake, the cookies are a bit dry. The persimmon flavor comes through a bit better; the cookies are more cake-y than crisp/chewy. I am going to do another batch with 1/3 c shortening instead of 1/4 c to see if that improves texture a bit. I am also going to do a version with granulated maple sugar instead of Succanat. I'll just update this blog entry instead of starting over.
Sunday, November 08, 2009
Chanterelles!
While mountain bike riding with friends in the Oakland Hills this morning, I stopped to move a dead squirrel off the road since "roadkill makes more roadkill." As I started to remount my trusty steed, I nearly stepped on two golden chanterelles growing in the gravel inches from the paved road.
Needless to say, I grab those little golden fungi and dropped my bike. In just a minute, I had 2# of chanterelles in my hands - and no place to keep them. I wrapped them in my polar fleece vest and stashed them in Scott's CamelBak. Then
we high-tailed it for home to put on long pants & hiking shoes.
First we went to "the usual spot" - where we found about 3/4 lb of Oyster Mushrooms and 1# of chanterelles. Then we returned to Dead Squirrel's Spot - it was probably the most ideal first mushroom hunting trip ever - Scott had a great old time comparing it to a children's Easter egg hunt. We also collected trash (being so close to the side of the road, it helps make a plausible excuse) and picked every chanterelle we could find - bringing home about 8# in mushrooms.
Saturday, November 07, 2009
Wednesday, November 04, 2009
Persimmon Paste
A review of my freezer tells me two things - first, I still have frozen persimmon puree from last year. Second, roasted tomato sauce, persimmon puree and carrot soup all look fairly similar in the freezer and should be labeled appropriately.
After rave reviews of my quince paste (dulce de membrillo) it occurred to me - why not do this with some other fruits? Like, for example, persimmon?
I measured out equal quantities of persimmon & sugar, mixed and heated it. Concerned that it would not set as well as the dulce de membrillo (remember - quinces have more pectin in them than other fruit), I added some pectin (based on volume) and cinnnamon to the persimmon paste.
Let me tell you - this stuff sticks to the pan at higher temperatures a lot more readily than any jam or quince paste has! You have to keep the heat low and stir often - once it reduces, then put it into low dishes or cookie sheets lined with canola oil rubbed parchment paper and put into the dehydrator. The persimmon paste set a lot more quickly than the quince paste (likely the pectin) and according to one friend, "it tastes like Thanksgiving!"
Monday, November 02, 2009
Persimmons - 2009!
Today I went to my friend's house and helped harvest unripe persimmons. We cleared probably less than 50% of the tree - there are still a lot on the tree. It seems like more than last year - perhaps because we picked so many last year that the tree was very happy about it! I brought home two big blue tubs weighing about 75# each.
This year, instead of laying the persimmons out in a single layer on the floor and tables of my project room - I decided to utilize the solar dehydrator. The weather is cool enough and the right setup would keep the ants out - Dobson, of course, helped.
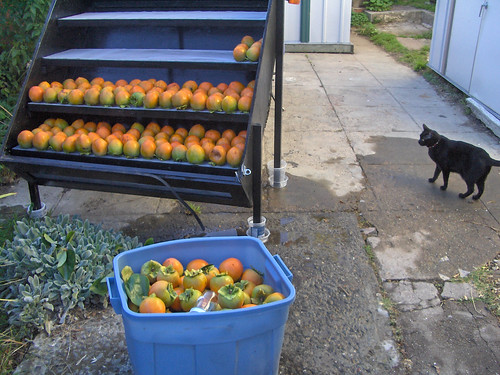
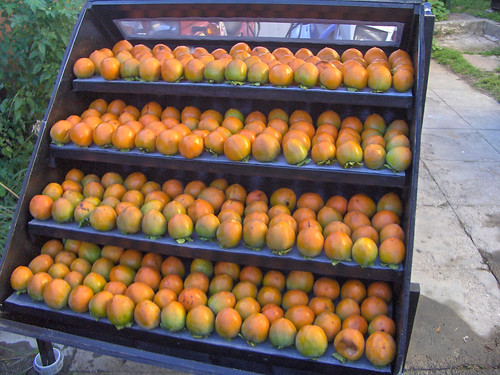
Now, I just have to wait and start figuring out what to do with the ripened persimmons!
This year, instead of laying the persimmons out in a single layer on the floor and tables of my project room - I decided to utilize the solar dehydrator. The weather is cool enough and the right setup would keep the ants out - Dobson, of course, helped.
Now, I just have to wait and start figuring out what to do with the ripened persimmons!
Saturday, October 31, 2009
Red Enchilada Sauce
Friday night found me putting together red enchilada sauce - after reviewing a ton of recipes, I decided a course for my own version which turned out quite well. It isn't as much a rockstar as the Green Enchilada Sauce, but quite good. I've noticed this happens in my food experiments - the Fig-Early Girl Tomato chutney had a combination of spices & fruit that worked so amazingly well together that it nearly made me want to chuck all the other chutneys I have made.
Faithful readers - for your review - here is the recipe. If you have suggestions for tweaks that might send this over the top - please chime in!
Red Enchilada Sauce
Measure spices:
Toast & grind:
Add remaining 3 ingredients to puree & reblend in batches to ensure thorough mixing.
Prepare your enchiladas with fillings of your choice or ladle into sterilized jars for canning.
YIELD:
Faithful readers - for your review - here is the recipe. If you have suggestions for tweaks that might send this over the top - please chime in!
Red Enchilada Sauce
- 8 c roasted/seeded/peeled red Anaheim chiles
- 6-7 c veggie broth
- 2 c water (add'l as needed)
- 1/2 lb tomatillos, husked & halved
- 1.5 lb white or yellow onions, peeled & quartered
- 1 bunch cilantro
- 1/2 bunch parsley
- 3 Tb dried epazote
Measure spices:
- 1 Tb cumin seed
- 1 Tb coriander
- 1 t white pepper
- 1-2 dried chipotle peppers, snipped into 1/4" bits
- 1 6-8" stick Mexican cinnamon (soft cinnamon - aka "Ceylon cinnamon") - broken into 1/2" pieces
- 1 star anise
- 1/2 c white sesame seeds
Toast & grind:
- 2 c whole raw almonds
- 3-4 c yellow cherry tomatoes
- 2 Tb salt
- 1-1.5 c cocoa powder
Add remaining 3 ingredients to puree & reblend in batches to ensure thorough mixing.
Prepare your enchiladas with fillings of your choice or ladle into sterilized jars for canning.
YIELD:
- 1 large pan of 12 enchiladas
- 10 - 16 oz jars of red enchilada sauce
Thursday, October 29, 2009
Green Enchiladas
The first time I made green enchilada sauce, it was with a recipe from "The Vegetarian Table: Mexico" by Victoria Wise. I always found that it didn't make quite enough sauce for my tastes and frequently used more tomatillos than she recommended. After a recent review of recipes for green enchilada sauce across the internet, I have come to the conclusion that the recipe is fairly basic and should bear the personal touch of the person preparing it.
I defrosted the roasted green Anaheim chiles from a few weeks ago - that yielded about 5 c of roasted, peeled peppers. After shelling out some bucks for tomatillos and onions at Rainbow Grocery, I was ready to go! You can modify the amount of ingredients to taste, and remember - it's easier to add than to take away ingredients.
Green Enchilada Sauce
Instructions:
Green Enchiladas
Enchiladas are one of my favorite things to make because they are so easy and you can put whatever you want into them.
Ingredients:
I defrosted the roasted green Anaheim chiles from a few weeks ago - that yielded about 5 c of roasted, peeled peppers. After shelling out some bucks for tomatillos and onions at Rainbow Grocery, I was ready to go! You can modify the amount of ingredients to taste, and remember - it's easier to add than to take away ingredients.
Green Enchilada Sauce
- 5 cups roasted & peeled green Anaheim or Poblano chiles
- 2 cups vegetable broth
- 3 small-med white or yellow onions (mine were just smaller than tennis ball size), peeled and quartered
- 1 - 2 lbs husked tomatillos, halved or quartered
- 5-6 cloves of garlic, peeled
- 1 c raw pumpkin seeds
- 1 pint yellow cherry tomatoes
- 1 bunch of cilantro, stems trimmed off
- fresh parsley, stems trimmed off
- fresh leafy greens - Romaine, white mustard, arugula (careful with strong flavors like spinach)
- sea salt
- 1 Tb coriander seed
- 1 Tb cumin seed
Instructions:
- Pour 2 cups vegetable broth into a sauce pot, add garlic, onions & tomatillos, add water to cover and bring to a boil. Let simmer til onions are transluscent and tomatillos are soft.
- Heat up a dry cast iron skillet, spread the pumpkin seeds in a single layer and heat til they start to pop. Turn down the heat if necessary to prevent burning. Use a wooden spoon to keep the seeds moving as needed and pop/toast as many as you can. Put into a separate dish.
- Put cumin and coriander seed into the hot pan - warm and slightly toast but don't burn - then put spices into coffee or spice grinder and pulverize, set aside.
- Check your veggies - add half of the cleaned cilantro to the water to soften, and turn down the heat if your veggies are soft.
- Mix in the roasted peppers with the veggies in the pot.
- Reserve 1/8 c toasted pumpkin seeds and put rest of toasted pumpkin seeds into food processor or blender, add water from veggies to get it moving when necessary, until all seeds are ground.
- Continue adding veggies & cooking broth til all is processed and smooth. Add yellow cherry tomatoes and leafy greens -- I used white mustard because it was in my garden, you might try romaine (it's got Vitamin C!).
- Add about half of the ground cumin & coriander.
- Taste - adjust cumin, coriander, salt and cilantro as needed.
- Return to pot and heat on medium, stirring. Cook down if necessary, or add more water/broth if necessary. Taste and adjust as needed.
- Make a batch of enchiladas and freeze or can the rest of your sauce!
- 1 medium size pan of enchiladas
- 4 - 16 oz jars
Green Enchiladas
Enchiladas are one of my favorite things to make because they are so easy and you can put whatever you want into them.
Ingredients:
- 1 package corn tortillas
- 1/2 yellow onion, minced
- 1/2 package Westsoy seasoned seitan strips, julienned
- 1 c yellow cherry tomatoes
- 2 cloves garlic, coarsely chopped
- 1/2 c chopped cilantro leaves
- Sautee onions and garlic with oil or broth til translucent.
- Add cherry tomatoes and cook til they start to split.
- Add seitan and cilantro.
- Stir and add broth or water to deglaze when it starts to stick to the pan.
- Warm up the tortillas in the microwave for 20 seconds, or steam them - you want them to be soft but not cooked so that they don't crack when you roll them up.
- Lay tortillas in the sauce - get both sides wet with the sauce, then lay the tortilla over your casserole dish. Put down a line of fillings along edge and roll up the tortilla, put it in the casserole pan.
- Once your pan is full of tortillas drenched in sauce and filled with seitan, cover with a little more enchilada sauce and bake for 15-20 minutes while you set the table or make your guacamole.
- Sprinkle with toasted pumpkin seeds and serve!
Saturday, October 17, 2009
A New Home for the Dehydrator!

When I told her and her partner about my idea - and showed them the photos - they were very excited! Her partner informed me that they had lots of friends with orchards and both assured me this was a most excellent gift.
Now, transportation is the issue - her brother & I are conspiring to determine a good time to wrap it up and strap it to the roof of his SUV for the trip North. Super yays!!!
Vegan Camping: Planning & Provisioning
I love camping and have to confess to being a major camp chef - if I'm car camping, I figure, there's no reason not to bring a cast iron skillet and to plan out delicious meals. I tend to err on the side of "why did we buy this much food" but have been improving my planning and provisioning.
Nearly all camping cookbooks I have read focus on incorporating highly processed foods (ramen, instant pudding, powdered milk, Minute rice, canned beans, instant powdered soups). There are no vegan/whole foods camping cookbooks, much less backpacking cookbooks. It's like they are going out of the way to find things like powdered eggs and individual packets of butter.
Packaged meals are ridiculously popular - and not all that tasty. I've even tried out some Mary Jane's Farm vegan meals and the meals that worked best were the premixed pancake and brownie mix. Just not worth the extra packaging.
The great thing about cooking vegan is that you're not really worried about your food going bad and poisoning you. And - why go out of your way to prepare things that you wouldn't normally eat?
Among my considerations are:
Typical meals are pasta with sauce (my own - if I'm packing in/packing out, my own mason jars are just fine), veggies with curry sauce in small glass jars, tofu scramble & homefried potatoes for breakfast, olives, dolmas (the kind in a tin or jar) and hummus with bread for a lunch.
On the Death Valley trip, I put beets in foil into the fire and used them for sandwiches and made a jar of beet salad with the rest of the fresh mushrooms, red onions, balsamic, olive oil & herbs de provence.
What are your favorite car camping or backpacking/motorcycle camping meals? Do you end up eating PB&J or meals from packets?
Nearly all camping cookbooks I have read focus on incorporating highly processed foods (ramen, instant pudding, powdered milk, Minute rice, canned beans, instant powdered soups). There are no vegan/whole foods camping cookbooks, much less backpacking cookbooks. It's like they are going out of the way to find things like powdered eggs and individual packets of butter.
Packaged meals are ridiculously popular - and not all that tasty. I've even tried out some Mary Jane's Farm vegan meals and the meals that worked best were the premixed pancake and brownie mix. Just not worth the extra packaging.
The great thing about cooking vegan is that you're not really worried about your food going bad and poisoning you. And - why go out of your way to prepare things that you wouldn't normally eat?
Among my considerations are:
- Ingredients which cook relatively quickly - though I have been known to make up Thai sticky rice with delicious nutty black rice, it uses a lot of camp fuel and rice doesn't go on most trips. Couscous and quinoa are both a "win."
- Reducing packaging - why bring individual size packets of anything?
- Reducing use of disposables - cooking in foil packets is easy but why use foil when car camping?
- Meals that have no or small amounts of leftovers.
- Menu plans that have flexibility in types of cooking.
- Menu plans that use up fresh ingredients earlier in the trip.
Typical meals are pasta with sauce (my own - if I'm packing in/packing out, my own mason jars are just fine), veggies with curry sauce in small glass jars, tofu scramble & homefried potatoes for breakfast, olives, dolmas (the kind in a tin or jar) and hummus with bread for a lunch.
On the Death Valley trip, I put beets in foil into the fire and used them for sandwiches and made a jar of beet salad with the rest of the fresh mushrooms, red onions, balsamic, olive oil & herbs de provence.
What are your favorite car camping or backpacking/motorcycle camping meals? Do you end up eating PB&J or meals from packets?
Saturday, October 10, 2009
Roasted Beet Sandwich
Recently, I have discovered the delicious Tofu-Yu tea smoked tofu. It comes in a package of 2 1/2" thin squares that are divided into 4 square pieces - perfect for sandwiches! I also love beets, so for a recent camping trip, I brought along the ingredients to make sandwiches for our 150-mile dual sport ride through Death Valley, and made up 4 delicious sandwiches:
Ingredients:
Instructions:
Ingredients:
- 1 avocado
- 2-3 roasted beets (different colors are great), cut 1/4" thick or smaller
- balsamic (spray bottle is perfect)
- 1 package Tofu-Yu tea smoked tofu
- 1 heirloom tomato, 1/4" slices
- 1 small red onion, thinly sliced
- vegan garlic aoli
- salt & pepper
- ciabatta rolls (about 6-8" long)
Instructions:
- Cut open the ciabatta roll on one side, leaving connected if possible.
- Spread 1/4 of an avocado on top slice of bread.
- Press thinly sliced onions into avocado.
- Spritz balsamic vinegar across both sides of bread.
- Layer 1/4" slices of roasted beet on bottom - cut to fit.
- Spread garlic aoli over beets.
- Put 1/2 of sheet of tofu on top of beets.
- Layer thinly sliced tomato (cut to fit).
- Press sandwich closed and wrap firmly with wax paper, slice in half after it's wrapped, and put into wax paper bag or ziplock for transport.
Friday, October 02, 2009
Quince - the Final Chapter for 2009
While we were enjoying the fire in the backyard and preparing to render five pounds of red jalapenos into charcoal, the rest of the quince were simmering away on the stove. I did one pot of quince preserves in big chunks with very light syrup and spices, and one pot of compote with dried cherries and figs added - and that one certainly came out beautifully!
YIELD:
3 quart jars of quince preserves
2 quart jars of quince-cherry-fig compote
2 - 12 oz jars of quince-cherry-fig compote
YIELD:
3 quart jars of quince preserves
2 quart jars of quince-cherry-fig compote
2 - 12 oz jars of quince-cherry-fig compote
Chipotle - FAIL!
This evening, before dark, I got a really good fire going. Scott helped me clean the quince, and we sat outside for a couple hours, had some awesome cucumber-cherry tomato-avocado salad with a pistachio butter-blood orange vinegar dressing, and chatted while grilling seitan sausages & corn, enjoying the Unti 2005 Dry Creek Zinfandel, nearly full moon and sounds of four different aircraft and the freeway from my North Oakland neighborhood.
Finally, the fire died down and it was time to put on the mesquite chips in the heavy aluminu foil pan I made for Sunday's test run. Scott thought the fire would die down too quickly so bade me add more small bits of wood - some oak bark the size of my wrist - around the sides of the pan. I put the 5# of red jalapeno peppers above the soaked mesquite and put the aluminum foil covered spar arrestor back on. It was smoky.
Soon enough - I saw weird lights - I knew what it was - a few weeks ago at my friend Freeze's house in West O, we were visited by firefighters looking for a housefire. I went back into the yard and stepped up on the fence to see my new neighbor Pete showing his cold grill to a firefighter. I told him "I'm smoking peppers back here on my BBQ, do you want to come see?" - he said no and left. Then, less than 10 minutes later, I saw more weird flashing light from the front of my house - I went out and saw another fire truck - they wanted to see my grill. One of the first things they did was hand me half an 8.5x11" sheet of paper with a phone number of the fire dispatch - next time I have a BBQ, they said, just call and give my address.
The three firefighters followed me to my back yard - I showed them my fire pit and they said, "That's fine - fires in that kind of contained setting are good." I lifted the lid to show them my red jalapenos that were supposed to be smoking - and the flames jumped up and the flashlights showed charred peppers.
"Oh," said one firefighter, "That's a do-over."
Gee. Thanks, dude. Scott took responsibility for it - he said to add more wood and the fire went way too high. I salvaged 1 cup of roasted pepper for 5# of peppers. *sigh* That's expensive. Time to check with Julia at Mariquita to find out if I can get more red jalapenos in a couple weeks when I get back from my big off road motorcycle adventure.
Thursday, October 01, 2009
Quince Jelly
This year, my quince jelly came out a gorgeous shade of rose instead of a deep carnelian - perhaps because I used unrefined cane sugar (I may have used sucanat last year...). The half gallon jar of juice was so thick and syrupy without sugar - having soaked with a vanilla bean pod for a week - it was edible as it was and I nearly broke out my seltzer bottle to make it into quince soda!
However, preserving prevailed and I made a gorgous quince jelly instead:
YIELD:
6 - 12 oz jars quince jelly
3 - 4 oz jar quince jelly
However, preserving prevailed and I made a gorgous quince jelly instead:
YIELD:
6 - 12 oz jars quince jelly
3 - 4 oz jar quince jelly
Wednesday, September 30, 2009
Quince - the Cleanup Recipes!
Ahh - the quince - I still have 25 quince, several are half mushy and six or so are bigger than my two fists together. Since I am out of all vinegar except balsamics (I KNOW? right??) - quince pickle is out, but I do have cranberries in the freezer so am going to make (drum roll) Quince Cranberry Compote. A compote is fruit cooked in sugar - you serve it over something like cake or ice cream. Or crepes.
So, tonight - I'll make quince jelly with the lovely half-gallon jar of juice, quince-cranberry compote and... I'm going to need to do something else with the quince. Poached? Time to go fill the hot water bath and get it started!
Quince Compote:
Sort and rinse cranberries, add to cooked quince. If mixture seems too dry, add a little more water or cranberry juice. Increase heat a little and cook cranberries until they begin to pop open, 12-to-15 minutes. Gently mix them with quince. Remove cinnamon & vanilla and pack jars. Add 1 Tb vinegar to each jar.
YIELD:
5 16 oz jars
2 8 oz jars*
*In a very odd "first" - one of the wide mouth half pint jars cracked - the bottom of the jar broke right off, and the jar turned over, keeping most of the fruit inside the broken jar (which I saved for picture in the morning). This is only the 3rd mason jar I have ever broken. The 2nd was an empty half-gallon broken by a falling filled half pint. The 1st happened last year - a jar just cracked down the side when I put hot plum jelly into it. Are jars being made with less quality assurance these days? I have never had jars break like this in 20 year of canning!
So, tonight - I'll make quince jelly with the lovely half-gallon jar of juice, quince-cranberry compote and... I'm going to need to do something else with the quince. Poached? Time to go fill the hot water bath and get it started!
Quince Compote:
- 2 lbs quince, quarter, peeled, cored & cut into 1/2" pieces
- 8 c water
- 2 c sugar
- 12 cloves
- 18 allspice berries
- 2 Tb orange zest (wide strips)
- 1 12-16 oz bag cranberries
- 1 c currants
- 1 cinnamon stick (3" long)
- 1 vanilla pod
- Blood orange vinegar, 1 Tb in each jar after filled
Sort and rinse cranberries, add to cooked quince. If mixture seems too dry, add a little more water or cranberry juice. Increase heat a little and cook cranberries until they begin to pop open, 12-to-15 minutes. Gently mix them with quince. Remove cinnamon & vanilla and pack jars. Add 1 Tb vinegar to each jar.
The compote is BEAUTIFUL!
YIELD:
5 16 oz jars
2 8 oz jars*
*In a very odd "first" - one of the wide mouth half pint jars cracked - the bottom of the jar broke right off, and the jar turned over, keeping most of the fruit inside the broken jar (which I saved for picture in the morning). This is only the 3rd mason jar I have ever broken. The 2nd was an empty half-gallon broken by a falling filled half pint. The 1st happened last year - a jar just cracked down the side when I put hot plum jelly into it. Are jars being made with less quality assurance these days? I have never had jars break like this in 20 year of canning!
A Cooking Course - CHALLENGE!!
For years, I have cursed myself for buying cookbooks and then not ever feeling like I have properly exploited their benefit. I thought about cooking my way through one or two, recipe by recipe for ages and then several years ago came across the book "Julie & Julia" but the sort of "chick lit" bent didn't appeal to me greatly. My friend Cris agrees with me - she also wants to "do" a cookbook. Everyone in food blogs seems to be writing cookbooks - how about cooking your way through a really good one?
I'm planning to tackle "The Millennium Cookbook" and my friend Cris is going to tackle "The Gluten-Free Vegetarian Kitchen" by Donna Kein (212 pages) AND "Recipes for the Specific Carbohydrate Diet" by Raman Prasad (224 pages).
Anyone else interested in this challenge?
I'm planning to tackle "The Millennium Cookbook" and my friend Cris is going to tackle "The Gluten-Free Vegetarian Kitchen" by Donna Kein (212 pages) AND "Recipes for the Specific Carbohydrate Diet" by Raman Prasad (224 pages).
Anyone else interested in this challenge?
Tuesday, September 29, 2009
Dilly Beans (Again) & Peppers
Since I have such poor impulse control, I responded affirmatively to the call for orders for peppers from Mariquita, and had to pick up 25# of peppers on Friday after work. Saturday was dedicated to quince (and I still have 10# of quince!). After various motorcycle & household chores, Sunday night saw me roasting peppers on the fire pit in the back yard in the company of three friends - in the dark. Less than ideal as it was late and I ended up not seeing what I was doing quite as well. I was up well past midnight peeling and seeding peppers with Scott's company & Season 1 of Mad Men.
My purchase consisted of:
The Anaheims are destined for red and green enchilada sauce, while the sweet peppers are to be canned plain for use in recipes over the winter.
I also picked up 3# of string beans and some habaneros to make even more spicy dilly beans... so, tonight, I managed to actually finish the dilly beans and put the roasted sweet peppers into jars! I also had two japanese cucumbers in the garden so in jars they went as dilly spears (with some slices of red jalapeno and yellow sweet pepper).
That leaves only freezing the roasted Anaheims to make sauce later, smoking the rest of the red jalapenos, and making a quick batch of quince jelly with the half gallon jar in the fridge before I can actually start packing for my trip! I do wonder sometimes why I do this to myself! It's a good thing I am off on Friday and the Lost Coast Dual Sport ride is on Saturday!
YIELD:
5 - 16 oz jars spicy HOT dilly beans
2 - 16 oz cucumber dill spears
1 - 16 oz pickled yellow sweet pepper
1 - 16 oz roasted yellow pepper
4 - 12 oz roasted sweet yellow-red peppers
2 - 8 oz roasted sweet yellow-red peppers
My purchase consisted of:
- 10# mixed sweet peppers (mostly yellow & orange, a few red)
- 10# Anaheims (equal mix of red & green)
- 5# red jalapenos
The Anaheims are destined for red and green enchilada sauce, while the sweet peppers are to be canned plain for use in recipes over the winter.
I also picked up 3# of string beans and some habaneros to make even more spicy dilly beans... so, tonight, I managed to actually finish the dilly beans and put the roasted sweet peppers into jars! I also had two japanese cucumbers in the garden so in jars they went as dilly spears (with some slices of red jalapeno and yellow sweet pepper).
That leaves only freezing the roasted Anaheims to make sauce later, smoking the rest of the red jalapenos, and making a quick batch of quince jelly with the half gallon jar in the fridge before I can actually start packing for my trip! I do wonder sometimes why I do this to myself! It's a good thing I am off on Friday and the Lost Coast Dual Sport ride is on Saturday!
YIELD:
5 - 16 oz jars spicy HOT dilly beans
2 - 16 oz cucumber dill spears
1 - 16 oz pickled yellow sweet pepper
1 - 16 oz roasted yellow pepper
4 - 12 oz roasted sweet yellow-red peppers
2 - 8 oz roasted sweet yellow-red peppers
Monday, September 28, 2009
Late Summer Vegetable Soup
Fresh tomato juice is one of my favorite soup bases - it just tastes so good, doesn't it? Since I am getting ready to go on a road trip, I wanted to clear the fridge and what better use for 2 quarts of fresh tomato juice than a soup (OK, bloody marys, but that's not dinner - well, not without spicy dilly beans). So, this soup turned out really amazing - it's all about putting together the right things and not overdoing it, right? And, wanting to make some space in the fridge, I found a quart bag stuffed with ice cubes of tomato juice and added those, too...
Late Summer Vegetable Soup
Step 1: Saute in olive oil, in heavy bottom stockpot:
1/2 large white onion, minced fine
Step 2: when onions are softening and getting clear, add:
2 10-12" squash (1 zucchini & 1 coccozelle in this case), diced
Step 3: as zucchini are starting to brown, add
1 c frozen peas
2 c green beans chopped in 1-2" segments
Step 4: as everything starts to soften, add broth ingredients
3 quarts fresh tomato juice
1.5 quarts chanterelle broth (simmer 1-1.5 c. dried mushrooms, strain & reserve the mushrooms)
2 c of fire roasted red pepper juice (just happened to reserve after peeling & seeding peppers)
1 c orange tomato curry ketchup (some left from last fall's recipe)
Step 5: finely mince or julienne mushrooms, add to broth
Step 6: chiffonade into pot with scissors 2 handfuls of kale (red russian winter and lacinato), stems trimmed, more kale is good - depends on what you have (chard, arugula, parsley would all be good)
Step 7: add herbs, salt & pepper to taste:
1 t. dried tarragon
1 t. dried sage
1 t. dried marjoram
1 t. dried savory
1 T. dried rosemary
1 t. powdered garlic
1 t. black pepper
1 T. salt
Step 8: cube 16 oz block of extra firm Nigori tofu into 1.5' chunks, stir in gently
Step 9: prepare 2-3 c orrechiete pasta in salted water with olive oil (to keep it from sticking together - you aren't tryig to get sauce to stick to this pasta, so it's ok) - once broth is about where you want it, still thin - add cooked pasta to soup
Step 10: eat yummy soup and bring some to work in a nice big quart size mason jar.
YIELD:
Serves A FREAKING LOT! Ok, about 8 quarts. Get eating!
Saturday, September 26, 2009
Dulce de Membrillo - Quince 2009
Quince season is here once again - my friend sent out the bat-signal to tell me that they ripened early and "I have quince falling to the ground and rotting!" I hadn't been excited about trying quince again this year but not wanting to be bested by a damned furry pear-apple thing, I gamely headed over with Scott and we cleaned up the groundfall and picked the tree clean.
This year, there were far fewer quince - I ended up with 27# of quince. Some of them were quite large - the size of big softballs, with the smallest being tennis ball size. They are almost all entirely yellow - much riper this year than last year, so that heartened me a lot. My friend and her fiance invited us to help them taste test wines for their wedding and we had a nice visit, even cleaning up some of the gorgeous pink flesh apples - again, fewer than last year but still quite yummy. Her apricot tree, so far, is the only fruit tree that really overproduced this year (though the persimmons are still small and unripe - I may end up with another 200# of those this year).
Today, while my friend married her best friend, I quartered and peeled 14# of quince. I cooked the first 4# batch while I continued to clean some more. When the next batch was ready, I strained the first and retained the water, pouring it back into the pot over the next batch of raw quince quarters.
I've ended up with 17 cups of quince puree and a half gallon of gorgeous rose coloured quince juice for jelly. The puree is on the stove - a pretty high 1:1 puree to sugar ratio is recommended by most recipes for membrillo.
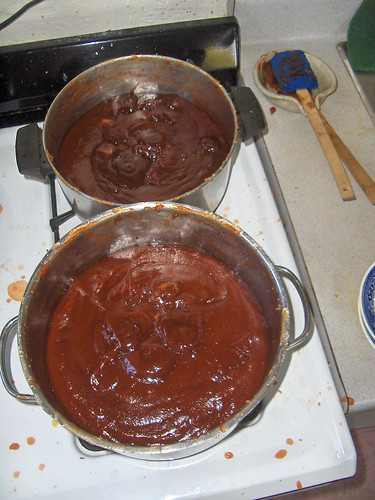
My plan this year is to line some shallow cardboard boxes with parchment and to put the cooked down puree into the dehydrator and just leave it there for days at 105 degrees til it sets. This year, gosh darn it, I am going to make membrillo that can be sliced!
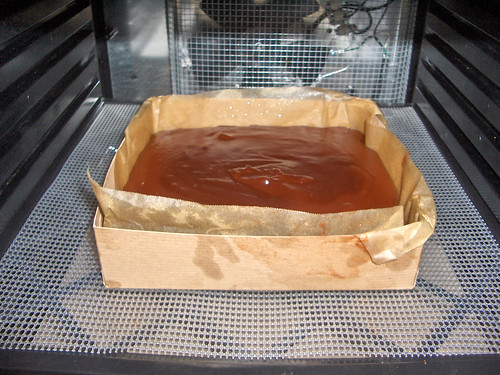
Your quince recipes & membrillo making stories welcome as I wait for the puree to cook on super low, wash dishes, watch Season 1 of "Mad Men" and wait for Scott to bring over thai food and beer.
POST-SCRIPT: The dehydrator worked BEAUTIFULLY! I ended up with 9 pounds of quince paste that is sliceable at room temperature, and somewhat spreadable (a bit stiff) - it is so delicious that if I had managed to make it in a commercial kitchen, I believe I would be able to sell it to restaurants (at least one of my chef friends expressed interest). I had the dehydrator at 95-105 degrees F for about a two days - very low energy usage compared to running the oven at 125 for two days, let me tell you!
I highly recommend stovetop-to-dehydrator for making your membrillo - you won't have to fuss and worry about the stove or dread overdoing it in the microwave.
This year, there were far fewer quince - I ended up with 27# of quince. Some of them were quite large - the size of big softballs, with the smallest being tennis ball size. They are almost all entirely yellow - much riper this year than last year, so that heartened me a lot. My friend and her fiance invited us to help them taste test wines for their wedding and we had a nice visit, even cleaning up some of the gorgeous pink flesh apples - again, fewer than last year but still quite yummy. Her apricot tree, so far, is the only fruit tree that really overproduced this year (though the persimmons are still small and unripe - I may end up with another 200# of those this year).
Today, while my friend married her best friend, I quartered and peeled 14# of quince. I cooked the first 4# batch while I continued to clean some more. When the next batch was ready, I strained the first and retained the water, pouring it back into the pot over the next batch of raw quince quarters.
I've ended up with 17 cups of quince puree and a half gallon of gorgeous rose coloured quince juice for jelly. The puree is on the stove - a pretty high 1:1 puree to sugar ratio is recommended by most recipes for membrillo.
My plan this year is to line some shallow cardboard boxes with parchment and to put the cooked down puree into the dehydrator and just leave it there for days at 105 degrees til it sets. This year, gosh darn it, I am going to make membrillo that can be sliced!
Your quince recipes & membrillo making stories welcome as I wait for the puree to cook on super low, wash dishes, watch Season 1 of "Mad Men" and wait for Scott to bring over thai food and beer.
POST-SCRIPT: The dehydrator worked BEAUTIFULLY! I ended up with 9 pounds of quince paste that is sliceable at room temperature, and somewhat spreadable (a bit stiff) - it is so delicious that if I had managed to make it in a commercial kitchen, I believe I would be able to sell it to restaurants (at least one of my chef friends expressed interest). I had the dehydrator at 95-105 degrees F for about a two days - very low energy usage compared to running the oven at 125 for two days, let me tell you!
I highly recommend stovetop-to-dehydrator for making your membrillo - you won't have to fuss and worry about the stove or dread overdoing it in the microwave.
Tuesday, September 22, 2009
Bread & Butter Pickles - 3 ways!
I just can't resist the allure of making up pickles to snack on over the winter and into next spring - I love bread & butter pickles. I made a promise to myself that next batch will be dilly - I'll do more dilly beans because the batches that I did with a half habanero quartered (but not separated) and pushed into the top of the jar turned out amazing!
Tonight, I turned my attention to the very large striped cocozelle and zucchini in the fridge, as well as 3# of 6" long pickling cucumbers from the garden. I also decided to take the last few unripe green tomatoes and sliced them up and did a bread & butter treatment just to see how it would turn out...
YIELD:
6 - 12 oz jars cucumber bread & butter pickles
4 - 12 oz jars zucchini bread & butter pickles
1 - 12 oz jar green tomato bread & butter pickles
1 - 8 oz jar green tomato bread & butter pickles
Saturday, September 19, 2009
Apricot & Red Pepper Chutney
APRICOT CHUTNEY for 2009 follows a modified recipe based on last year's recipe. I liked the spice combination from the fig-tomato chutney, so left out the tumeric and star anise this time.
YIELD:
2 - 12 oz jars apricot chutney
16 - 8 oz jars apricot chutney
14 - 4 oz jars apricot chutney
Fruits & alliums
- 12 cups (7.5#) fresh apricots, pitted and chopped (no more than 1/2 inch thick)
- 4 large (3#) white onions, finely chopped
- 5 (1.25#) red bell peppers, chopped
- 2.5 oz finely minced fresh garlic
- 16 ounces mixed mixed raisins and currants
Spices
- 2.5-3 oz ginger root, peeled and grated
- 2-4 big sticks of Ceylon cinnamon
- 3 Tb salt
- 1 Tb chili flakes
- 2 dried dried Ancho chilies, toasted lightly in the oven so that they can be crumbled, include seeds for extra zing but omit any stems
- 1 tsp allspice berries
- 1 Tb brown mustard seed
- 1 Tb white peppercorns
- 2 Tb fenugreek seed
- 1 Tb coriander seed
Sour & sweet
- 2.5 cups apple cider vinegar
- 1.5 cup malt vinegar
- 1.5 pounds Sucanat
- 4 lemons, both zest and juice
Method
- Lightly toast the spices until they start to get fragrant. Remove from pan quickly and put into a cool dish to cool a bit, then grind coarsely with mortar and pestle.
- Put apricots, garlic, onions and spices into a large stock pot with a heavy bottom. Turn the heat onto medium high. Pour in enough vinegar to prevent mixture from stick to bottom of pot. Bring to simmer then lower the heat to medium.
- Add more vinegar as the mixture simmers to prevent it fairly mobile - you don't want it to erupt like molten apricot lava out of the pot. You should have used more than half of the vinegar by now. Continue to stir to avoid sticking, lower the temperature to maintain a gentle simmer.
- After about 1 hour, stir in the raisins, lemon zest and lemon juice.
- Stir in the brown sugar as soon as the apricots look like they are nearly falling apart. Add the sugar gradually, stirring and letting it dissolve. Alternate with remaining vinegar or additional lemon juice if needed.
- Simmer and stir occasionally another 45 minutes or until the chutney has a thick jammy consistency.
- Turn off of the heat, and set aside overnight on the stovetop or cool and put in fridge if you plan a longer delay.
- To finish, stir and taste your chutney!
- Bring the chutney to a simmer over medium high heat, then lower the temperature to medium low or low to maintain a gentle simmer.
- Add any additional spices, vinegar or sugar to desired taste and viscosity. Cook for 1 hour.
- Ladle the hot chutney into the jars and process (10 minutes in hot water bath).
- Store in a cool location at least 2 to 3 months before serving.
YIELD:
2 - 12 oz jars apricot chutney
16 - 8 oz jars apricot chutney
14 - 4 oz jars apricot chutney
Wednesday, September 16, 2009
Tomates a la Provencale, Redux!
You can never have too much of something as good as Tomates a la Provencale! Please revisit my recipe and make some - and remember - it's better to do it under the broiler but I don't have one so I bake. You can crisp up your garlic & breadcrumbs much better in the broiler. Yums!
Fried Green Tomatoes Po-boy Sandwich
I remember a dear friend once asking me - "Where do you get green tomatoes?" - and when I said only from my garden, she got confused, thinking I meant some kind of heirloom - rather than unripe tomatoes. The idea of eating unripe tomatoes had never occurred to her - but there are so many things you can do with them - including frying and pickling them.
Fried green tomatoes are tangy and delicious - firm and unique. You can fry up ripe tomatoes the same way, but getting unripe tomatoes is something that requires timing and perfect seasonality.
I like to make a thin batter of flour & water to dip my sliced tomatoes, and then roll them in a mix of corn flour and wheat flour, black pepper, salt and paprika - and then fry them in canola or peanut oil. These were delicious topped with Green Zebra tomato jam and with the Fig-Tomato Chutney.
So, naturally - the next day, I decided to make a sandwich out of them.
Fried Green Tomato Sandwich:
- Leftover fried green tomato slices from the fridge
- Fresh bread - poboy bread would be idea, but Semifreddi's seeded sourdough baguette and ciabatta have worked pretty well
- Harissa (roasted red pepper spread) for the bottom piece of bread
- Add tomatoes - cut to fit on the bread
- Sprinkle salt & pepper if desired
- Add fig-tomato chutney
- Add fresh arugula - cut or tear pieces so that they don't just pull out of the sandwich when you eat it
- (vegan) garlic aoili on the top piece of bread
- fold your bread and eat it!
Friday, September 11, 2009
Green Zebra Tomato Jam
I got this idea from a recipe for Tomato Jam on paninis from a Portland newspaper - and sort of ran with it. You may not have Green Zebras on hand - but the fresh, ripe mellow flavor of green heirloom tomatoes is really good in this recipe.
YIELD:
8 - 4 oz jars
- 2# of peeled, seeded & coarsely chopped tomatoes (drained - reserve the juice for bloody marys, for the love of mike!)
- 1 c. sugar
- 2 tsp fresh chopped thyme
- 1 tsp freshly ground white pepper
- 4 Tb sherry vinegar
YIELD:
8 - 4 oz jars
Thursday, September 10, 2009
Fig Persimmon Chutney
In the spirit of experimentation and - I still have a lot of frozen persimmon, I decided to try this sort of recipe - I already have some modifications for next time but here's what I did first:
YIELD:
8 - 8 oz jars
12 - 4 oz jars
- 4# figs - quartered/coarsely chopped
- 6 c persimmon puree
- 3# onions - fine mince
- 4 serrano chiles, seeded & minced
- 1 1/4 oz fincely minced/grated fresh ginger
- 1 can pineapple rings, coarsely chopped & juice
- 1/2 tsp tumeric
- 1/2 tsp garam masala
- 3 star anise, 1/2 tsp fenugreek seed, 5 allspice berries, 1/2 tsp dehulled cardomom - ground
- 1 Tb salt
- 4 oz dried dates, chopped
- 1 c raisins
- 2 c apple cider vinegar
- 1/2 c dried flake coconut
- 1.5 c sucanat
YIELD:
8 - 8 oz jars
12 - 4 oz jars
Wednesday, September 09, 2009
Pottsville Relish

The "official" version of this has cabbage in it - but my grandmother only used onions, tomatoes, green peppers, salt, vinegar & sugar.
RECIPE:
10# seeded, peeled & chopped tomatoes (reserve juice separately for soup)
8.5# to 10# chopped onions
5 large green bell peppers, seeded & chopped
2 c apple cider vinegar
2 c unrefined cane sugar
3 Tb salt
Cook down til the onions are translucent and you've reduced most of the liquid.
YIELD:
14 pint jars
11 half pint jars
Tuesday, September 08, 2009
Fig & Tomato Chutney
I found a recipe that looked interesting - a way to kill two birds with one stone, I thought - figs AND tomatoes! So, as usual - I've altered it quite a bit and the result smells amazing.
*I only quartered them and am going to have to fish out big pieces and smoosh them smaller!
Be sure to put the seeds and skins into a chinois or fine mesh strainer to allow you to capture the juice - the juice can be frozen in ice cube trays for later soups or drink it fresh (or make a bloody mary!)
Yum.
YIELD:
8 half pints
15 4 oz jars
- 4# figs - quartered then roughly chopped*
- 3# onions - peeled and chopped all to hell in the Cuisinart DC10
- 4# Early Girl tomatoes, seeded, peeled & quartered
- 1 c. Thompson seedless raisins
- 1 c. sherry vinegar
- 1 c. apple cider vinegar
- 1 c. firmly packed brown sugar
- 1 c. sucanat
- 1 tb chili flakes
- 2 tb salt
- 1/2 tsp each whole white pepper, coriander seed, fenugreek seed & black mustard seed ground together
*I only quartered them and am going to have to fish out big pieces and smoosh them smaller!
Be sure to put the seeds and skins into a chinois or fine mesh strainer to allow you to capture the juice - the juice can be frozen in ice cube trays for later soups or drink it fresh (or make a bloody mary!)
Yum.
YIELD:
8 half pints
15 4 oz jars
57# of San Marzano Tomatoes
My friend Jeff visited on Saturday and took 10# of the San Marzanos, leaving me with 57# which I cooked in one big and one smaller batch.
I put everything into the giant colander over a big steel bowl and then ran that juice through the chinois (to capture the seeds), then smashed all the pulp and seeds out in the chinois.
Next step was to process through the Kitchen Aid fruit strainer/puree attachment which is not quite robust enough for a lot of tomatoes - I had to stop every 5-10 minutes to take it apart, unclog it and put it back together. Next time - I will get a big tomato press/strainer!
YIELD:
- 11 quarts San Marzano tomato sauce
- 7 pints San Marzano tomato sauce
- 3/4 of 1 quart jar (for dinner tonight!)
- 2 quarts San Marzano raw tomato juice (to be frozen for soup broth)
Sunday, September 06, 2009
Pesto, Part 2
Ah... Sunday... the day of mucho food processing. I got started on seeding the tomatoes for the sauce and James came to help with the pesto. He pulled leaves off all 20 bunches and we made another giant batch of pesto to split. I know have just over 3# of pesto in my freezer - yay!
Time to go through and clean out more frozen goodies to use in cooking projects - like the gallon of chopped apricot, persimmon puree and... hey - roasted tomato garlic marinara sauce? Time to eat that!
Time to go through and clean out more frozen goodies to use in cooking projects - like the gallon of chopped apricot, persimmon puree and... hey - roasted tomato garlic marinara sauce? Time to eat that!
Saturday, September 05, 2009
Tomatoes, Figs & Peppers, oh my!
Perhaps I overcompensated but... the tomatoes were so friendly at Mariquita's U-Pick day, and their skins so warm and compelling to my touch... I ended up bringing home 67# of San Marzanos, and 60# of mixed heirlooms, Early Girl, Beefsteak and Green Zebra tomatoes. Along with 2# of pimientos de padron (including a big bag that Julia warned were "too hot" to sell because most of her customers fail to appreciate the charm of super spicy pimientos de padron), several pounds of red and yellow bell peppers, 20 (more) bunches of basil (because I just can't get enough pesto!),
I still have to put up the figs and am looking over fig chutney recipes to occupy my afternoon while the tomatoes cook down... some ideas are fig & tomato chutney, fig chutney with Meyer lemon zest & (canned) pineapple, fig & red pepper chutney, and fig & persimmon chutney. I'm also going to try my hand at tomato jelly this week, as well as defrosting the apricots to make up some apricot chutney.
I still have to put up the figs and am looking over fig chutney recipes to occupy my afternoon while the tomatoes cook down... some ideas are fig & tomato chutney, fig chutney with Meyer lemon zest & (canned) pineapple, fig & red pepper chutney, and fig & persimmon chutney. I'm also going to try my hand at tomato jelly this week, as well as defrosting the apricots to make up some apricot chutney.
Wednesday, September 02, 2009
Pesto-riffic!
Mariquita had basil "shares" for $1 a bunch - I took the bait and bought 20 bunches of basil.
James came over and we spent all evening pulling the leaves to make pesto. 20 bunches = 1.5 lbs of leaves = 3.25 lbs of pesto. We split the goods and froze up our pesto in muffin tins as well as ice cube trays this time. We also managed to eat 1/2 # of pimientos de padron and lots of tasty fresh tomato bruschetta instead of an actual meal - but it all worked out.
Looking in the freeezer, I have little space but need more pesto to get me through the winter. I still have 20 cups of frozen chopped apricot that wants to be chutney, and a 1.6 gallon tub of fresh figs from James' friend's home in Rio Vista. I am going to be busy this week!
YIELD: 20 bunches basil = 1.5# leaves = 3.25# pesto
Half of 3.25 lb of basil-pine nut-garlic-olive oil pesto:
12 - 1/2 c muffin tin size frozen portions
24 ice cube tray size portions
Subscribe to:
Posts (Atom)